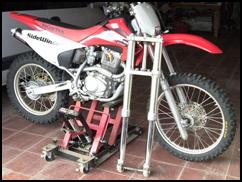
Finally, after
months of work, we got the modern upside-down forks installed on our
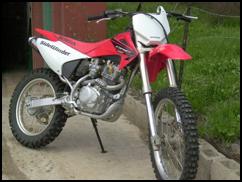
Project CRF 230F Honda. If you'll recall, we were very pleased with the
43 mm forks that took the place of our pathetic stock 37 mm forks. In
fact, the only reason that we tried the new generation forks was that the
readers of ORC requested it - they were simply curious.
 |
So, we started the project and promptly ran into a brick wall. You see, we wanted to make the fork installation doable by the average person. It would be easy enough to drop the bike off at a shop at have it done, but the goal was to do the bulk of the work in our very own garage. With our own hands.
The biggest problem faced was that the stock CRF 230 steering head races are much smaller than the races used on the upside-down forks. We got a set of the newer races (with the bearings, as they come as a set) and did some measuring. The larger races are 2.046 inches (5l.98 mm) at the top edge, way too big to be inserted into the steering head.
To get those larger races to work, it was necessary to get most of the race into the steering head. Note that we said most. While I'm not an engineer, I figured that 2/3 rd of the race was enough to get the job done. Refer to the drawing in the step-at-a-time process, and you'll see that we turned down the races to fit.
 |
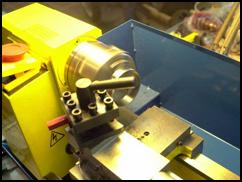 |
The actual measurements were 1.892 inches (48.08 mm) in the first step and 1.845 inches (46.86 mm) in the second step. The race was divided into three parts, with the top part left untouched. Again, refer to the illustrations and the photos of the finished races to get a better picture of what we were after.
Now you won't get every machine shop to do the job. Some will say the races are too hard to turn down. To which I say bulls**t. They just don't want to sharpen their bits often, which is what's required when you turn down something as hard as steering head races. We got the job done for $40 for the pair.
The races themselves were a real pain to acquire. We hit three different Honda shops in the San Diego area, before we found a savvy parts man and he did some cross checking. Bingo! It was found that Yamaha races were identical to the Honda parts we were looking for. Here's what worked:
- 2004 YZ 450 race/bearing package, part number 93332-00081
- 1993 YZ 250 race/bearing package, part number 93332-00078
The only reason that we used two race/bearing kits instead of two of the same, was that was all they had. Cost was $26.57 each, cheaper than the same part in the Honda line.
In your search, you'll find that a whole bunch of part numbers match the parts we were searching for. Kawasaki and Suzuki parts, too. All we needed were races that were used on KYB (Kayaba) forks on certain year Hondas. Here's what we used for forks:
- Any 1997 through 2006 Honda KYB KYB forks with a tube diameter of 45 mm. These were all CR 125 forks.
- They changed the valving in the 2000 forks, but essentially they were the same dimension-wise. We opted for a set of 1997 forks.
 |
Prior to 1997, the CR 125 had upside-down forks, but they had 43 mm fork tubes. Here's the info on those forks:
- 1993 – Showa 43 mm fork tubes
- 1994 – KYB 43 mm fork tubes
- 1995 - KYB 43 mm fork tubes
- 1996 – KYB 43 mm fork tubes
While we prefer KYB forks over Showa forks, a conversation with George Quay of Pro-Action, revealed the facts that Showa forks were better built and of a higher quality than KYB forks, and after they were properly revalved, they were at least the equal in action and measurably longer lasting. George noted that the seals, wipers and bushings in Showa forks are of higher quality than KYB forks. By the way, George builds many of the suspensions of top level racers.
Before we assembled our forks, one more thing had to be made by the machinist: a spacer with the dimensions of 1.187 inch I.D., 0.340 inch tall and about 1/8 th inch thick. The wall thickness is not critical, as there's plenty of spare room in the steering head for a thicker spacer. The cost to have this made by a machine shop was a mere ten bucks.
There you have it, a total cost of about $100, plus the forks, to do the installation. The cost for forks? Well, we bought ours off ebay and the prices varied wildly. By buying the fork pieces separately, you can get a better price than by buying a complete set. For example, we found a bunch of complete triple clamps for anywhere from $40 to $120. Forks varied in price from $80 a pair, to $400 a pair. The "normal" price for a complete set of forks in good shape seems to around $300. We got ours for $127, complete with triple clamps and axle (plus shipping). So, for the price of decent set of boots, we got everything needed for a modern fork swap, including the races, modifying the races, new bearings and a spacer.
Now, to put it all together.
Follow the step-at-time photos and captions, and you should have the front end on in less than a half hour. Good new; you can use the stock front brake, as it bolts right on the forks. The stock front brake line can be used, even though it's on the short side. Some careful routing of the brake line is essential, but we never had any trouble with the brakes when riding.
Full Step By Step and Photos
Some planning is required on the front wheel. Because the axle is 20 mm in diameter, you have to use a wheel – guess what? – a 20 mm hole to fit the axle. Don't think you can use an '84 through '92 front wheel and just change the wheel bearing to a 20 mm and make it work. We had a number of those wheels around and the bearings were too wide on the O.D. to fit in the wheel. Man, we looked long and hard for a 20 mm bearing fit the stock 230 front wheel, and couldn't find one. If you manage to locate such a set of bearings, let us know and we'll share the info.
As it turned out, we used a 1997 CR 250 front wheel. Our cost without a tire, but with a rotor, was $62 and the wheel was in great shape. The '97 rotor was left in and the wheel easily slid place. Everything was clamped down tight and double checked. The brakes worked fine and the wheel spun true.
The bolts on the triple clamps made contact with the gas tank at full lock. Here's a good tip from reader Kari Cristman on how to fix that:
Well, my project 230 front end fix is completed. I did, however find that the turning radius was compromised too much for my liking without modifying the gas tank to increase the turning radius. I would have had to extend the steering stopper over and inch and a half without modifying the gas tank. What I ended up doing was using one of those industrial type heat guns to heat and mold the plastic on the gas tank where the CR125 triple clamps where making contact. Once the plastic was pliable, I used a large single jack hammer head to press into the plastic and move it back. Just be careful, work slowly, and only press a small amount at a time. I still had to extend the steering stopper, but by slightly less than an inch, which allows for a usable steering radius. Just thought you might like to know in case you run into the same problem with your front end fix. Again, thanks for all the fix it tips.
Kari Cristman
Once everything was checked out, the Maxxis front tire was slipped in place and the bike taken for a test ride.
 |
WHAT'S IT LIKE TO RIDE?
Frankly, not that much better than the 43 mm conventional forks we originally installed on the CRF 230. Maybe 10 percent better on taking bumps, especially the small ones. After the ride, we checked the wiper marks, and noted that forks were not traveling all the way. Also, the front end tended to push a bit in the turns, in spite of the forks being raised up quite a bunch in the triple clamps.
Overall, the ride is plush, but on the bigger/larger bumps, the 43 mm units seemed to go all the way through the stroke better. Perhaps this is because the forks were designed to work on a full-out motocross bike and were set up to handle the nasty stuff. Either way, we'll trying some adjusting and tuning and report back to you. But for now, those 43 mm forks are looking good.
| Comments On This Article? |
|
Off-Road.com Newsletter Join our Weekly Newsletter to get the latest off-road news, reviews, events, and alerts! |
Follow @Off-Road
 Your Privacy Choices