Choosing the Winch
Wishes 1 and 2 pointed to a hitch receiver type mount. With receivers on front and rear of all three 4x4s I could fulfill both wishes. I needed receivers in the rear of the two trucks for towing and wanted one in the front of the Ford for boat launching anyway. I selected a Warn Multi-Mount winch mount because it was rated for a 9,000 pound winch and fit standard 2" receivers. Others I looked at either had a lower rating or required a special receiver that wasn't compatible with my towing needs. Wish 4 was best met with a PTO or hydraulic winch . Wishes 1 and 2 require having power access at both ends of all three 4x4s. Electrical wiring is easy to string and only requires one heavy conductor since the frame provides a return. A high current connector assembly was included with the Multi-Mount kit since it was intended for quick removal with an electric winch. A hydraulic winch requires two hydraulic lines from the pump to the winch and lines from front to rear for operation at both ends. A key to a removable hydraulic winch installation is use of hydraulic quick connect fittings. Hydraulic quick connects are readily available and provide the same function as the electrical connectors used with an electric winch. A PTO winch requires a drive shaft from the transfer case to the winch. Since none of my 4x4s had PTO ports on their transfer case I didn't even consider drive shafts to both ends. Weight played into 1, 2, and 3. If I were to carry the winch front to rear and between vehicles without help or a hernia I wanted the winch plus carrier to weigh less than 100 pounds. The range of 4x4s sizes I would be using the winch on also limited the total installation weight if I didn't want to beef up the front suspension on the lighter ones. Battery or hydraulic pump weight also needed to be included in the total installed weight. After considering what I wanted and the tradeoffs involved it was apparent that Milemarker offered the best choice in winches. Their 9,000 pound hydraulic winch weighed in at about 60 pounds which, when combined with the Warn Multi-Mount carrier, made an assembly of less than 80 pounds. Milemarker winches use the power steering pump for power so I needed no special pump, extra battery, or drive shafts. Installing the hydraulics was straightforward and used readily available parts. I did this at the right time because MOAB Offroad was running a special price on Milemarker 9,000 pound winches and I jumped onto their offer. The guys at MOAB also gave me good advice on using the Milemarker on the Warn mount. Admittedly a 9,000 pound winch is a bit light for the F-250 but with a good snatchblock it will do the job and it is overkill for the Suzuki. It meets my needs. The first 4x4 I put my transportable winch set up on was my S-10 pickup. Installation on the others is still in progress with the Ford being second and well underway. Hydraulic Plumbing
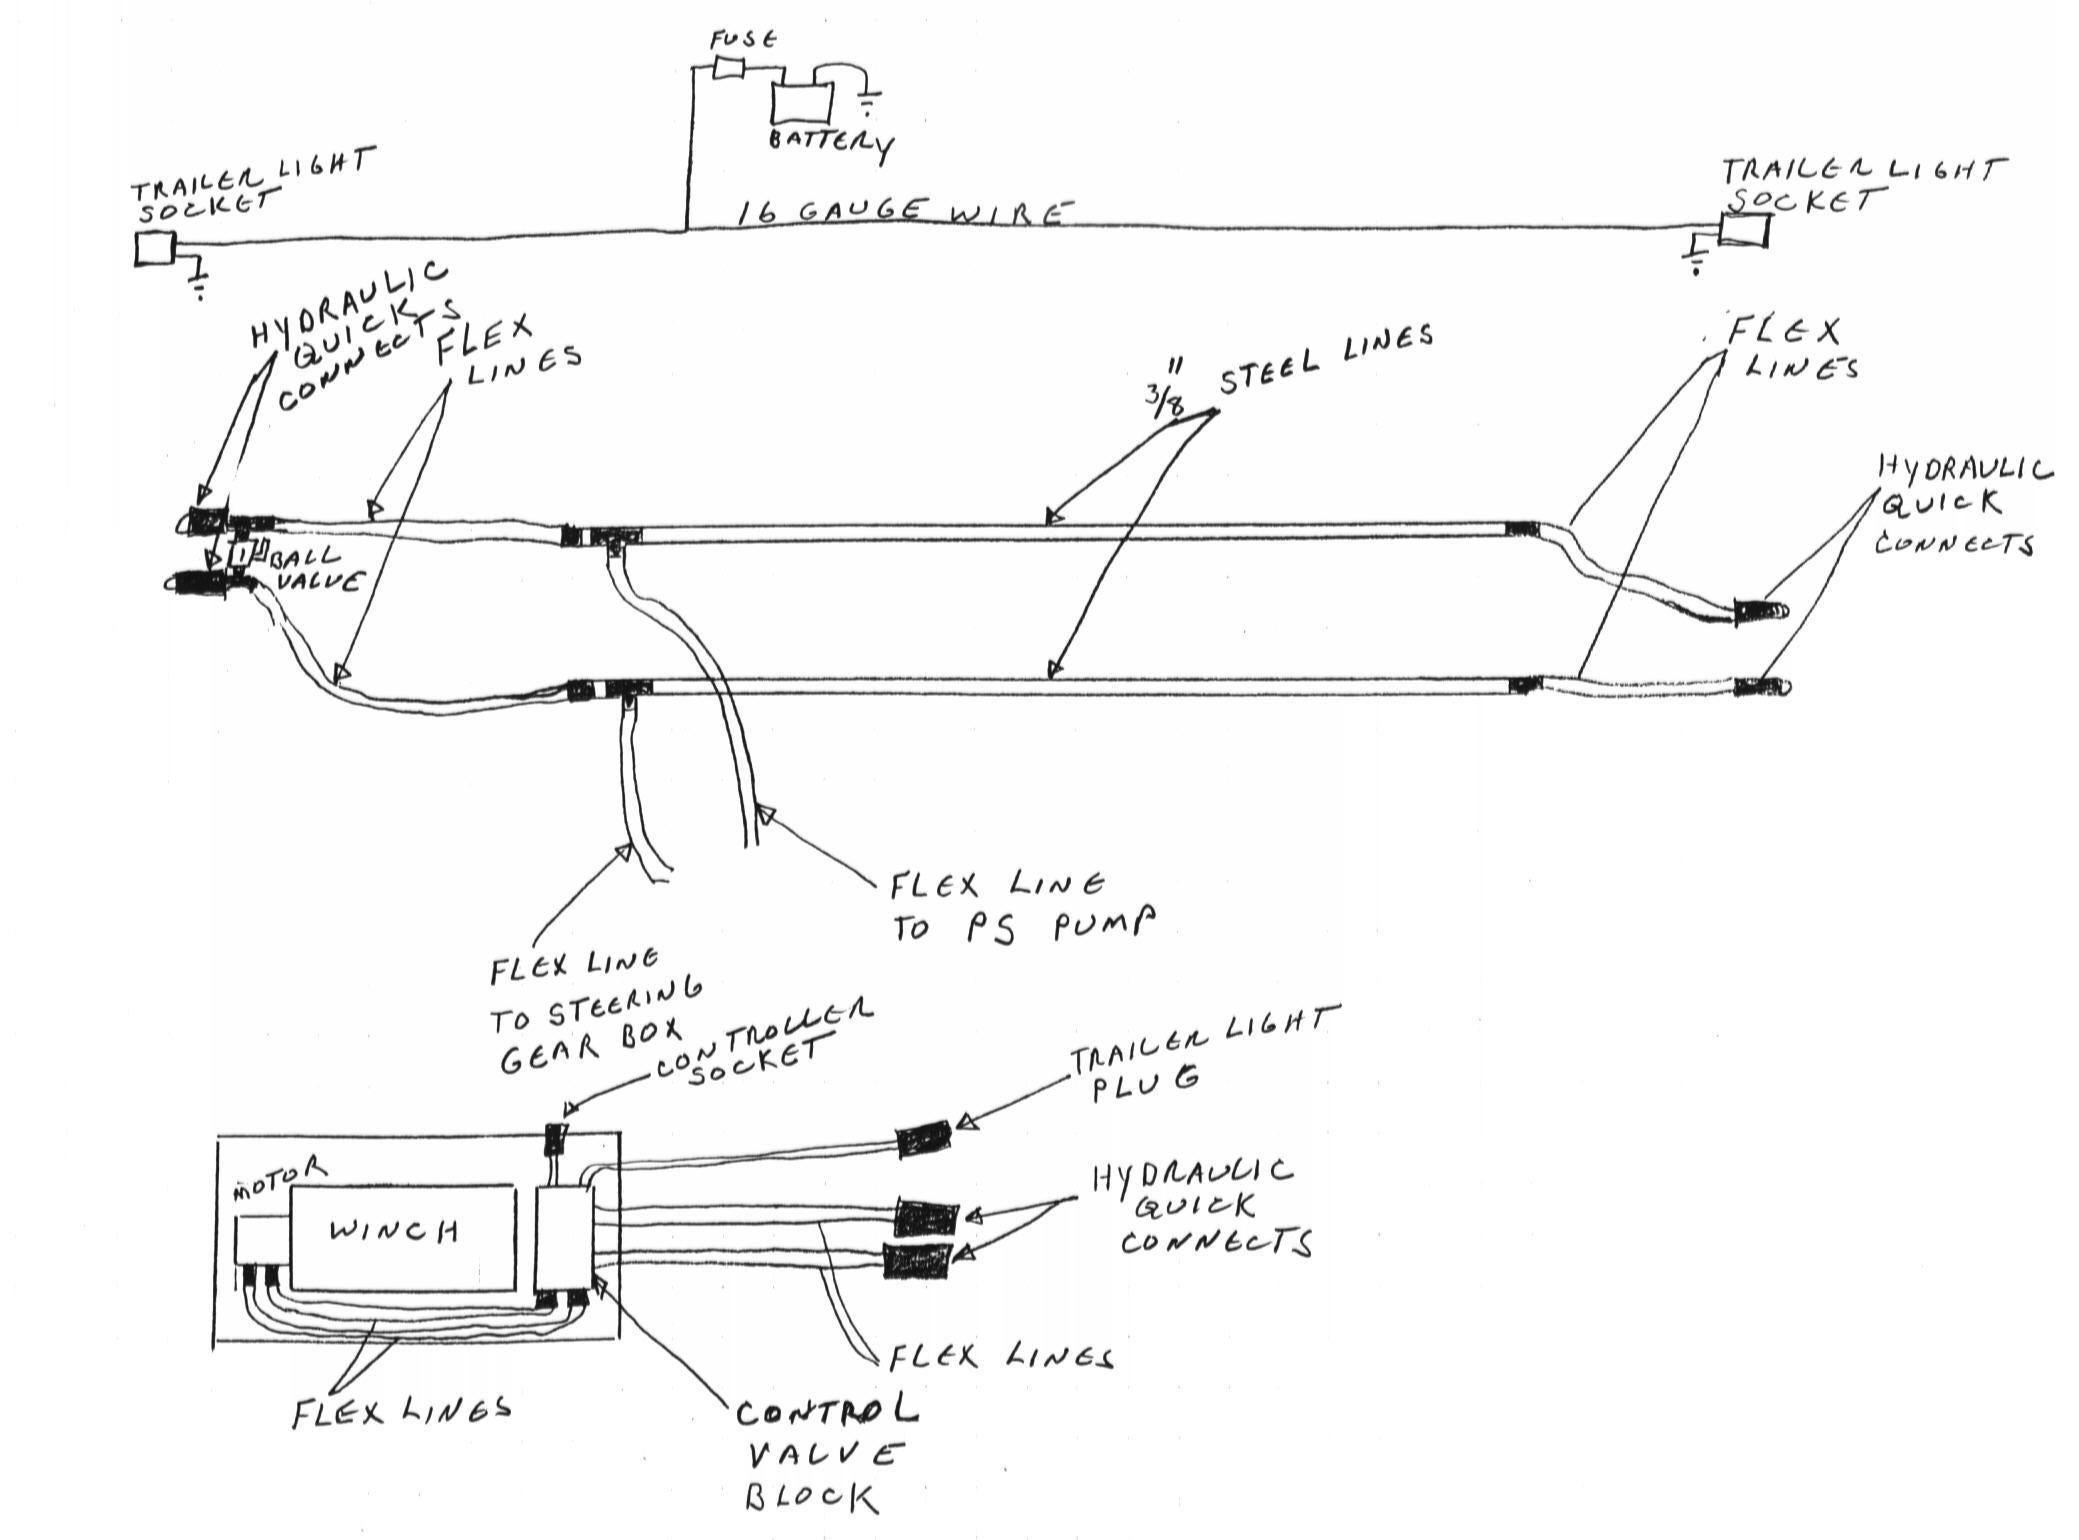 Connection Diagram I did a hand sketch of the hydraulic plumbing and electrical power wiring before starting. Milemarker provides adapters to fit into the power steering pump and steering gear box that adapt to flexible hydraulic lines for hooking to the winch. Flex hydraulic lines adequate for a fixed installation are also included in the installation kit. I bought the winch with an installation kit for the S-10 and made use of all the parts that came with it. I am making my own adapters from old power steering lines for the other installations.
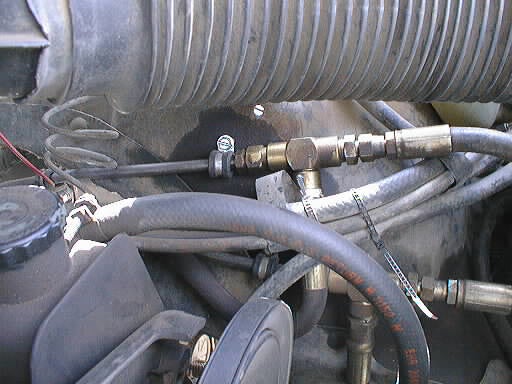 WINCH "T" The 3/8" steel lines that run to the rear terminate at the front in "T" fittings on the drivers side fender well in the engine compartment near the power steering pump. Flex lines run down to the pump and steering gear box from the "T"s. The original long flex lines that were supplied by Milemarker run from the "T"s to the front mount area.
 WINCH FRONT CONNECTORS At the front quick connect hydraulic fittings are attached to the right side push bar upright. A gate valve is connected between the lines at the front to allow the power steering oil to bypass the winch connectors when it is removed. A standard trailer type electrical connector is used to bring 12 volt power to the winch control valve that is mounted on the carrier with the winch. For an installation where the winch will be used on only one vehicle the control valve can be moved into the engine compartment and the gate valve eliminated.
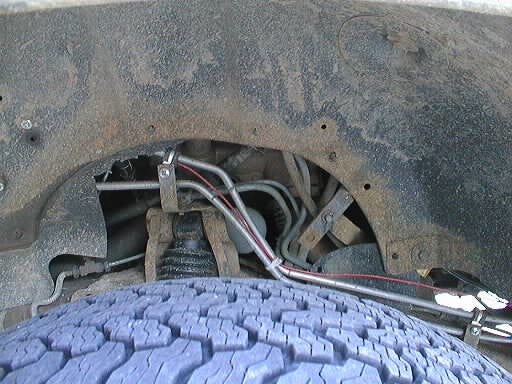 WINCH FRONT WHEEL WELL The steel lines run down into the left wheel well from the engine compartment and attach to the top of the frame. The steel lines were bent to fit with a low cost tubing bender that I got from Harbor Freight. The steel lines were bought from NAPA in 25 foot lengths. A fused hot wire for electric power to the rear is routed with the steel lines. 
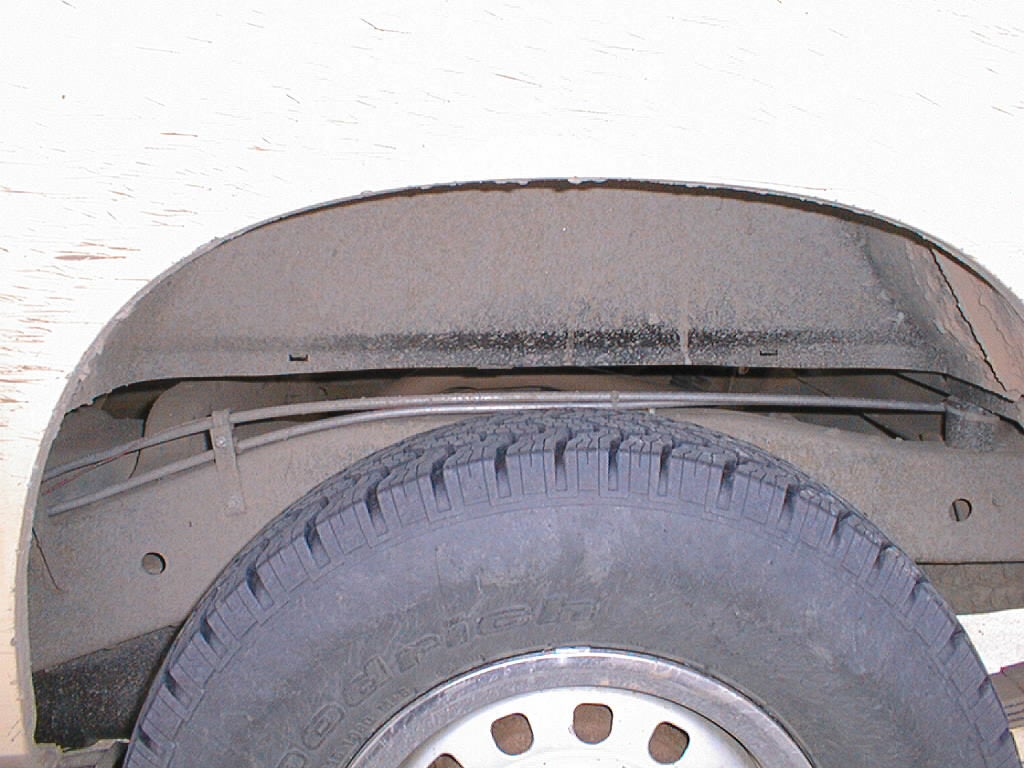 WINCH FRAME LINES AND REAR WHEEL WELL I have a 2 inch body lift on the S10 so the lines can be run on top of the frame for the length of the truck. I made tubing hangers with insulated metal electrical cable clamps and 1/8" steel strap for support. The Winch Mount
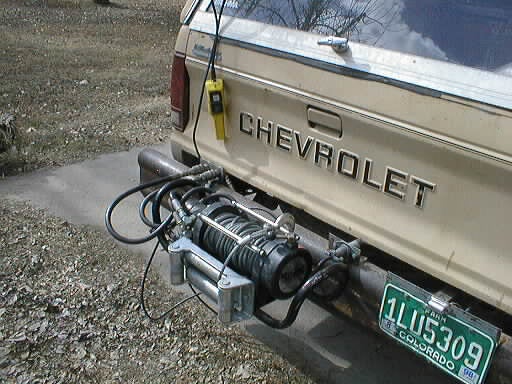
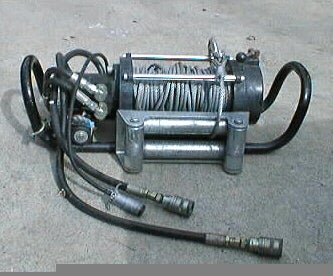 WINCH IN ITS CRADLE The Milemarker 9,000 pound winch bolts directly to the Warn Multi-Mount cradle with four grade 8 bolts that were supplied. I used a Warn roller fairlead which mated well with the cradle. The winch set about 1/4" behind the fairlead mounting plate so I used a few washers as spacers between the winch and fairlead and used grade 8 bolts to tie everything together. The bolts supplied were too short due to the spacers needed.
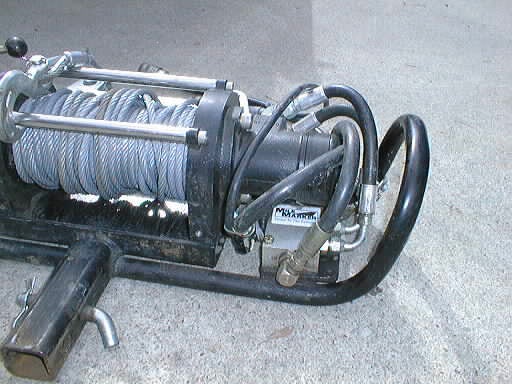 CRADLE PLUMBING Milemarker supplies a steel plate for mounting the control valve assembly to the vehicle. I welded the plate into the cradle and mounted the control valve assembly to it. I had custom hydraulic flex lines made at a local farm implement shop to connect the valve assembly to the winch motor. When the winch is connected the control valve bypasses the winch motor when the winch isn?t being operated so that the power steering continues to operate.
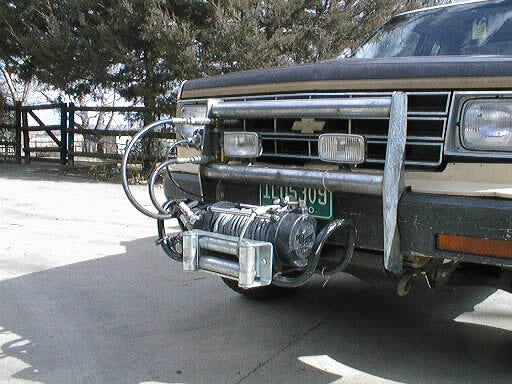 WINCH ON FRONT The Warn Multi-mount cradle was designed for an electric winch which is larger than the Milemarker hydraulic winch. The hitch bar pin was positioned to give clearance for the larger winch and held the cradle about three inches out from the receiver and bumper. I prefer having a minimum extension out front so I drilled a new hole that brings the cradle back to the bumper and shortens the mounted assembly those three inches. Having the winch closer in reduces the lever arm from winch to receiver hitch and gives more margin for the load rating.
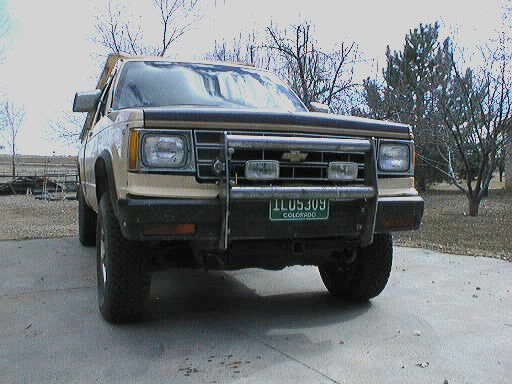 WINCH REMOVED-FRONT With the winch removed the Multi-mount receiver is barely noticeable. The only clues are the hydraulic connectors and gate valve. I've had a few curious inquiries on those. After using the winch a few times I found a weakness in the Multi-mount receiver hitch. The hitch has steel plates that are welded to each side of the receiver and bolt to the frame. The weld is a butt joint and Warn only ran a bead on the upper side. The loading during winching opened the joint and started cracking the weld bead. I ran a second bead on the side opposite the bead run by Warn and I've seen no cracking since.
 FRONT HOOKUP Connecting the the hydraulic lines to the quick connects and plugging in the electrics takes less than a minute. Flip the gate valve and you are ready to go.
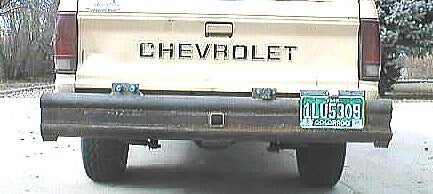 REAR BUMPER The stock S10 bumper was much to wimpy to consider using as a receiver attachment and I didn't want to lose ground clearance with an under bumper frame mount receiver hitch. This was an opportunity to play with my new MIG welder and build a sturdy bumper with integrated receiver. The bumper was made with two 3"x 1/4" pipes with a 3" x 3" x 1/4" "I" beam between them. The receiver is in the center of the bumper and flush with the face. The pin hole is between the bumper and truck. A 1/4" thick piece of steel "U" channel that fits snuggly inside the frame was used to attach the bumper to the truck. Jack points are welded to the bottom pipe at each end and the center.
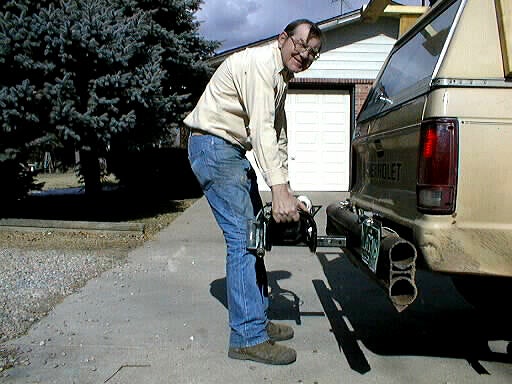 WINCH MOUNT-REAR The winch is light enough that it can be slipped into place by one weak old man without assistance.
 WINCH ON REAR With the winch mounted in the rear I'm ready to retreat.
 WINCH CLEVIS A heavy farm equipment clevis provides a good place to hook a tow chain. I find that when towing someone else out of a bad spot, especially if they are bigger than me, I need to tie the S10 down. The receiver and clevis provide a good tie point.
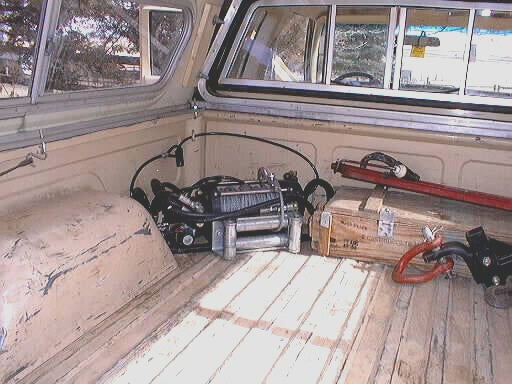 WINCH IN BOX
When the winch isn't being used I carry it in the pickup box. It fits in the front corner with my ammo box tool and chain box. A locking cable secures it in place for protection from someone wishing to relieve me of my winch. 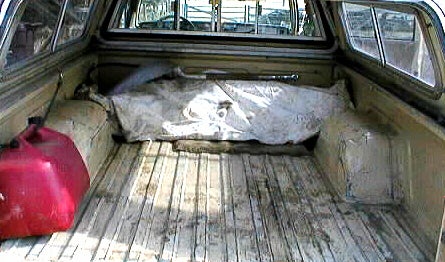 WINCH COVERED I cover the winch and tools with a canvas that can be thrown over the winch cable for safety when the winch is in use and to keep me dry and clean if I need to crawl under the truck in the mud. The cover makes things less obvious to anyone looking in the windows.
This page was last modified on 19 Apr 98 Please post any comments or questions on the Dodge message board. Please put the phrase "receiver mount hydro winch" in the subject heading so Larry can find it among the other messages. Return to the Off-road.com Dodge
Page |
|
Off-Road.com Newsletter Join our Weekly Newsletter to get the latest off-road news, reviews, events, and alerts! |
Follow @Off-Road
 Your Privacy Choices