|
A few months ago in this column I talked about how your swaybar works, and why it is a good thing on the street, but that it limits off-road articulation. I then talked about how to disable it. Toyota owners have had to either put up with body roll or less-than-possible articulation. Wouldn't it be nice if you could easily engage or disengage the swaybar?
There have been a number of "quick" swaybar disconnects put together by various people, though I know of none that were ever commercially produced. While these various designs disabled the swaybar far easier than a full disassembly of the stock setup, most of them, including some of my own previous designs, were too difficult to use, left you with a lot of parts to keep track of, were difficult to fabricate, and/or required you somehow secure the ends of the swaybar once disconnected. I suspect that many people found themselves picking one setting (enabled or disabled) and doing all their driving on it. I've come up with a design that I believe overcomes all these shortcomings. I'll explain the construction first, and the theory of operation a little later. The design should work (perhaps with some modification) on all swaybars with bolt-style endlinks. Some 4Runners use an endlink with a small tie-rod end. Later on I'll talk about how to adapt this mode of operation to that style of endlink. 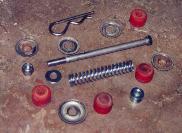 Parts you'll need:
 I'll attempt to explain the contruction. This is a situation where the pictures really explain it best. Note that some of my pictures here are of a too-short earlier prototype and don't show all the washers being used, but the basic construction and theory of operation remains the same.
To build this, we first need to partially assemble the driver's side to determine where to drill the hole for the hitch pin. Remove your driver's side stock endlink. Pay special attention to the sequence of bushings and washers. We'll start by basically replacing the stock endlink bolt, though we'll put the threads UP. Take one bolt, and feed onto it an endlink washer and a bushing (#4). Now feed the bolt up through the lower mount (the lower control arm on IFS toys). Slide on another stock washer (if this is the way your stock setup was), a bushing (#3), and another washer. Now, slide on, but do not tighten yet, the shaft collar, which will eventually secure the lower end and serve as a spring base. Slide on the spring. Slide on the non-stock washer. Slide on a stock washer then a bushing (#2). Feed the threaded end of the rod now through the swaybar itself, slide on the last bushing(#1), a washer, and cap it off with a nut. Now, jack up the passenger's side of the truck just a little, which will put upward force on the swaybar. On an IFS rig, place the jack under the end of the control arm, and on a solid axle rig, place it under the front axle as far to the passenger's side as possible. Alternatively, you could simply drive the passenger's side up onto a 2x4. Now the swaybar is under a little tension. Adjust the nut on our assembly to get the endlink length you want. Generally, the absolute length isn't important, but both endlinks (this one, and the other one you'll build) need to be the same length, though they don't necessarily need to be the same length as stock. Now, with pressure still on the swaybar holding up the uppermost bushing(#1) and washer, slide up the next bushing(#2) and washer up against the swaybar (depending on your spring length, the spring may do this for you). Using a knife or scratch awl, place a mark on the bolt directly beneath the washer you just lifted up. This is where you need to drill a hole for the hitch pin. Lower the passenger side of the truck. Disassemble the parts we just put together (yes, I know you just assembled it!). Drill a hole for the hitch pin where we marked it. If you don't get the hole in exactly the proper place, its not a big deal; we'll be able to adjust the tension with the upper nut, and slight variations won't really affect swaybar performance. Use the first bolt as a guide for where to drill the second bolt. Ideally, we want both holes in the same relative position on each bolt. Now, put the whole assembly back together again. This time, insert the hitch pin through the hole, above the non-stock washer and below the stock washer (which is directly below bushing #2). Otherwise, the assembly is the same. Do not over-tighten the upper nut; if you do so, there will be too much pressure on the hitch pin and it will be difficult to remove.
To operate: With both new endlinks in place and the pins in place, your swaybar behaves as it did when stock. If one end of the front suspension compresses, that force is transmitted through the endlink and to the end of the swaybar.
Now, go wheeling in your truck and enjoy the articulation. When you're ready to head back to the highway, re-enable the bar. To do this, simply park on a level surface, retract a spring a little if necessary, and insert the pin, being careful to get it properly between the stock and non-stock washers. Repeat for the other side. This takes a little practice, but I can usually do it one-handed now. I find it easiest to turn the steering wheel all the way one direction, insert a pin, turn the wheel the other way, then insert the other pin. It also helps to round the tip of the hitch pin. I hope you understand these wordy directions and are able to make a set for yourself or use these ideas in your own designs. As usual, please email me if you have any questions or can offer any improvements to this design. Even if you make a set exactly as described, I'd like to hear how well it works for you. I'm extremely happy with these end-links after using them for a couple weeks and a couple off-road trips. I was a little concerned at first that the hitch pins wouldn't be strong enough to keep from shearing during hard cornering on the street, but so far, it has not been a problem. I even wheeled a little on some bouncy forest roads with the bar engaged to see if I could break it. So far, I could not. I had been running full-time without the swaybar, and had forgotten how nice my 4Runner corners with the swaybar enabled.
Now, for those of you with tie-rod-end-style endlinks, you can do this type of disconnect too, but you'll need to use your stock endlink, and set it up so that on compression, the lower end of the link slides through the lower control arm, as opposed to up through the swaybar.
|
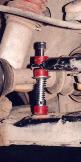
 One side is basically assembled now, except we need to tighten the shaft collar. Jack up the opposite side to put upward pressure on the swaybar. Make sure the lower bushings(#3 and #4) are seated well. Slide the collar down as far as you can, and tighten it with a hex wrench.
Now, assemble the other side. A picture of the installed endlink assembly (less some of the washers) is shown at left. Its hard to tell in the photo, but the hitch pin is installed.
One side is basically assembled now, except we need to tighten the shaft collar. Jack up the opposite side to put upward pressure on the swaybar. Make sure the lower bushings(#3 and #4) are seated well. Slide the collar down as far as you can, and tighten it with a hex wrench.
Now, assemble the other side. A picture of the installed endlink assembly (less some of the washers) is shown at left. Its hard to tell in the photo, but the hitch pin is installed.
 Here's where the magic happens: To disable the swaybar, pull out the hitch pins (don't lose 'em!). Now, when one end of the suspension compresses, the end link bolt on the compressed side slides through the swaybar, without putting any twist on it (see picture at right). The little springs will compress, but they are so weak that it won't have any twisting effect on the swaybar. The spring's purpose is to keep the swaybar from rattling around at the bottom of the endlinks when disconnected, and also to basically hold everything in a stock position for when you want to re-enable the bar.
|
Off-Road.com Newsletter Join our Weekly Newsletter to get the latest off-road news, reviews, events, and alerts! |
Follow @Off-Road
 Your Privacy Choices