|
Before we start, let me say that this is information only. Any modifications to the stock brake system is to be done at your own risk and liability
You must first get your hands on the parts. You shall need a pair of front Scout II disc brake calipers, a pair of front Scout II rotors, Scout II Front wheel studs and caliper brackets. All these parts should be from a Dana 44 front end.
Step two remove the hub assembly from the center of the rotor by knocking out the front studs (you can reuse these studs to install the rotor on the rear axle but we recommend that you purchase new ones). The large hole in the center of the rotor shall need to be enlarged by an 1/8" all the way around. This is apparent when you slide the rotor over the axle because it will not "seat" flush with the backside of the axle flange. I found a large deburring or dremmel type bit to work well for this. Another option is to grind the ridge down on the inside flange of the axle so that it allows the un-ground rotor to match up to the axle (6 of one, half a dozen of the other).
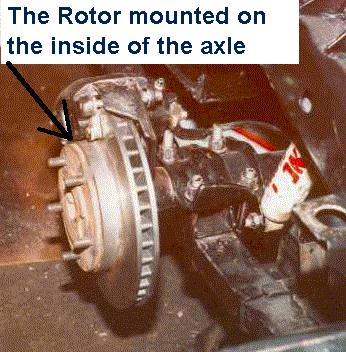
Step three because it is difficult to get the rotor over the bearing retainer plate you have two options. One is to remove the axle bearing and retaining plate and slide the rotor over the axle. Two is to cut the retainer plate in half at its' narrowest points so that it can be removed with the bearing still in place. Either way works but removing the bearing allows you to install a new one after the rotor is installed. Slide the rotor over the axle (see picture below) and use the longer front wheel studs to attach it to the backside of the axle making sure that you have a flush "seating" of the rotor to the inside axle flange (IMPORTANT!). Now pound the studs in (IMPORTANT! make sure you check your rear lug nuts for the first couple of weeks after completing installation as they will loosen up as the studs completely seat themselves).
Step four will take a good sized drill bit. If you look at the axle flange you will see a 1 1/4" hole for accessing the axle bolts. The rotor is blocking part of this hole. You shall need to drill out the rotor to allow access to the axle bolts via socket wrench. If you do not have a drill bit this size use the largest bit you have and then finish enlarging the hole with your air dremel tool. TIP: it is possible after cutting the opening out of the rotor to install the rotor over the axle bearing retaining plate without cutting the bearing retaining plate in half or pressing it on and off. It's a little tricky but possible.
Step five read this step through completely first. You will need to increase the diameter of the caliper bracket opening so that it is slightly larger then the outer diameter of the axle tube behind the plate where the axle bolts up. The deburring air dremel works well for this as well! Now you must cut out a section of the caliper bracket so that it will fit over the axle tube. If you take your time with a few trail and error fits you should only need to remove about a third of the opening. Once you get the caliper to fit over the axle tube you shall need to drill holes in it where it lines up with the axle retaining holes on the axle plate. If you were careful to not cut out too much metal on the caliper bracket you should be able to get three of the four holes on the caliper bracket. To make it easier to bleed the brakes in the future it is important to mount the caliper bracket in a similar orientation to the front brackets (rocked slightly towards the rear of the Scout). We still recommend that you weld this caliper bracket on in addition to the bolts after you have completed installation and are sure that all the parts bolt up. Now I'm sure that you have noticed that the axle plate is steel and the caliper bracket is cast steel. You should have a certified welder use a nickel rod to weld the two pieces together. You can finish the job and drive to the welding shop. You are ready to install the modified axles into the axle housing. You should have access to the retaining bolts through the hole in the axle and rotor you made earlier . If you choose to split the retaining plate in half you will now need to fish them into the backside of the rotor behind the bearing (watch out for the seal). Finally install the disc pads in the caliper and install the caliper over the rotor similar to the front brakes. Your done except for the hydraulics! I used flexible brake lines similar to the front brake lines only with the smaller 5/16" opening where the steel line bolts up. This is not a requirement since you can adapt the stock brake lines to the rear steel brake lines. just neater.
Step six the master cylinder should be modified by removing the small check valve in the rear discharge port (unscrew the rear brake line from the master cylinder). A screw and a vise grip work well for this. This is not a requirement but here are the pros and cons. If you do remove it, the first time you hit the brakes after you have been driving awhile the brake pedal will be low. If you leave the valve in , you may wear out your brake pads quicker, but no low pedal. I left mine in and bought a set of Napa'a life time warranty pads. They still seem to last at least 20,000 miles. Another optional feature, but recommended, is to install and adjustable proportioning valve in the line to the rear brakes. This will take a double flaring tool. You can mount this valve on you inner fender. The adjustable proportioning valve can be purchased at a Chrysler dealer. If you choose not to install the adjustable proportioning valve you will experience rear brakes locking up before front brakes under hard deceleration. I have found that the larger the tire the less of a problem this becomes. Your choice!
Last step is the emergency brake. You can use Cadillac calipers and hook them up to the regular parking brake ( this requires some engineering). Or you can go to an aircraft used parts warehouse and get a hydraulic that planes use as a parking brake. This is for small planes and the valves must have a small ferrel on the cylinder that moves in and out. This means that it will hold up to the pressure. Then hook up a cable to the inside of the Scout that has a locking handle. Most parts houses have this. Good Luck!
If all this still sound like a little more than you want to tackle TSM makes a bolt on kit. Look under their 1/2 ton applications for Scout II's.
|
|
Off-Road.com Newsletter Join our Weekly Newsletter to get the latest off-road news, reviews, events, and alerts! |
Follow @Off-Road
 Your Privacy Choices