For most of it's life the coil spring suspension on the back of my
4Runner has done a good job both on the trail and off. However
after swapping in a solid front axle from All Pro Off Road and
installing 35" tires, I needed a bit more lift in the rear to match
the front solid axle
conversion and provide clearance for the 35" tires. There were
a number of problems with lifting the coil suspension beyond the 3"
it already had. See section bellow on "Why Change to Leafs" for more details.
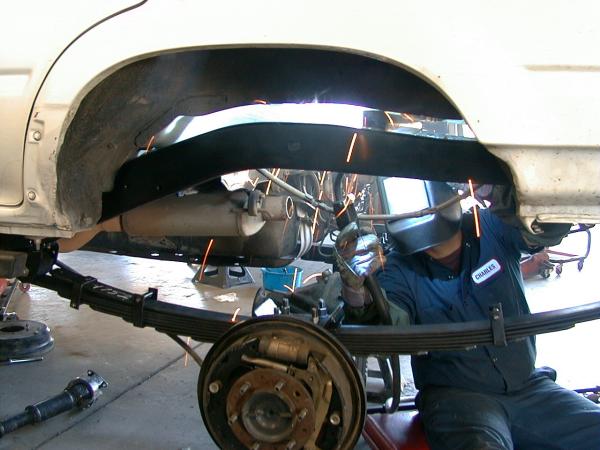
With the mounts all tacked
into place the tires were installed and the truck put down on the
ground to see if everything is in the proper place, then the entire
thing was dissembled and the finish welding was completed. Next the
suspension was assembled again and the welds were
painted.
Why Change to Leafs?
The axle really needed to be moved back by 1.5" to
center it in the wheel well. This I felt was the best way to clear
the 35"s tires with the minimum lift possible. Do to the
close proximity of the coil springs, shocks, and panhard tower it
would not be easy to move the original system back. With the
leaf springs, choosing axle position is just a matter of welding
the perches in the proper location.
The lower bracket
extensions do not seem to have any failure problems however they
hang down quite low and are constantly hitting and hanging up on
the trail.
I truly believe that all of these problems could
be solved except for the ground clearance issues related to the
lower control arms.
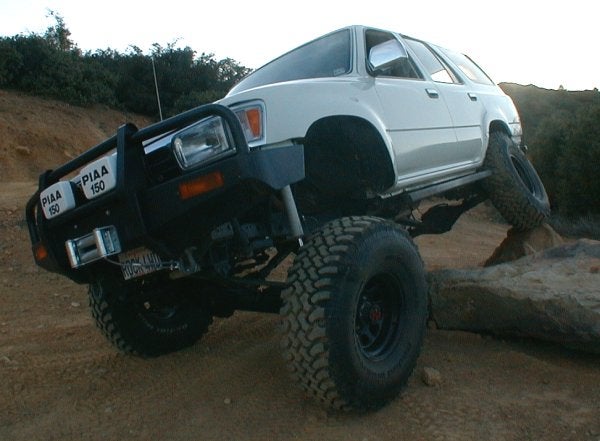
Overall Results
The coil spring suspensions I have used over the
years include stock, 1.5" Downey coils, 3" coil and spacer kit, 4"
Pro Comp and now the leaf spring swap. Leaf springs have
netted about 6" of rear lift and the truck sits level now.
The rear travel as measured on a 20 degree ramp right after
installation is 19.5" of articulation. Two weeks later I
performed the same teat and as predicted by Jon at All Pro the
springs would travel further after breaking in. Now I measure
21" of rear articulation.
With the
downey 3" lift I got about 19", with the Pro Comp 4" lift I got
20.5" While the downey 3" lift worked and drove very well the Pro
Comp kit springs were way too soft and they caused the truck to be
much less stable on and off road.
The
springs work wonderfully and provide a very nice controlled ride.
They are able to support much more weigh than any of the coil
suspensions and provide a very comfy ride. When people take a
ride in my truck they can't believe it's sitting on leaf
springs. I do not plan to put sway bars on like I had used
with the coil suspension. The leaf spring suspension does not allow
body roll like the coil suspension did. Over all the rear
suspension made a huge improvement both in terms of off road ride
but also in load handling and street ride. I can confidently
recommend these springs for any Toyota truck or 4Runner.
Contact Info:
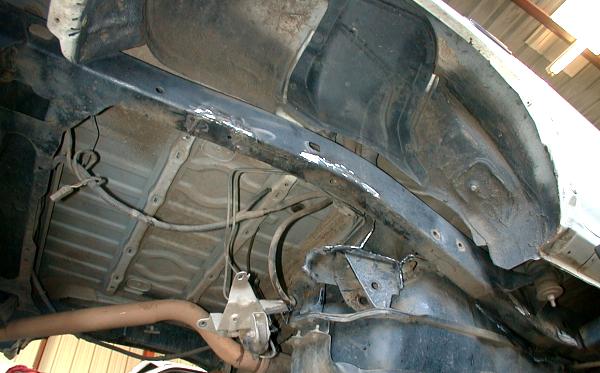 The hardest
part of converting my rear coil suspension to leaf springs was
removing the coil suspension and all of it's brackets from
the axle and frame. This took by far the most time of all the steps
involved. There are five different control arms and each of them
has two brackets, one at each end. The pan hard crossmember was
also removed. My original plan was to keep the upper control arms
In case I needed them to control axle wrap. I also planned to keep
the rear sway bar to control lean on the highway. As it turns out
neither was possible and to do things correctly both must be
removed. The rear exhaust also needed to be cut and will be
relocated later.
The hardest
part of converting my rear coil suspension to leaf springs was
removing the coil suspension and all of it's brackets from
the axle and frame. This took by far the most time of all the steps
involved. There are five different control arms and each of them
has two brackets, one at each end. The pan hard crossmember was
also removed. My original plan was to keep the upper control arms
In case I needed them to control axle wrap. I also planned to keep
the rear sway bar to control lean on the highway. As it turns out
neither was possible and to do things correctly both must be
removed. The rear exhaust also needed to be cut and will be
relocated later.
 The soft feel and poor road
performance of a lifted coil suspension was annoying on the
highway. The truck had a tendency to go all over the road and was a
hand full to control. Off-road the truck had a tendency to
feel tipsy and would lean easily, especially on side hills. This
caused me to choose a very conservative route when choosing the
components for the rear suspension. To control sway and limit that
tipsy feeling that a soft suspension can give I choose to get a
relatively stiff leaf spring: an All Pro 8 leaf pack with an
extra torque leaf to control axle wrap. By making the spring
pack as long as possible I am able to control axle wrap and still
allow good rear travel without using a torque rod. The
springs I choose are 56" long that have 5.5" of lift when compared
to a 1989 Toyota leaf spring. These springs can also be
installed on any 1979-1995 truck or leaf sprung 4Runner. Some
welding and cutting is required.
The soft feel and poor road
performance of a lifted coil suspension was annoying on the
highway. The truck had a tendency to go all over the road and was a
hand full to control. Off-road the truck had a tendency to
feel tipsy and would lean easily, especially on side hills. This
caused me to choose a very conservative route when choosing the
components for the rear suspension. To control sway and limit that
tipsy feeling that a soft suspension can give I choose to get a
relatively stiff leaf spring: an All Pro 8 leaf pack with an
extra torque leaf to control axle wrap. By making the spring
pack as long as possible I am able to control axle wrap and still
allow good rear travel without using a torque rod. The
springs I choose are 56" long that have 5.5" of lift when compared
to a 1989 Toyota leaf spring. These springs can also be
installed on any 1979-1995 truck or leaf sprung 4Runner. Some
welding and cutting is required.
 The springs are mounted
using four spring hangers, just like the factory uses. These are
relatively cheep to purchase and are easy to weld onto the frame.
The ones used here are from a 1985 truck and can be ordered
directly from Toyota you can still see the Toyota part number label
in this picture. You can also see the two tiny tack welds that hold
the hangars in place temporally. It was hard to determine where
exactly to put the springs so every thing was tack welded in place
to allow for easy changes. To reduce rubbing problems I had
with my 35" tires in the rear I choose to move the rear axle back
1.5". This also reduces the amount of overhang behind the rear
axle. With the front axle moved forward 1" the overall wheelbase is
now 105.5".
The springs are mounted
using four spring hangers, just like the factory uses. These are
relatively cheep to purchase and are easy to weld onto the frame.
The ones used here are from a 1985 truck and can be ordered
directly from Toyota you can still see the Toyota part number label
in this picture. You can also see the two tiny tack welds that hold
the hangars in place temporally. It was hard to determine where
exactly to put the springs so every thing was tack welded in place
to allow for easy changes. To reduce rubbing problems I had
with my 35" tires in the rear I choose to move the rear axle back
1.5". This also reduces the amount of overhang behind the rear
axle. With the front axle moved forward 1" the overall wheelbase is
now 105.5".
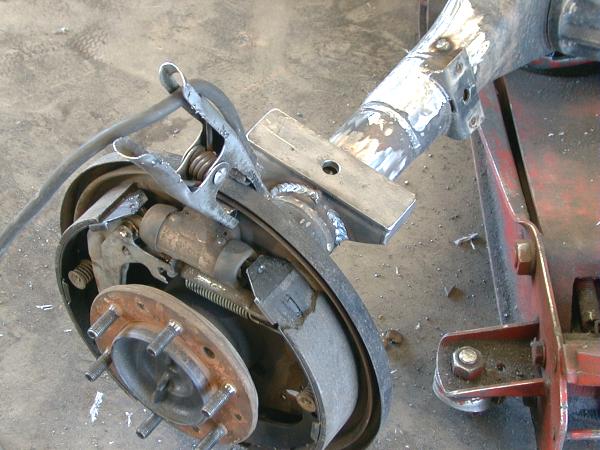 On the axle a 2" longer than
normal spring perch was made. The spring perches Toyota uses
are 4" long. By making the perches a little longer (6" total)
the axle does not wrap as easily do to the larger spring contact
area. Shorter perches allow more travel but also allow more
wrap up of the springs. Making a spring perch is easy.
Just take a 2" X 3" piece of tubing and cut a 3" hole into it using
a drill press. You can also create a little lift by using 2" X 4"
steel. Spring perches can also be purchased from a number of
custom shops. You can see here the axle with the original
link brackets removed. The sway bar mounts were retained for
possible future use.
On the axle a 2" longer than
normal spring perch was made. The spring perches Toyota uses
are 4" long. By making the perches a little longer (6" total)
the axle does not wrap as easily do to the larger spring contact
area. Shorter perches allow more travel but also allow more
wrap up of the springs. Making a spring perch is easy.
Just take a 2" X 3" piece of tubing and cut a 3" hole into it using
a drill press. You can also create a little lift by using 2" X 4"
steel. Spring perches can also be purchased from a number of
custom shops. You can see here the axle with the original
link brackets removed. The sway bar mounts were retained for
possible future use.
 I made a set of shackles for
the rear using flat bar steel. There is no cross-bar on these
shackles to allow the leaf spring to twist a little, thus allowing
a little more travel. The corners of the shackles were rounded to
prevent binding with the frame. Greaseable shackle bolts and
bushings were used and allow for easy lubing. Adding a shot
of grease at every oil change should keep the squeaks under
control.
I made a set of shackles for
the rear using flat bar steel. There is no cross-bar on these
shackles to allow the leaf spring to twist a little, thus allowing
a little more travel. The corners of the shackles were rounded to
prevent binding with the frame. Greaseable shackle bolts and
bushings were used and allow for easy lubing. Adding a shot
of grease at every oil change should keep the squeaks under
control.
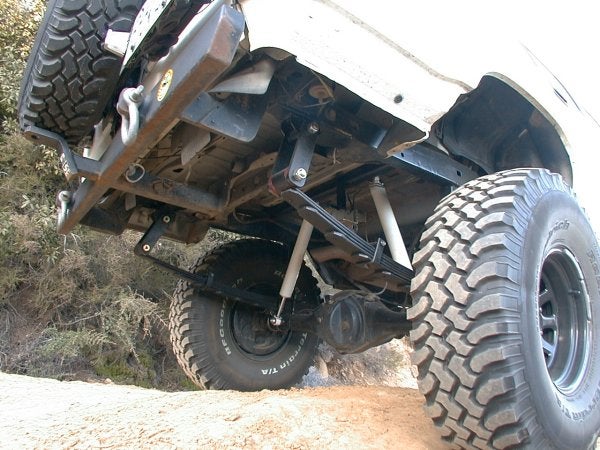
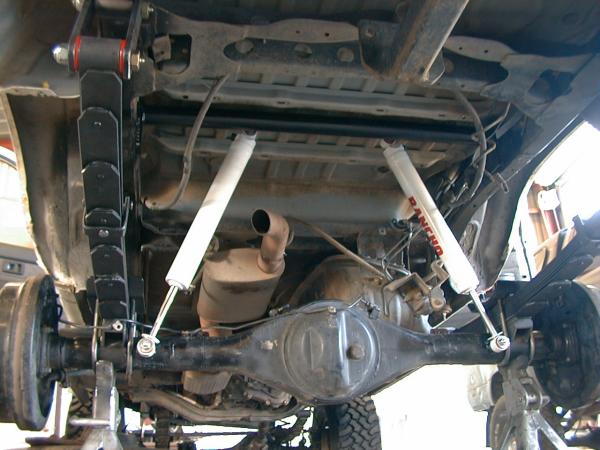 The pan hard rod crossmember was removed to allow
the Rancho 9012 shocks to be mounted as high as possible.
These were mounted upside down to prevent damage to the
adjusters. A new crossmember was created using 2" round
tubing and 2 pieces of flat bar. The 1" body lift I
have allowed for a little extra space for the new crossmember to be
mounted slightly above the frame. A U bolt flip kit was used
to make the under side of the axle as clean as possible.
There is nothing under the axle to hang up on now. Bump stops
were installed to limit compression, preventing damage to the
springs.
The pan hard rod crossmember was removed to allow
the Rancho 9012 shocks to be mounted as high as possible.
These were mounted upside down to prevent damage to the
adjusters. A new crossmember was created using 2" round
tubing and 2 pieces of flat bar. The 1" body lift I
have allowed for a little extra space for the new crossmember to be
mounted slightly above the frame. A U bolt flip kit was used
to make the under side of the axle as clean as possible.
There is nothing under the axle to hang up on now. Bump stops
were installed to limit compression, preventing damage to the
springs.
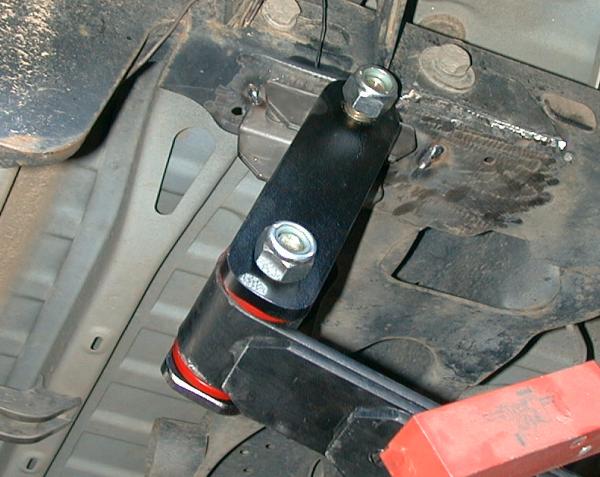
 My proportioning valve was connected to the pan
hard rod crossmember and when this was removed the valve mount was
removed too. So a small bracket was fabed up that allows the valve
to be mounted in the same location as before. The valve arm has
been tied
up to increase rear breaking effectiveness.
My proportioning valve was connected to the pan
hard rod crossmember and when this was removed the valve mount was
removed too. So a small bracket was fabed up that allows the valve
to be mounted in the same location as before. The valve arm has
been tied
up to increase rear breaking effectiveness.
There are a host of other problems associated with
modifying the original coil system to accommodate the 5"+ of rear
lift I needed to match the front solid axle
conversion and clear my 35". When lifting the rear suspension
it is necessary to relocate the mounting points so as to level the
control arms. If the control arms are not nearly level with the
ground the rear axle induces bump steer when the body rolls to one
side or you hit a bump with one of the rear tires.
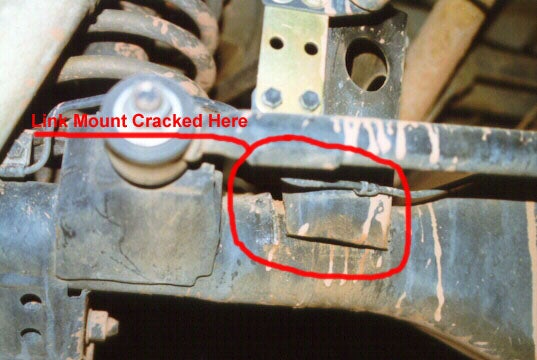 The brackets I used
for the rear coil suspension were the Pro Comp 4" rear lift along
with custom coil springs made by A1 spring. The Pro comp kit comes
with 5 drop brackets, one for each of the rear control arms. The
"upper" two drop brackets bolt onto the existing upper axle
brackets on the differential. This causes more leverage to be
placed on the original bracket and several people have reported
that left upper bracket has been ripped off of the
differential.
The brackets I used
for the rear coil suspension were the Pro Comp 4" rear lift along
with custom coil springs made by A1 spring. The Pro comp kit comes
with 5 drop brackets, one for each of the rear control arms. The
"upper" two drop brackets bolt onto the existing upper axle
brackets on the differential. This causes more leverage to be
placed on the original bracket and several people have reported
that left upper bracket has been ripped off of the
differential.
 The Panhard rod relocation bracket drops the
panhard rod by about 2" but with the rear lift at about 5.5" the
pan hard rod is still at a an angle. The main problem with this is
that it causes the rear axle to shift to the right as the rear
suspension drops. This causes the drive shaft to hit the gas tank
and reduces spring extension because the suspension binds as it is
pulled to the right by the panhard rod. The pan hard rod really
needs to be level when the truck is sitting on level ground.
The Panhard rod relocation bracket drops the
panhard rod by about 2" but with the rear lift at about 5.5" the
pan hard rod is still at a an angle. The main problem with this is
that it causes the rear axle to shift to the right as the rear
suspension drops. This causes the drive shaft to hit the gas tank
and reduces spring extension because the suspension binds as it is
pulled to the right by the panhard rod. The pan hard rod really
needs to be level when the truck is sitting on level ground.
 To solve these problems and set up the rear end
so that it would be safe to drive and get the full 20" of travel it
is capable of would require most of the suspension to be cut off
and replaced or relocated. This would be a very time consuming
process and would require lots of trial and error work.
To solve these problems and set up the rear end
so that it would be safe to drive and get the full 20" of travel it
is capable of would require most of the suspension to be cut off
and replaced or relocated. This would be a very time consuming
process and would require lots of trial and error work.
Springs and
Installation by:
All Pro Off Road
25171 North Palm
B3
Hemet, CA
92543
909-658-7077
Shocks:
Rancho
Suspension
P.O. Box 5429
Long Beach, CA
90805
213-630-0700
|
Off-Road.com Newsletter Join our Weekly Newsletter to get the latest off-road news, reviews, events, and alerts! |
 Your Privacy Choices