Project Tacoma: Long Travel Rear Suspension
""Trails Less Traveled""
 INTRODUCTION
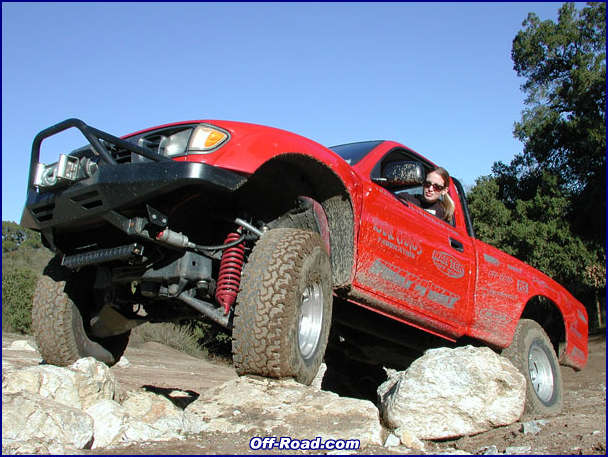
In comparison to the supple long travel Total Chaos front suspension, the shortcomings of the factory Tacoma rear suspension become painfully evident. Literally. The stiff overload springs are great for hauling loads, but severely limit the compression travel of an unloaded truck and greatly decrease the ride quality and performance off-road. On-road, our stock rear suspension has a tendency to skip and slide through corners instead of finding the traction we are looking for.
To keep up with the front suspension, we would need to clear 33" tires with minimal lift and maximum suspension travel (at least 14-18"); and it has to handle like a rally car on-road. If your experiences have led you to believe that these goals are in conflict with each other, please follow along through the first round of rear suspension modifications and check back each month as we continue to build-on and improve the performance of the TLT Tacoma.
Deaver is the premier manufacturer of custom and production leaf spring packs for performance off-road vehicles, and has developed a line of race-quality Tacoma leaf springs that cover almost any application. In every case, they can improve the performance of a vehicle on and off-road by increasing the amount and quality of the suspension travel.
With only 3 leafs in each spring pack and less than 10" of total vertical suspension travel, we didn't think twice about scrapping our 52" long stock leaf springs in favor of an 11 leaf, 62" long (61.5") set of Deavers that are capable of over 18" of useable travel. They are also tuned for the weight and specific ride height of Tacoma trucks; we ordered ours in the lower of two lift heights available (+0-1" & +2-3") because we wanted to keep the vehicle/weight as low as possible. To use as much compression travel as these springs allow, fiberglass bedsides are mandatory.
The new leaf springs mount under the axle, as opposed to the stock springs, which are mounted over the axle. Before anyone objects- there are advantages and drawbacks to each setup and in this application, installing the springs under the axle will provide more room on top of the housing for additional suspension travel on compression, a lower center of gravity and increased lateral stability, as well as reduced axle-wrap/wheel hop on acceleration. For all those people that would rather stay spring-over, Deaver has an excellent bolt-in spring pack that we plan to install and test on another truck in the near future.

| 
|
| Because of their additional length, the stock spring hangers will not work with this kit. We chose to use Total Chaos replacement spring hangers as well as a pair of their awesome new tubular shackles. longer/relocated shackles are required in order to cycle all of the available spring travel. The shackles are sold in lengths from 8-12" (in 1" increments) and include the bushings as well as the weld-on shackle hangers. Kartek sells all of these parts in a "box kit" that includes some other important small parts, such as an extended stainless braided brake hose and high quality axle spring pads with u-bolts/nuts. Kartek is also an excellent source for fabrication parts like the shock tabs pictured. | |

| The function of a leaf spring (or a coil, torsion, or any other type of spring) is to support the weight of the vehicle. The dampening at each wheel is provided by a shock absorber. The 2.5x16" Swayaway piggyback reservoir shocks we chose to use, are absolutely amazing. They are completely rebuildable and can be easily tuned to suit any application. Note the Swayaway 4" hydraulic/nitrogen charged bumpstops and mounting cans in the first picture. Our long-term suspension plans have always include these very effective, progressive-rate secondary dampeners and we plan to detail that installation next month. Stay tuned… |
BLUEPRINTING
This installation is involved and technical. Any performance gains are dependant on a well designed and professionally executed installation. Modifications this extensive must be considered custom, and are often best left to a qualified fabrication shop. We have included the blueprints used for our project vehicle for reference in hopes that it inspires some creative variations. The Tacoma body/chassis vary a great deal between standard cab, extra cab and double cab trucks. For instance: our early model, standard cab truck came with 52" leaf springs, while most later and extra cab trucks have 57" long leaf springs. Do NOT assume that the measurements discussed or published here will transfer to your vehicle exactly. Some math is required. Not to discourage anyone, but numbers are unavoidable. We used a simple CAD program to plot the fixed points of the chassis and then designed the suspension (leaf spring, shackle and shock mounts/angles) using our new suspension components.

| Because the main spring eye is being relocated forward and the spring is relocated under the axle, we needed to determine the ideal placement for the front spring hanger that would locate the axle and tires in the center of the wheel-well on compression travel. The front spring hanger-to-axle pad is a fixed distance, so the axle travels in an arc around that pivot point. Because the leaf spring flexes along it's entire length, pinion angle is set at ride height and does not change as predictably as a link-type suspension through the range of travel. |
The second fixed chassis point is the shackle hanger. The shackle's mounting point needs to take the shackle length into consideration. Determining shackle length should take into account the amount of swing, or linear travel, that is required of the shackle, the desired angle of the shackle at ride height, the plane the spring is mounted on, and lastly, the desired ride height. A simple rule to remember is that the distance between the main spring eye and the shackle hanger (measured in a straight line), plus the length of the shackle (measured eye-to-eye), must add up to a number greater than (but close to) the length of the leaf spring (measured eye-to-eye in a straight line, while the spring is flat).
For our application, using a 61.5" long leaf spring, a front spring hanger-to-shackle hanger distance of 55" (measured aligned), and a 10"long (eye-to-eye) shackle, mounted directly on top of the frame rail offers the best suspension travel and associated geometry. A 10" shackle has more than enough swing travel to allow the spring to cycle unrestricted from full extension through full compression, but is no longer than absolutely necessary. When mounted on top of the frame rail as specified, the shackle was designed to clear the bottom of the frame rail on compression by at least 1/2". Longer shackles will NOT provide any more suspension travel, they will only provide additional lift.
Determining ride height will also be important in planning the amount and percentage of compression (bump) and extension (droop) travel. We tuned for about 10"(60%) bump travel and 7"(40%) droop travel from the desired ride height. The springs and shackles can squeeze out over 18", but the leafs start to fan out (pull apart) on further extension, and it is not advisable to force a spring into more than a slight negative arch on compression
To take advantage of all the available rear suspension travel, a suitably long pair of shocks must be used. We ordered a set of 2.5x16" stroke Swayaway piggyback reservoir shocks after calculating that we could pull over 17" of travel out of them if they were angled forward slightly (10 on full extension & 25 on full compression). 18" shocks could have been mounted near-vertically, but we had plans for the bed-space that longer shocks and interfered with.
These shock mounts would protrude through a stock bed by 12-14", but can easily be made to work. We actually cut apart and remounted the stock bed just to see how it fit, but decided that we could create more useable space by removing the bed entirely and designing a purpose-built utility bed that we could reattach the fiberglass bedsides to. This article only addresses the fabrication related to the rear suspension, but next month we'll have a full write-up on the custom rollcage/utility bed we built that can haul two full sized dirt bikes and two mountain bikes plus up to a 35" spare tire, along with our gear, tools, etc.
FABRICATION SHOP

| With our plans finalized, we headed over to Rock Star Trux in San Jose, CA, where Mike Jimenez and his crew are turning out some of the cleanest fabrication work in Northern California. We removed the bed before delivering the truck because we didn't plan on doing the bodywork there, and we wouldn't be able to fit the stock bed back onto the frame after the shock hoops were installed. As soon as we showed up, the guys got right to work stripping down the chassis to the starting point. They removed the gas tank, brake lines, E-brake, rear axle, and taillight wiring harness. |
UPPER SHOCK MOUNTS

| 
|
| Chris Vierra is Rock Star's head fabricator, and he began work by laying down critical measurements in marker pen on the chassis. The forward crossmember of the shock hoop spans the two frame rails, and anchors the entire assembly. Here the framerail is marked, checked and drilled out to receive the 1.5"x.120DOM tubing. We used the 1.5" for the low-stress areas, and 1.75"x.120DOM for the all the load-bearing/structural, suspension and perimeter rollcage tubing. | |

| 
|
| The crossmember is shown here installed and then welded. It was also plugged and welded on the outside of the frame rail. | |

| The upper crossmember is shown on the left positioned with two temporary uprights. They will be removed as soon as permanent uprights are cut and fitted. |

| 
|
| The forward uprights are then cut, fit and tack-welded into place. After the positioning of everything is verified, the temporary uprights are removed to fit the rear uprights. | |

| 
|
| The rearward uprights are designed to intersect the crossmember through the frame rail. In the picture on the left you can see the angle marked and on the right you can see the tube being test fitted where the frame must be drilled. | |

| 
|
| Note how the hole-saw is use to pierce the frame rail cleanly and then the upright is refitted and tack welded into place. | |

| 
|
| After the completed assembly is double-checked against the blueprints, it is welded 360 . Chris laid down some great welds- Even upside down. | |

| 
|
| The upper shock mounts are shown here painted and with the shocks installed. They wrap around the back of the crossmember because there is not much material below the centerline of the tube and we didn't want it to shear off under load. | |
Continued on Next Page >
Contact Information: |
 Deaver Spring
714.542.3703
902 East 2nd Street
Santa Ana, CA 92701
![]() Swayaway
Swayaway
www.swayaway.com
818.700.9712
20724 Lassen St.
Chatsworth, CA91311
 Total Chaos
www.chaosfab.com
909.737.9682
159 North Maple St - Suite J
Corona, CA 92880
![]() Rock Star Trux
Rock Star Trux
www.rockstartrux.com
408.295.5055
573 Julian Street
San Jose, CA 95110
![]() Kartek
Kartek
www.kartek.com
909.737.7223
2871 Ragle Way
Corona, CA 92880
Talk about our Tacoma Project in the
Tacoma BBS
Send us
Emailabout Project Tacoma
|
Off-Road.com Newsletter Join our Weekly Newsletter to get the latest off-road news, reviews, events, and alerts! |
 Your Privacy Choices