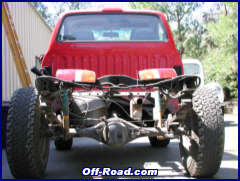
We are installing a Total Chaos long travel suspension system on our 4wd Tacoma and the kit is 3.5" wider per side and the new front suspension system increases suspension travel from less than 7" to almost double that, at 13" of measured vertical wheel travel. In order to get the benefits of a long travel front suspension kit on an IFS truck, flared fiberglass fenders are a necessity, aside from any of the other "It looks killer Bro…" type of reasons people want to install fiberglass.
In the conversations we had with many people while researching companies and fiberglass products, trying to find the best-made body panels for our Project Tacoma, the name Glassworks Unlimited out of Huntington Beach, CA kept coming up. We can confirm that they're turning out some of the best fitting, well-finished, and most durable fiberglass replacement body panels currently available. On top of that, the styles fit and complement the bodylines of the trucks they are designed for.
FRONT FENDER INSTALLATION
The front fenders we installed have 4.5" of flare, and the wheel opening is cut 3" higher than stock. Glassworks also offers a less aggressive, 3.5" flared model for stock-width trucks that just want to cover larger tires. The front glass a bolt-on replacement for the stock sheet metal, only requiring a few mounting holes to be drilled in the new fenders. The installation can be completed in about 2-3 hours with basic tools and no additional parts or hardware are required. The installation is so straightforward that we'll fly through it here without having to show you how to turn the wrenches.
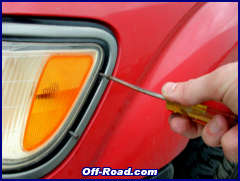
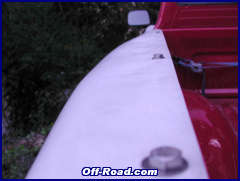
| Start on one side by removing the removing the corner light. There are two screws on the side of the housing, as shown in the photo, and one on the top, inside the hood line. Pull out the light, disconnect the wiring, then remove and set aside the corner light. |
Remove the plastic inner fender liners by unscrewing the assorted sheet metal screws that holds it in place and pull out the plastic snap-in retainers with pliers or by hand. A couple of good pulls will actually take the whole thing out pretty easily, and those clips do not need to be reused. Discard the inner fender liner.
| The front bumper must be removed in order to access two of the bolts that secure the fender to the body. First, disconnect the turn signals in the bumper from the wiring harness from behind the bumper. Then there are only two bolts on each frame rail that the bumper is mounted to, and then there are also two bolts (one on each side) that hold the outer edges of the bumper to the body. Set aside the front bumper to be reinstalled later. Finally, remove the two bolts securing the front of the fender to the body, after they have been exposed. |
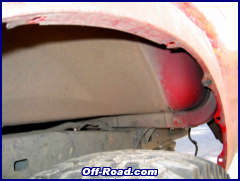
| To get access to the single front fender bolt, remove the painted lower front grill detail under the headlight by pulling gently on it from the outside edges. Remove the now exposed bolt and then remove the three bolts along the top of the fender, inside the hood line. Next, open the door to get access to a bolt located within the door jam, close to the upper hinge. Finish by removing the two bolts at the bottom of the fender, at the rear of the wheel well opening. On the passenger side, the antenna mount must also be removed using a spanner wrench. Remove the fender and set aside. |
| | |
| Test fit the Glassworks fender, marking where the three holes need to be drilled in the fender along the hood line. Make sure to check the fender - hood gap as well as the fender - door gap. Remove the fender again and drill small pilot holes where marked. Re-fit the fender to verify that they are placed correctly and then drill out the holes to 5/16". |
| | |
| Reinstall the stock hardware to firmly secure the fender and then move on to marking and drilling the other holes in the same fashion. Reinstall the stock hardware. Note that some of the holes may need to be drilled slightly oversized or slotted to allow for the fender to be shifted and positioned while installing. This is typical. Reinstall the front grill detail and the corner light. Finally, reinstall the front bumper. |
| | |
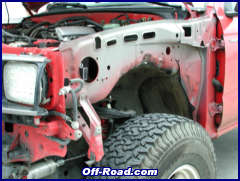
| The completed installation shows how well the fenders fit and look. They leave more than enough room for our upcoming suspension installation and judging by the quality of construction, they should hold up to anticipated use. |
BEDSIDE INSTALLATION
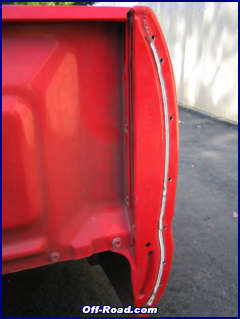
In the rear, the steel bedsides do not even have adequate clearance for stock width axles with tires larger than 31", making it impossible to use the extra compression travel that aftermarket leaf springs and long travel shocks can provide. In order to use all of the 18" of suspension travel that our new rear suspension will cycle, we had to first make room for the tires. The Glassworks bedsides we installed feature a 4" flare and also have a 3" higher cut wheel well opening to match the front.
Installing fiberglass bedsides is much more involved than the front fender installation. Expect the complete installation to take the better part of an eight hour day, because the bed must be removed from the truck and pulling off the stock sheet metal is fairly time consuming. This is mainly due to the fact that the bedsides are spot-welded onto the bed instead of being bolted on like the front fenders. Installing new bedsides should be considered a semi-permanent modification because the stock sheet metal cannot be easily reattached after it has been cut from the truck. The improved suspension performance that the bedsides complement was enough to convince us it was worth it.
| Start by removing the inner plastic splashguard, similarly to how the front was removed, unscrewing sheet metal screws and pulling out the snap-in fasteners. Discard the fasteners and plastic splashguards. At the same time, remove the bolt that attaches the bedside to the support bracket at the front of the wheel well, leaving the support bracket attached to the inner bed. |
Remove the taillight via the four Philips head screws, disconnect the wiring at the light and remove the taillight assembly. Feed the electrical wires down through the taillight holes and remove the plastic fasteners from the bed so that the wiring harness is not attached to the bed of the truck at any point. Disconnect the electrical connections to the license plate lights.
Remove the tailgate and the tailgate hardware from the bed. The tailgate can be reused with the new bedsides if desired. Either way, the hardware can be reused to fasten the tailgate edge of the new fenders. Don't forget to open the gas filler door and remove the gas cap just as if you were going to fill the tank. The gas filler is not actually bolted to the bed, so no further disassembly is required.
Remove the four bolts and two nuts that secure the bed to the frame rails and then transfer the bed off of the truck onto a stable, elevated work surface. The bed is easily light enough for two grown men to handle. Take care to lift it free of things like the gas filler. The beside can be placed on anything like blocks of wood or used tires, etc. to create a work surface that will not require the low-hanging wheel openings of the sheet metal to support the weight of the bed.
| From this point you are committed to completing the project. Make sure that you can finish in the same day it's started if you need to drive anywhere (to pick up parts, etc.) because this is what it will look like until it's done. We did the installation over two half-days in a weekend, and made one trip to the hardware store to purchase eight 5/16" x 1" stainless bolts and lock nuts, sixteen 5/16" stainless washers, two 1/4" x 1" stainless bolts with locknuts and four 1/4" stainless washers. |
| Each spot-weld must be drilled out along the edges where the bedside is fastened to the body, and there are a plenty of them. Spot-weld specific drill bits are made, but we just used a center punch and hammer to mark all of the places that needed drilling and then used a small bit to create a pilot hole. We started at the front edge of the bed and drilled out all of the spot-welds in that area and removed the body-sealing glue from the seam with a putty knife. We came back through and drilled the holes out to 1/4", and the majority of the spot-welds broke loose without any further prying required. |
| Working our way rearward, we drilled out all of the spot-welds in the bed rail in the same fashion. They are spaced at even intervals, but vary in the height at which they are placed on the inside of the rail. They are easy enough to locate because they create a dimple in the painted surface. |
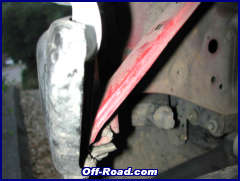
| There is a supporting bracket that braces the stock outer bedside at the top of the wheel well opening and there are three spot-welds that need to be removed. They are easiest to drill from inside the bed, in the positions shown in the photo. On the driver's side pictured there is also a bracket that supports the gas filler that we chose to remove at the same time because we plan on changing the location of the filler. The two extra holes from that bracket are visible. |
| | |
| There are two spot-welds inside the taillight housing that are easy to miss. Remove these and all of the spot-welds along the tailgate edge. The bed must be stood on it's front end or turned upside down in order to access the bottom three spot-welds at the rear of the bed, below the taillight. |
| Separate the bedside skin from the inner bed sheetmetal, prying and persuading it with a stiff putty knife and/or a flat blade screwdriver and hammer as required. At this point you will find any spot-welds that were missed or other places the bed is still fastened. Again, start at the front of the bed and work through the bed rail to the rear tailgate edge. |
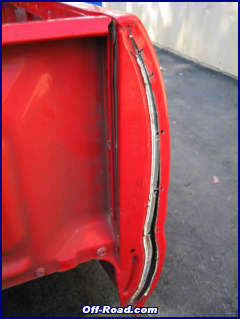
| After removing the bedside completely, work on removing the long vertical piece of sheet metal with a lip on it, at the tailgate edge. This is the piece that all of the tailgate hardware goes through, so make sure to only remove the outer piece and leave the inner metal, nuts, etc. attached to the bed. |
| | |
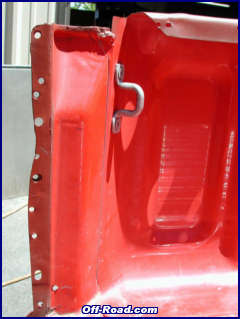
| Trim the upper rear corner as shown in the image on the left and remove the lower rear brace by drilling out the spot-welds as shown in the image on the right. |
| Test-fit the bedside and note the areas along the tailgate edge that will need to be trimmed. Remove the bedside and grind down the areas of the tailgate edge as needed until the bedside fits without interference. |
| | |
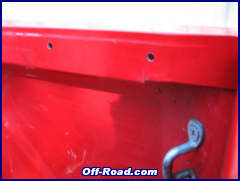
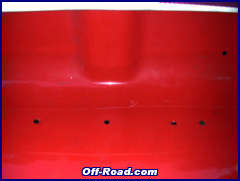
| There are three holes in the bed rail that are raised and provide a level surface to mount the fender. These holes are marked and shown in the next two images. There is also one existing hole in the front edge of the inner bedside. With the fiberglass installed transfer these marks with a pen or paint to the fiberglass. |
| | |
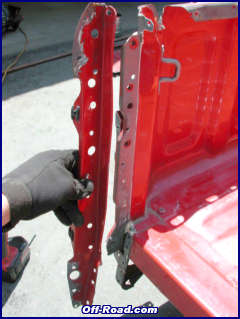
| Remove the bedside one last time and drill the mounting holes where the pen/paint marks were made using the inner bedside as a template. In both images you can see the pen marks where mounting holes will be drilled. Drill the pilot holes from the inside - out where the marks indicate. Then drill the 5/16" holes from the outside - in so in order to avoid cracking the gel-coat. Note the quality of the mold and smooth pattern of the matte that is laid visible on the inside of this bedside. |
Primer/paint the drilled holes and cut edges of the inner sheet metal and body before permanently mounting the bedside. Cut sheet metal and drilled holes are quick to rust without protection from the elements. We used a red oxide primer because it's durable and will not be visible on the completed vehicle.
| Install the bedsides for the last time (hopefully) and with the bedside in place, start fastening the hardware at the bed rail. Install the nut/bolt/washer assembly at mounting point on the front edge of the bed, and then move on to the tailgate hardware. |

| Stock tailgate hardware can be used to secure the rear of the glass. Start by drilling pilot holes through the fiberglass from inside the taillight housing, using the existing hardware holes as reference. Drill out the holes to the required sizes from the tailgate side - in, using the appropriate drill bits and being careful not to drill farther than through the fiberglass because it is easy to damage the threads on the nuts. On each side there is one tailgate hinge bolt, one support cable bolt, and two bolts that fasten the latching mechanism. |
Drill one 1/4" hole through the stock rivet hole in lower rear support bracket, just below the taillight. Install 1/4" hardware. Also drill the fiberglass bedside support flange at the front of wheel well opening and mount to stock support bracket reusing the stock bolt.
Reinstall the bed on truck, taking care not to damage the gas filler lines or pinch the wiring harness between the bed and frame. Secure the six nuts and bolts after centering the bed on the frame mounts. Reconnect the wiring harness and reinstall the taillights, drilling pilot holes for the self-tapping screws to thread into, using the taillight assembly as a template.
| We'll have to get back to you regarding what we decide to do with the fuel filler. Glassworks does have a bolt-on solution that we would be happy to use, except that we might end up changing the location of the fuel tank. Their product uses a universal mount and a billet aluminum boat/aircraft style filler that looks pretty slick. Our hands will get a little dirty filling up at gas stations, with the cap staying tucked inside the fiberglass skin for now. |
| | |
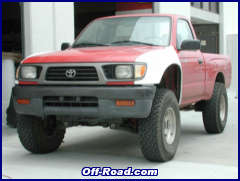
| The completed installation shows how well the bedsides fit and cover the 33" x 10.5" tires. The rear bedsides look like they will cover any 33-35" tires up to 12.5" wide on 8" rims with no less than 3.5" backspacing. The completed truck is looking pretty patchwork at the moment, but the lines are good and a paint job is coming soon. Until you do paint glass, acetone is great to clean greasy handprints off of the gel-coat. |
Glassworks Unlimited
5382 Oceanus Drive, Unit A
Huntington Beach, CA 92649
Telephone: 866.817.7828
www.glassworksunlimited.com
gwork@prodigy.net
Kartek Off-Road
909.737.7223
www.kartek.com
offroad@kartek.com
2871 Ragle Way
Talk about our Tacoma Project in the
Tacoma BBS
Send us
Email about Project Tacoma


 Your Privacy Choices