Project Chevy Tahoe: 1998 Chevy Tahoe gets new Rough Country Suspension
Lift It!
 Lift It!
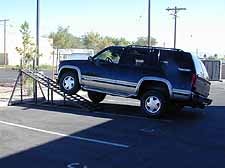
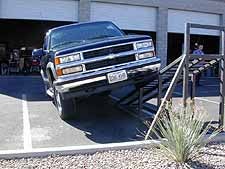
"IFS CHEVY KIT - $595.00 - 88-98 2-3" LUG FULL SIZE 4X4: This highly acclaimed complete suspension system is an installer's dream. Very minor modifications are required to install. A fabulous kit for the money! All inclusive package includes: Front torsion bars, A-arms, New brake lines, Powder-coated cross braces and hardware, Luxury-Ride long leaf rear springs and shocks. Run 33" tires on stock rims. Try one and experience Rough Country's smooth controlled ride."There's the marketing spin - let's check out the reality. This kit is intended to provide only minor lift, only 2 1/2 to 3 inches, but that is enough to go up a couple inches from stock while avoiding major modifications. Other kits designed for independent front suspension are MUCH more complicated and MUCH more expensive. With Project Kickin' It targeted at the weekend do-it-yourself mechanic, we wanted to examine a relatively new market for us, away from "How High Can You Go," "How Radical Can You Get." Let's get real. Some of us have to drive our 4x4 on weekdays too, and would like to park it in a garage without a 13' door. Many of you have installed a lift kit already, so we'll take a look at the kit itself - what you get, how good the instructions are, what kind of support we found from Rough Country. We took Project Kickin' It back to our buddies at The Kool Guys Shop, and began a long, interesting week. First we ramped the stock Tahoe, just for kicks. Not much to write home about - climbed the ramp a whopping 55 inches, putting a score up of 470. Pretty laughable for rock-crawling, but it will work just fine for towing or running around town. Just curious.
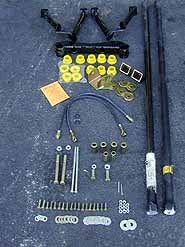
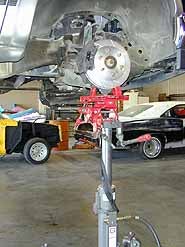
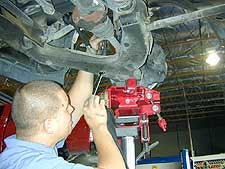
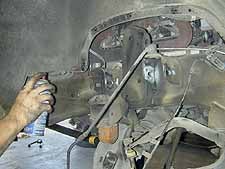
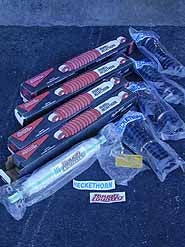
Then it was up on the lift, and take a worm's eye look. If you are installing a lift at home in your driveway, by the end of the project you have the poor truck on jackstands and high-lift jacks galore - we all wish we had a hoist at home! Pretty cool to walk around under rig, and look eye-level with your work. Let's open up the boxes, and see what ya get:
First Step - we were already running into problems. It simply says to remove the anti-sway bar connecting links. Doesn't mention that in the 1998 Tahoe, or ours at least, the hole up from the bottom of the lower A-arm is NOT lined up with the bolt to disconnect the sway bar. Curse, smash knuckle, try three different wrench/socket configurations.
Step 2 - Disconnect the brake lines - Suggest you DON'T yet. You don't need to do anything with them at this point, and they'll just leak brake fluid for the next 3 days while you work.
 Step 3 - Removing ball joint
from upper A-arm - all went as instructed. No
sweat.
Step 3 - Removing ball joint
from upper A-arm - all went as instructed. No
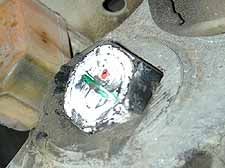
sweat.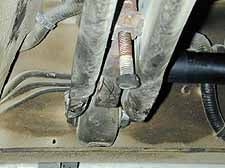 Step 4 - When you remove the torsion bar adjusting
bolts from the crossmember in the center of the truck, note how far
in they had initally been. It's pretty obvious when you look
at the rust line. You'll want to re-install them later to
this approximate depth. Step 5 - Installing New Torsion Bars
- Instructions say simply "If you are installing new torsion bars,
please do so at this time, following the installation instructions
contained in the kit very carefully." Yes, since new
heavy-duty torsion bars were included in the kit, we would
absolutely be installing them. After chasing one new
bar down (UPS lost one of the pair - they were shipped with a label
directly on the bars, not boxed), we then looked around for the
instructions. Nothing. No moving parts - how
hard could it be?! But wait - is there a trick? Do you
push the bar all the way out the front, destroying the rubber
skirting below the front bumper, or part of the way forward and
then torque it down and go out backwards? We lost over an
hour banging the torsion bar both directions, and it did NOT fit
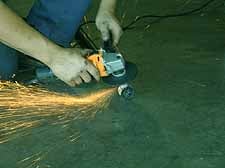
either way. Solution? Grind the head of the stock bars
slighly to remove any burrs and then bang those babies all the way
back from the front, heck with the plastic air dam that is going
away (later) anyway. Then we ground the head slightly of the
new bar so we could put it in the same way.
Step 4 - When you remove the torsion bar adjusting
bolts from the crossmember in the center of the truck, note how far
in they had initally been. It's pretty obvious when you look
at the rust line. You'll want to re-install them later to
this approximate depth. Step 5 - Installing New Torsion Bars
- Instructions say simply "If you are installing new torsion bars,
please do so at this time, following the installation instructions
contained in the kit very carefully." Yes, since new
heavy-duty torsion bars were included in the kit, we would
absolutely be installing them. After chasing one new
bar down (UPS lost one of the pair - they were shipped with a label
directly on the bars, not boxed), we then looked around for the
instructions. Nothing. No moving parts - how
hard could it be?! But wait - is there a trick? Do you
push the bar all the way out the front, destroying the rubber
skirting below the front bumper, or part of the way forward and
then torque it down and go out backwards? We lost over an
hour banging the torsion bar both directions, and it did NOT fit
either way. Solution? Grind the head of the stock bars
slighly to remove any burrs and then bang those babies all the way
back from the front, heck with the plastic air dam that is going
away (later) anyway. Then we ground the head slightly of the
new bar so we could put it in the same way.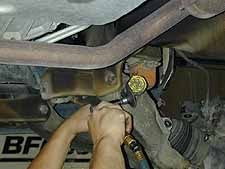
 *Here was our
first phone call to the company - laying side by side, the new
torsion bar was several inches longer than stock. We called
Rough Country in Dyersburg Tennessee for advice.
They told us that using the new torsion bars were optional for
as minor of a lift as we were doing, but if we did use
the new ones, they would fit. We were concerned that the end
of the bar that is pentagon-shaped would extend beyond
the similarly shaped slot in the frame, and eventually
strip. They assured us that was how everyone else was running
it! Once in place we were satisfied that a good portion
of the end remained in the collar, though not all as the stock bar
did. We'll be ocassionally checking on this fit to make
sure nothing gets stripped or damaged. Step 6 - Remove Upper
Control Arms - No sweat Step 7 - Removing the ball joint housing
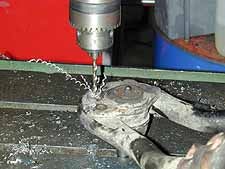
from the old control arms - pain in the butt number two!
To remove the rivets, the directions say to use center punch, 1/8"
drill bit, and finally 1/2 drill bit. There is no other
easier way to do this - we suggest spending $35 - $40 to
buy new ones and save the hour of frustration.
*Here was our
first phone call to the company - laying side by side, the new
torsion bar was several inches longer than stock. We called
Rough Country in Dyersburg Tennessee for advice.
They told us that using the new torsion bars were optional for
as minor of a lift as we were doing, but if we did use
the new ones, they would fit. We were concerned that the end
of the bar that is pentagon-shaped would extend beyond
the similarly shaped slot in the frame, and eventually
strip. They assured us that was how everyone else was running
it! Once in place we were satisfied that a good portion
of the end remained in the collar, though not all as the stock bar
did. We'll be ocassionally checking on this fit to make
sure nothing gets stripped or damaged. Step 6 - Remove Upper
Control Arms - No sweat Step 7 - Removing the ball joint housing
from the old control arms - pain in the butt number two!
To remove the rivets, the directions say to use center punch, 1/8"
drill bit, and finally 1/2 drill bit. There is no other
easier way to do this - we suggest spending $35 - $40 to
buy new ones and save the hour of frustration. 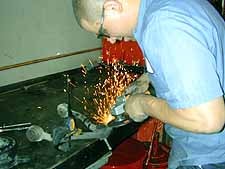
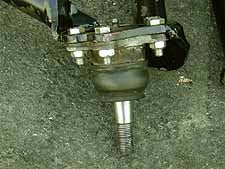
 Step 8 - Attach the ball joints to new control arms
- directions do not say or show whether to attach them to the
bottom or dropped down through the hole through the top. It
fits either way, so which is correct? Stock has it bolted on
the bottom, but we thought we'd get an extra inch tire stuff if we
went from the top. Turns out we hit the bump-stop, so we
should have bolted to the bottom.
Step 8 - Attach the ball joints to new control arms
- directions do not say or show whether to attach them to the
bottom or dropped down through the hole through the top. It
fits either way, so which is correct? Stock has it bolted on
the bottom, but we thought we'd get an extra inch tire stuff if we
went from the top. Turns out we hit the bump-stop, so we
should have bolted to the bottom. 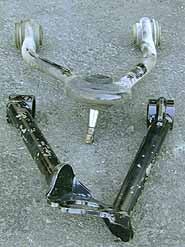
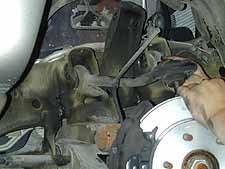
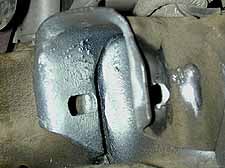
 Note the radical shape difference in the old versus the new
upper A-arms. Note also the shabby condition of the
paint on the new A-arms! We would certainly have preferred
they be powder coated as other kit parts were. Since these
A-arms do show, this cheapens the overall look when installed. Step
9 - Install Urethane bushings - key here - LOTS of lube! Use
a good quality white lithium grease. Ever heard a otherwise
really-cool Jeep creaking down the trail? Look underneath -
chances are it has various urethane bushings, and they were either
installed without the correct grease or enough of it. Also, the kit
is glaringly lacking a Parts List. Since it comes with two
different sized sets of bushings and sleeves, it would be nice to
know which to use BEFORE you press the wrong ones in. It
doesn't help that the set of sleeves you are instructed to use
says 1 7/8" when the actual measurement is 2 1/2". I guess
it's because I'm female that I didn't get this, or maybe it's a
two-by-four kind of thing...
Note the radical shape difference in the old versus the new
upper A-arms. Note also the shabby condition of the
paint on the new A-arms! We would certainly have preferred
they be powder coated as other kit parts were. Since these
A-arms do show, this cheapens the overall look when installed. Step
9 - Install Urethane bushings - key here - LOTS of lube! Use
a good quality white lithium grease. Ever heard a otherwise
really-cool Jeep creaking down the trail? Look underneath -
chances are it has various urethane bushings, and they were either
installed without the correct grease or enough of it. Also, the kit
is glaringly lacking a Parts List. Since it comes with two
different sized sets of bushings and sleeves, it would be nice to
know which to use BEFORE you press the wrong ones in. It
doesn't help that the set of sleeves you are instructed to use
says 1 7/8" when the actual measurement is 2 1/2". I guess
it's because I'm female that I didn't get this, or maybe it's a
two-by-four kind of thing... 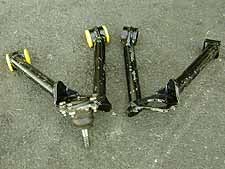 Here's what the arm looks like with the bushings
pressed in and the all joint attached.
Here's what the arm looks like with the bushings
pressed in and the all joint attached.Step 10 - Install the arms onto the truck - guess what?! Washers don't fit in the space between the mounts and new urethane bushings, and it doesn't help that there is no diagram, only one totally-black photo (did I mention the instructions that come with the kit are a photo copy of a photo copy? Toss those babies into the pile of "didn't fit/didn't use" parts. Again, use the white lithium grease liberally in the mounts.
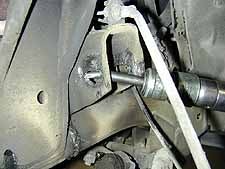
Also, there is no mention in the instructions of the essentrix holes. (I have no idea of the spelling there - look for a couple keyhole-shaped holes.) You will need to hit the factory-intalled plugs out before re-installing the control arms or you can't do the alignment later. Ours were totally stuck, and we had to grind the hole back to correct shape. There is a special removal tool which an alignment shop should have.
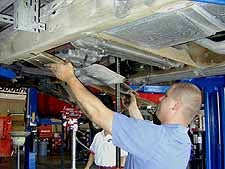 Step 11- Remove Skid Plate and bolts to diff
carrier (time for another floor jack!) - no sweat.
Step 11- Remove Skid Plate and bolts to diff
carrier (time for another floor jack!) - no sweat.Step 12 - Remove Axle Tube Crossmember - done easily Step 13 - Grind off Mounting tab on driver's side. Directions pretty clear here. Good thing, because the photo is pretty unusable. Step 14 - Install new axle tube cross member. Key here is you will need to put a high-lift jack under the wheels to take tension off the A-arms and compress the shocks. Or if you are out of high lifts, put the wheels back on and lower the truck for this step. The binding on CV proibits this going back together, and we had the whole joint come apart before we discovered it needed lifting back up. More wasted time, cursing, get additional staff to offer suggestions. *If we had been doing a driveway job, this would have been where tools were thrown down and a case of beer pulled out.
We did also have to grind one hole slightly to get bolt to go through.
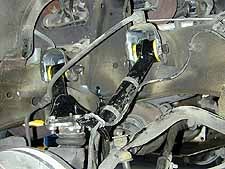
Step 15 - Install upper diff lowering tubes - these were amazing pieces. Looked cool in the engineering, however, no CLUE as to how they should have been placed. They did not fit up or down, right or left. Only way we could get a flat-fit on these was to use quite a few washers, including some additional ones that were not included in the kit. Step 16 - Install driver's side lowering bracket - all fine Step 17 - Align mounting bushings in front diff housing, tighten all nuts and bolts. Fine. Step 18 - Brake Line Swap - pretty straight forward. Good thing it hasn't been dripping brake fluid this whole time! We didn't like that the factory brake line was partially steel tubing which allowed it to be routed very accurately, and the kit only provided rubber lines. But we did need the extra couple of inches the longer lines allowed, so we used them. Positioning and zip ties are key. Make sure you move the tire all the way back and forth so the new lines aren't pinched anywhere. Step 19 - (Day 3 of our promissed 5-hour install) - Install front skid plate lowering brackets - these are noted as optional. We didn't use them, because it left a 4" gap between the skid plate and the front diff, and that just seem like trouble waiting to happen, or at least junk waiting to be scooped up. Then reinstall the skid plate. Step 20 - Can we really be almost done?! Shorten the anti-sway bar connecting link sleeves - well, the measurement you are supposed to shorten them by was off by over 1/2", and the 8 1/4" bolts did not have enough threads, so we had to go get others that would work. Step 21 - THIS IS IT! With one quick sentence, you are instructed to tighten all your bolts and reinstall the shock absorbers, wheels & tires, test the brakes and you are ready for your alignment. Luckily, there are additional instructions shipped with the shocks, and they appear to be written with the reader in mind, so that went well.
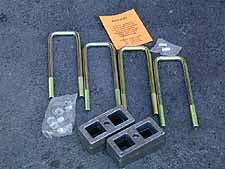
 Step 21 1/2? There is absolutely no mention
anywhere in the instructions of how to do the rear end - the kit
comes with longer U-bolts and blocks, and luckily the
lack of instructions wasn't a project-stopper. (If you can't
figure this part out, you really shouldn't be under a large
mechanical object anyway.) However, true to form, there
were more small issues on this end of the kit as well -
the hole in the block was slightly too small for the stock pin from
the top; the bottom pin from Rough Country was too short, so it
dropped all the way through the hole and out the bottom. On
other manufacturers' kits, it is actually part of the
block. We cemented it in and that seemed to work fine.
The U-bolts were barely long enough as well - especially on the
front end where the wedge of the block was thickest. The
nylon of the lock nut barely grabbed the threads on those bolts.
Step 21 1/2? There is absolutely no mention
anywhere in the instructions of how to do the rear end - the kit
comes with longer U-bolts and blocks, and luckily the
lack of instructions wasn't a project-stopper. (If you can't
figure this part out, you really shouldn't be under a large
mechanical object anyway.) However, true to form, there
were more small issues on this end of the kit as well -
the hole in the block was slightly too small for the stock pin from
the top; the bottom pin from Rough Country was too short, so it
dropped all the way through the hole and out the bottom. On
other manufacturers' kits, it is actually part of the
block. We cemented it in and that seemed to work fine.
The U-bolts were barely long enough as well - especially on the
front end where the wedge of the block was thickest. The
nylon of the lock nut barely grabbed the threads on those bolts.
 Rough Country also offers optional complete rear
springs for about $200. This would probably give you
less axle wrap than the blocks do, and they would be a wise upgrade
if you plan on carrying or towing a lot of
weight.
Rough Country also offers optional complete rear
springs for about $200. This would probably give you
less axle wrap than the blocks do, and they would be a wise upgrade
if you plan on carrying or towing a lot of
weight. Summary: Instructions - If I was home alone in my driveway doing this for the first time, I'd be screwed. They did tell us they are totally re-designing instructions for all their product lines, WITH new photos and diagrams. They were to be expressing a copy of these new instructions which would probably have arrived too late for the install, but we would at least have them for the writing of this article. Sound like we received it?
Grade - D Engineering of Components - Our experts at Kool Guys give it an "A" for simplicity and ingenuity. WIth the many lifts Tony had installed for customers or on his own personal rigs, he noted several re-designed parts that got his stamp of "Kool", and any step that was illogical or difficult, he worked out a better way before doing the other side of the rig. Grade - B Performance - As Tahoe's daily driver, my first impression was that it stiffened it up a little, and while the husband didn't notice it was stiffer, he did comment he liked how it rode much better. We'll be watching how the components hold up and wear as we give it some mild off-road use in the coming months. Grade - A Value for the Buck - Afterall, you can have some experienced buddies come over with lots of spare hardware, high lift jacks and patience (beer). There just aren't any other name-brand kits on the market to lift your truck in less than 2 days for under $600. Overall Grade - B We have intentionally not posted an "After" photo here - next month we'll be putting on new Alcoa Classic 15x8 wheels and 33"x 12.50" BFG's, THEN we'll get a real idea for how the lift looks and performs. Final result was we did go up 2 1/2" all the way around without the hassles of a body lift, and it gained a full inch on the RTI ramp. Whoopie! When we put on the new tires, we'll disconnect the sway arms and ramp it again. Once again, many thanks to my heros at:

3240 North Rancho RD.
Las Vegas, NV 89130 702-655-5545 |
|
Off-Road.com Newsletter Join our Weekly Newsletter to get the latest off-road news, reviews, events, and alerts! |
Follow @Off-Road
 Your Privacy Choices