!DOCTYPE html PUBLIC "-//W3C//DTD HTML 4.01 Transitional//EN">
October 2001 --
As
of the last article, the only task left to complete the swap was
the wiring. From the start, this was the part that I had feared the
most. While I can usually figure out most mechanical things, wiring
has always given me trouble. Enough so that at many times during
the swap I had contemplated letting an electrical shop complete the
wiring. But, when I got to that point, I figured that I had gotten
this far and I may as well try to finish it all myself. The first
step was to order the electrical wiring books from Toyota for both
the 4-Runner and Supra. The factory service manuals come with
wiring diagrams, but these books go way beyond that. They separate
out every circuit into individual sections, and show the location
and position of every single connector and wire in the vehicle. It
was invaluable to be able to trace any wire and positively identify
each wire from its position in a harness or connector, especially
when there could be more than one wire of the same color.
Way back when I had removed the engine harness
from the Supra, I left it as intact as possible. It is far easier
to cut out any unneeded wires than to try to reconnect anything
that was removed. I ended up with the complete engine harness
connected to the ECU, and 19 wires that ran either from the ECU to
somewhere other than the engine harness, or from the engine harness
to somewhere other than the ECU. In addition to those 19 wires,
there were also 5 wires that ran from the engine harness to
Junction Box #2, the main engine fuse box. In order to keep
everything as intact as possible, I removed the J/B#2 along with
the engine harness.
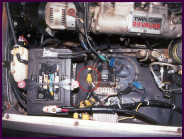 |
|
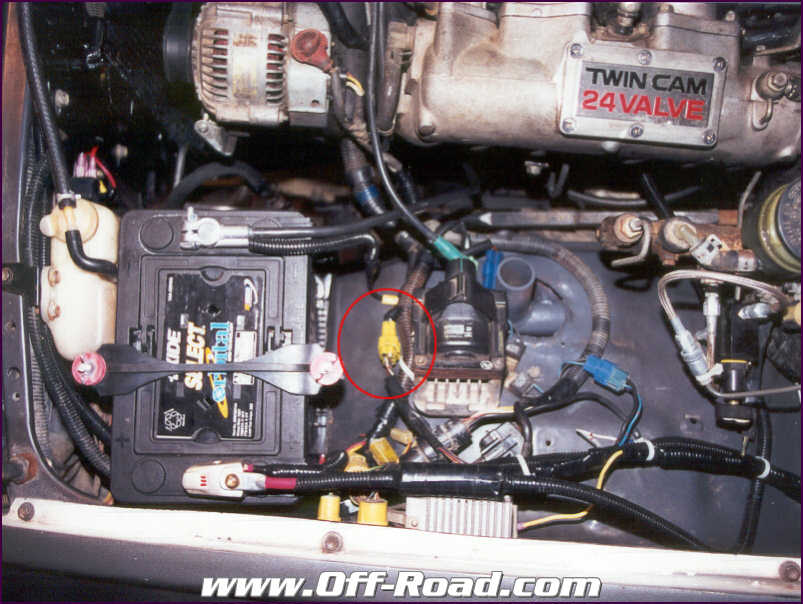
Circle is location of Junction
Box #2 connector where the +B/+B1, BATT, and white ground wires are
located |
Removing the 22-RE harness was a very similar
process- I removed the engine harness and any wire that went from
the engine harness to the ECU. Any wire that went from the engine
harness to anyplace other than the ECU was kept, as was any wire
that went from anyplace other than the engine harness to the ECU.
Effectively, what I was getting rid of was any connections between
the ECU and the engine harness, as they would be duplicated in the
Supra's harness. Any other wire was kept until I figured out what
it was. After removing all unnecessary wires, I started comparing
all the wires I had left to the wiring diagrams, and mapping
everything out. In order for the engine to run, there are actually
very few connections that need to be made. The following is a list
of the connections that need to be made- the color-codes are those
used by Toyota. This list along with the wiring manuals should make
the wiring a snap.
ECU
1) +B and +B1 (B-R) of Supra ECU to the
wires running to the +B and +B1 terminals (B) of the truck ECU. The
B-R Supra wires were accessed at the J/B#2 connector (see below),
and the truck B wires were accessed at the connector for the truck
ECU.
2) BATT (B-Y) of Supra ECU to
BATT (W-L) of truck ECU. The wire locations were same as
above.
3) IGN (B-O) of Supra ECU to
wire from truck IGN fuse (B-Y). The B-O Supra wire was located at
the ECU, and I accessed the B-Y truck wire from the unused rear
heater relay.
I mounted the ECU in the
stock location- it is slightly larger than the truck ECU so the
kick panel does not fit back on, and I plan on constructing a new
panel to protect the ECU when I get a chance.
STARTER
B-L wire in Supra
harness to B wire from truck starter relay. Both wires can be
accessed where the wiring harnesses enter the right
kickpanel.
IGNITION COIL
B-O wire in Supra harness to B-R wire from truck
IGN switch. I used the B-R wired that originally connected to the
truck coil and connected it to the B-O Supra wire at the coil
location.
ALTERNATOR
I ended up using only the truck's alternator
wiring- it has the same connector as the Supra alternator. That way
the charging circuit remained intact and separate from the Supra's
harness. I just needed to run an 8 gauge wire from the truck's
junction box to the (+) battery terminal.
FUEL PUMP
I temporarily
connected the fuel pump to a wire that has power with the IGN
switch on. Ideally, it should be run through a dual relay setup
that would cut power to the pump when the engine is not running, in
case of an accident. I plan on doing this in the very near
future.
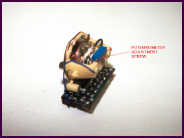 |
|
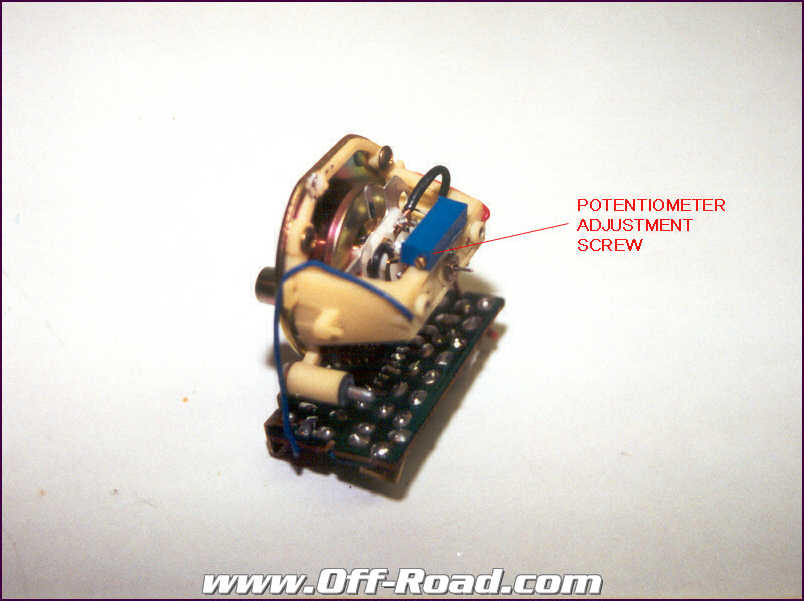
Tach unit showing mounting
location of potentiometer used to calibrate tach for the 6
cyl. |
JUNCTION BOX
As I
mentioned above, there were 5 wires that ran from the engine
harness to the J/B#2. They are as follows:
- W-B ground wire from check connector- ground on fender
- B-Y- BATT from ECU (see ECU above)
- B-O- M-REL terminal of ECU- not used
- B-R- +B/+B1 from ECU (see ECU above)
- W- power to the theft deterrent horn- not used
Other than those 3 wires needed (W-B, B-Y, and B-R) the rest
of the wiring and the junction box can be removed from that end of
the harness.
GUAGES
Tachometer- the tach is connected to the igniter
by a black wire that can be accessed from the engine harness. The
only problem is that the original engine was a 4 cyl, so the
tachometer will not read the correct RPMs for the I6. I could have
added an aftermarket tach, but I wanted to keep the gauges stock
and there really isn't any good location to mount another tach. I
knew that 4-Runners also came with a 6 cyl, so I figured there was
a way to adjust the tach. Luckily, others who have completed the
Chevy 4.3L swap also ran into a similar problem, and have come up
with a solution. By adding an adjustable area of resistance (using
a potentiometer) between the two tach leads, you can calibrate the
tach using a handheld tach. Potentiometers can be picked up for a
couple of bucks at any electronics store, and it is simply a matter
of soldering their leads to the tach leads. By hooking up a
handheld tach to the ignition terminal, and adjusting the
potentiometer until the two tachs match up at key RPM points (500,
1000, 2500, etc.), you get to keep the stock tach. It is way
cheaper than an aftermarket unit, and looks a lot better
also.
Oil Pressure gauge- both the Supra
and truck wires are Y-B, so it was simply a matter of connecting
the two where they exited the wiring harness.
Water Temp gauge- same as above, both wires were Y-G
4WD Indicator- as the Supra obviously didn't come
with 4WD, I kept the truck connection intact when I removed the
harness.
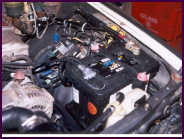 |
|
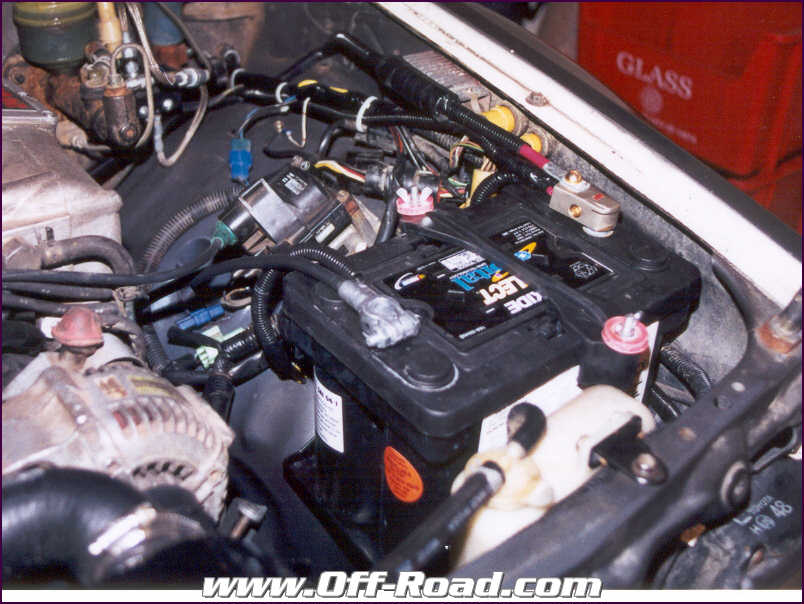
The new location of
battery. |
BACKUP LIGHTS
For
some reason I don't understand, the backup light switch for both
engines is in the engine harness. So, I just needed to connect the
two wires running from the IGN fuse to the switch (R-L on the
truck, Y for the Supra), and the 2 wires running from the switch to
the reverse lights (R on the truck and R-B for the Supra).
BATTERY
I mounted
the battery where the 4-Runner's airbox had been- the same location
on the fender as stock but the opposite side of the vehicle. I did
need to reinforce the mounting location with some ¼" steel,
but it fit in nicely.
Other than these wires listed, there are no other connections that
need to be made for the engine to run. However, there are several
other wires that go to the A/C system that I kept intact until I
hook up my A/C. I also have not figured out my check engine light
or a couple of the engine check connectors.
After connecting everything up, I was almost hesitant to try
to start it. I had worked so long on it that I didn't know what I
would do if it didn't work. Almost to my surprise, it turned over
right away. I did need to play with the timing a little, as the
distributor was one notch off, but after I got that figured out it
started right up. I let it idle for a while to warm up and kept an
eye out for any leaks or smoking. I only needed to tighten up a
couple of hose clamps on a heater hose that were loose, and
everything was good to go. I drove it around the block a couple of
times to get a feel for everything, and headed back to re-check for
leaks or anything obviously wrong.
IMPRESSIONS
I am very happy
with my choice of swaps. Considering my relative lack of experience
with engines, most things went pretty smooth. As with any new
project, the majority of the time was spent trying to figure out
how to make things happen. Once I figured it out, the actual
installation was easy.
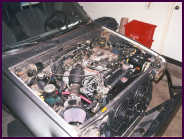 |
|
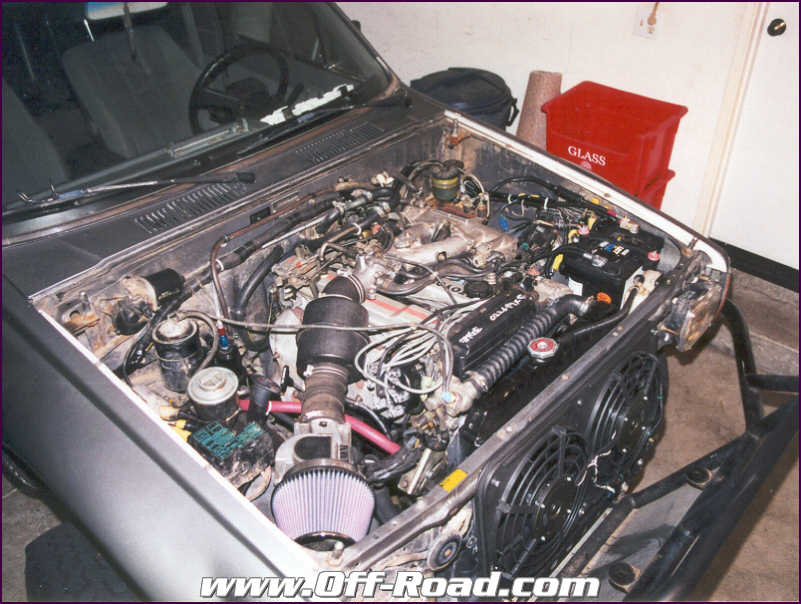
Here's the view of the engine
after the install. |
If I needed to do this swap again, I'd probably be
able to do it in less than 5 days, rather than the 6 weeks of
actual time I spent this swap (one full week plus weekends).
Post your comments or
suggestions on this article here
The power is impressive, especially at the higher RPM range.
It doesn't have lots of low-end torque, but once it hits 3000 RPM
it starts pulling great. I have no problem cruising up any of the
hills in 5th gear that I used to have to shift down into 4th or
even 3rd. I have also had no problems with overheating - even
though it has been near 100F the past few weeks it runs at the same
temp as the 22-RE did. The drive out to Primm next month will be
the true test, but I am confident it will be fine.
I did have one problem with the engine - a week
after it was installed I started noticing white smoke from the
exhaust and I could smell coolant in it. I pulled the oil filler
cap and sure enough there was coolant in the oil, a sure sign of a
blown head gasket. Unfortunately, Toyota engines are notorious for
this, and by re-torquing the head before installing it I may have
accelerated the problem. So, after getting to drive it for only a
week I had to pull the head off and have it resurfaced. I also got
the head pressure checked, and 4 of the exhaust valves were leaking
so I had them replaced as well. You never really know what
condition one of these import engines is in until it is apart, so I
was relieved that neither the head nor the block was warped, and
that the pistons were in great shape. I also replaced the timing
chain while everything was apart so I wouldn't have to take
everything apart again at a later date. I had it all back together
by the next weekend, and now it should be as good as new.
I would like to thank everyone on the Toyota
mailing list and bulletin boards who answered my questions during
the swap, and those who did this swap originally and planted the
seed in my head. I also want to thank Flex-a-Lite for the advice
and help with the electric fans, and Off-Road.com for publishing
these articles. Finally, I need to say thanks to my wife for
putting up with me living in the garage for the past 2 months! If
anyone has any questions that these articles haven't answered
please feel free to e-mail me.