
Portable solar panels are reshaping how backcountry explorers think about access to electricity. Solar has become far more affordable and widely available in less than a decade. As a result, these handy systems are increasingly being turned to for added electrical generation while stationary during off-road/overland trips. Understanding the basics of solar systems will help you know whether they make sense for expanding the capabilities of your rig and/or trailer.
If you’re new to electrical systems, and especially thse in vehicles, don’t worry. The first article in this Gear Doctor series provides a better understanding of how an off-road power grid works. Start there, and then you can begin looking at which hardware to equip yourself with.
READ MORE: Solar 101: Learning the Basics
Getting Started
Because solar components are often sold as individualized pieces, it’s common to not have all that’s essential as you dive into the purchase of “starter” components (e.g., a solar panel). For that reason, most companies offer “kits”, which bundle all the needed parts into a set with matching capacities. Taking the guesswork out of matching up components is, for most consumers, a godsend. Rather than costing a premium, such bundled kits typically offer cost savings (as well as saving headaches and the very real possibility of buying twice due to an mis-matched initial purchase).
Solar kits include, at a bare minimum, the solar, or “photovoltaic” (PV), panel itself along with a charge controller (sometimes integrated into the back of the panel) and the wires connecting them. Expanded kits may have an inverter, for converting the DC electricity to AC, and/or a battery for storage (or sometimes merely a battery box featuring common connection ports, such as for USB cables). That’s it in a nutshell. After that the differences between models are about each individual component, but the variations can be very important to understand.
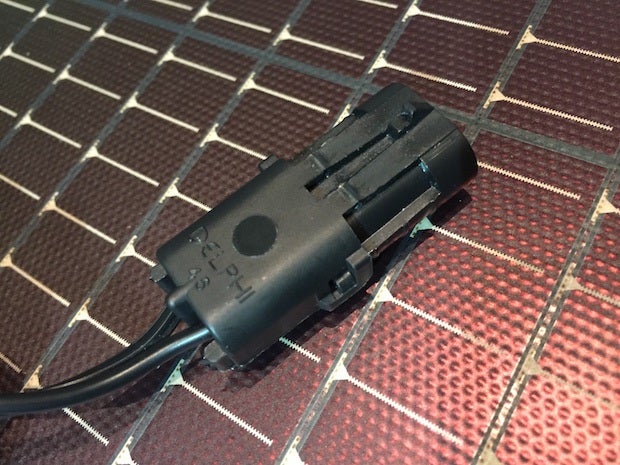
If you’re expecting solar systems to have easy interchangeability I have some disappointing news to share. Companies typically offer systems within which one component is configured to connect to the next. However, the connectors used in different companies’ systems don’t always link up. There are 4 major connector options: SAE, Anderson Power Pole, MC4 and Delphi Weather Pack. [In addition, fixed connections are sometimes made, but typically entail stripped wire held within a fixed set screw or other clamp, such as with an inverter.]. These four connectors vary by how secure their linkage is, as well as by how weather resistant and how commonly available they are. The most secure (and similar) are the MC4 and Delphi modules. Anderson connectors have been popularized with the ham radio crowd and robotics. SAE connectors are simple, commonplace and, unlike the other three, rely only on friction to resist separation. Goal Zero utilizes more proprietary friction connectors with its systems. For instance, their 4.7 and 8mm plug connectors mean you’ll need a solution for linking products such as their Yeti line to other companies’ components.
With a few tools (e.g., connector-specific crimp pliers) and modest wiring skills, you can re/configure wiring of solar system elements to assure you have compatible connectors. Adapter cables can also be purchased or made to provide solutions. Fully testing your intended configuration (virtually, before purchase, and physically, after purchase) is a key step to avoid frustration. It only takes one incompatibility in a would-be system to render it a non-functional pile of expensive parts. In particular, be mindful of appropriately sizing wire gauge to avoid ‘choking off’ electrical flow (and potentially dangerous overheating).
If you’re a consumer whose blood pressure rises at the thought of configuring a system, as opposed to buying a simple plug-n-play string of connect-the-dots, then you’re not alone. To varying degrees, companies in the off grid solar marketplace recognize that and try to attract your business with pre-configured “kits”, or at least pre-selected components with proper compatibility. Renogy, Goal Zero and others have sought to make PV as close to plugging into a home wall socket as possible. The drawback is that you often get a system that does not readily connect to others’ components.
You’ll also want to keep in mind compatibility with external connections. This includes devices you’re hoping to power with the system (e.g., camp lights, a laptop). There are a bevy of connectors used by these devices’ cables. The most common examples are 12v “cigarette” plugs, alligator clamps, 120v AC plugs, and USB cables. Consider what you will need, and how each product enables or restricts your needs.
While there’s a lot of benefit to plug-n-play systems, including lowering the technical skills required by a user, ease of use is not a substitute for quality. Whatever system you purchase it’s still important that you look over it thoughtfully to assure you’re getting all you need.
Solar Panels
Only a few years ago, consumers had but one option in choosing a photovoltaic panel: rigid ones. The advent of pliable PV film has meant that storing and/or mounting a large rigid panel is no longer necessary. Today, buyers instead need to ask which is better for their needs: a foldable or rollable film panel, a flexible panel (i.e., one that can be modestly bowed), or a traditional rigid unit. Each has distinct advantages and disadvantages.
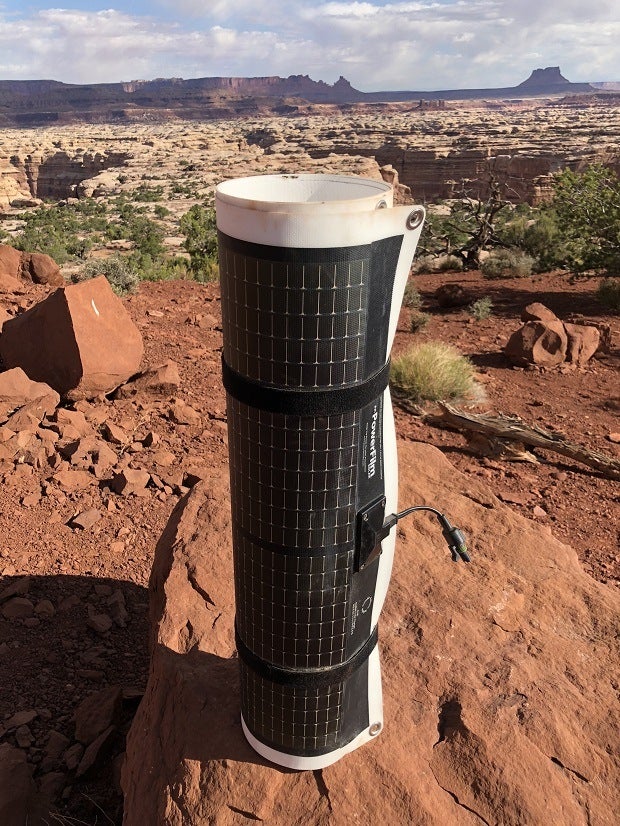
The obvious advantage of flexible film units is their portable size for stowing thanks to the ability to fold/roll them, along with their durability. They can be set up any number of ways, can be strapped down through their simple corner grommets (e.g., Nite Ize GearTies), will pack up relatively small, are not prone to breakage, and can endure rough treatment (e.g., dropping them), including accidentally stepping on them, depending upon the surface underneath. They usually lack the structural rigidity to simply lean them against an object, though they can be laid on a flat surface facing the sun (e.g., windshield).
Flexible, or semi-rigid, panels allow for gentle bowing thanks to a durable base material. These units can conform to more varied mounting surfaces than rigid panels, and yet are strong enough to allow for resistance to wind and movement. Some models can also withstand being walked upon or otherwise handling modest impacts and loading pressure. They give up packability as a consequence. For the most part, they are intended to be fixed mounts, though their overall rigidity also helps them stand up when propped against a tire or tree.
The simplest, oldest and most economical designs are the rigid panels. Often fragile, and requiring thoughtful framing and mounting to preserve their more delicate construction, some rigid panel makers have begun to innovate with one or more hinged folds to permit these otherwise cumbersome panels to be reduced in size by half or more. These are the types of panels that our family, as well as other homeowners and businesses, are using for large roof-mounted renewable energy systems.
Panel Efficiency
Sizing of your offroad solar system should be is based upon your electricity usage, coupled with projected energy uptake from the available rays. Where you will travel (and especially camp) sets the context for your system. The latitude, climate, terrain and forest cover your trips will take you through dictate available sunlight. The type and wattage of panels you use, along with overall battery storage capacity, must take this into account.
For example, if you live in Vermont the topography and dense deciduous forests could mean only a fraction of the available light that a friend who explores Nevada can expect. Adjust for shorter daylight hours if you explore into the colder months and that figure could drop yet again. To compensate for these losses of available light, systems need to have proportionately higher wattage ratings, and/or optimize energy uptake from indirect and dappled light.
Panel type relates to efficiency in two ways: efficiency of solar conversion, and wattage per sq ft. Generally speaking, efficiency is best in rigid panels, followed by flexible models, and finally folding/rollable ones. For instance, commercial Sunpower panels boast an impressive 22% efficiency, as do the Panasonic HIT used in our home’s 5.9kW solar system.
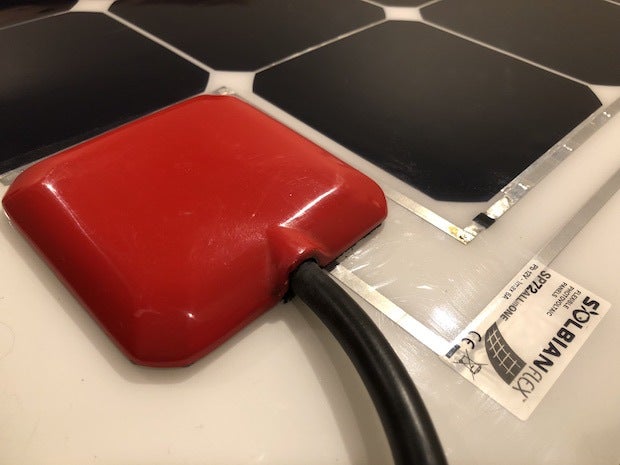
The efficiency that is never quoted by manufacturers, however, may be the figure off-road enthusiasts most want to know. I term this “wattage per square foot” (wsf). It’s a rating that translates into how compact (or unwieldy) a panel is to array. This measurement, which is not provided by any manufacturers that I am aware of, varies significantly. Flexible and rollable panels typically yield ~4-7wsf. Among the very best are models from South Africa’s Flexopower, whose models like the expandable Mojave offer nearly 13wsf. Flexible panels are a good deal better, with top quality brands such as Solbian and Go Power! rated at ~15wsf. Better still are rigid panels, the best of which are in the 18wsf range.
The added cost of manufacturing packable panels underscores the importance of considering your needs. Is space at a premium? Do you care if your panels are permanently attached to a vehicle/trailer? Will you want to take them with you on a flight to distant lands? Between their attractive efficiency and cost, the rigid/flexible panels may be the right choice for many adventurers, at least when it comes to powering a large battery. And that points to the sizing question.
Panel Sizing
Want to know the simple secret? Buy more wattage than all the online calculators prescribe. Real life outputs will routinely disappoint you using even the best of panels, whether rigid or flexible. While it’s true that you do not want to risk damage to an all-in-one battery unit rated for 120w input by pairing it with a 200w set of panels, in reality, panels routinely fail to exceed 50-60% of their maximum rated output. As a rule of thumb after testing numerous panels from leading manufacturers, I suggest buyers only count on 50% of a panel’s rated wattage. One of the main reasons is the quality and duration of available solar rays.
Although I have not seen a calculation for adjusting panel output for the solar capabilities of different regions, it’s not unreasonable to assume that even while in regions with high quality sun (e.g., the Southwest where I live) you will gain no more than 2/3 of a panel’s rated maximum wattage. Having the capability to daisy chain panels will provide more flexibility than having a single enormous panel. Here again, before you hope to chain different brands of panels be sure to check their connection types. Better still, buy matching panels (e.g., Flexopower builds their larger wattage Mojave and Atacama systems by pairing multiples of the same 120w and 79w panels, respectively, rather than making a single larger unit).
Mounting and orientation is critical for reaping the most of a panel’s capabilities. To understand this, think of your panel as not a thin, flat surface, but as a set of invisible tubes thru which the Sun’s rays must pass to reach the photovoltaic surface. The more perpendicularly aligned the panel is to the sun the more unimpeded those rays will pass thru that “tube” and reach the panel’s absorptive surface. Consequently, even a modest misalignment with the path of those rays will decrease energy absorption and wattage. This factors significantly in panel sizing. If your panels will reside in a fixed position, such as flat on your roof rack, where they can’t be adjusted at will, you can expect only a relatively short time of optimal solar absorption.
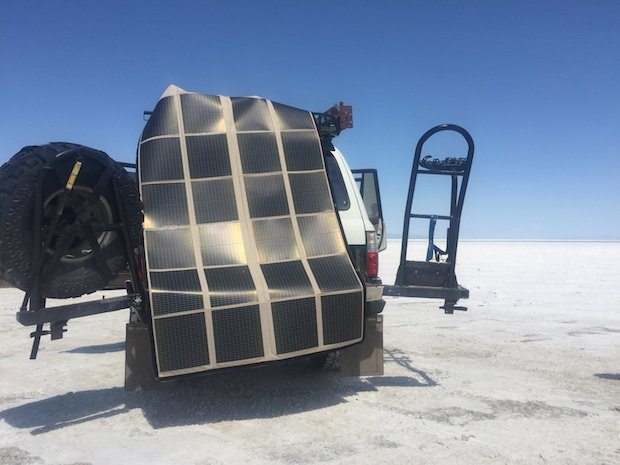
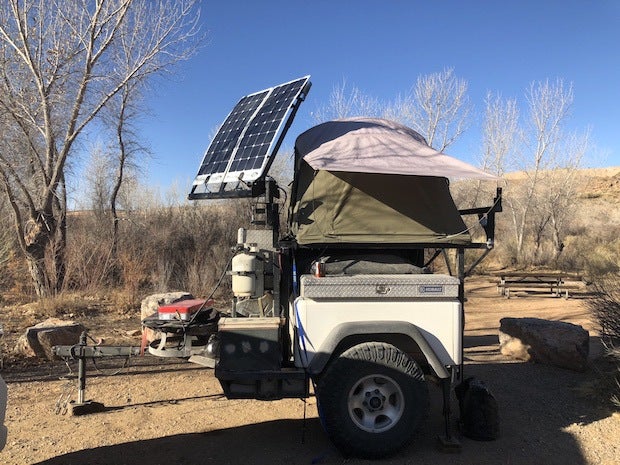
Conversely, if you will be able to reorient the panels to face the sun’s ever changing arc then expect much better efficiency. But also realize that the sun’s arc equates to ~15degree change every hour. When your goal is enjoying time in the field, spending it fretting over and fiddling with panel orientation is not going to be a welcome activity. It’s made worse when panels do not easily move and/or stay propped up. So annoying is the prospect that on our overland trailer we built a dual-axis rotating array. The system holds two Go Power! 100w flexible panels, and can be quickly locked into 64 different positions using, you guessed it, 15 degree increments.
Charge Controllers
Solar panels don’t care when or in what way you need electricity. Electricity created through solar panels is inconsistent. It arrives intermittently and continuously varies in its flow rates. This means your system needs a ‘valve’ of sorts, along with a conversion of the flow. This critical function is the responsibility of charge controllers. Situated immediately after the solar panel, charge controllers turn electricity from your panels into the electricity your batteries need.
Charge controllers, also termed charge regulators, function as voltage and/or current gatekeepers for how electricity reaches a battery. The most important function is to keep batteries from being harmed from overcharging. Batteries typically need 14 to 14.5 volts to charge. Charge controllers can both cap the amount of charge, thus preventing overcharging, and they can optimize the electricity from the panel so as to most rapidly complete the battery’s charge.
Charge controllers also prevent the unseen back flow of electricity out of the battery. That’s right, panels leech electricity from your battery if something doesn’t stop it! Think of water seeking its level between two basins. The controller acts like a back flow preventer in water pipes. Without it your batteries will slowly send electricity out.
Fortunately, all controllers prevent the back flow of electricity. Their main purpose is actually to get the electricity into the battery, and to manage draw from the loads you apply to the system. Controllers prevent over draining of the battery by again acting as a flow preventer if the battery voltage drops below a safe level.
All those functions are critical, the two major types of controllers both provide them. The real distinctions in selecting a charge controller lie in the electronics wizardry hidden within their similar looking cases. The differences aren’t any clearer in their names: PWM and MPPT. The differences though are first seen at the cash register…or Amazon cart. MPPT controllers are priced higher to match their increased performance. Specifically, they transform a higher percentage of the panel’s electricity into the battery’s storage.
Pulse width modulation, or PWM, controllers differ from maximum power point tracking, or MPPT, controllers in that they can’t convert excess voltage into amperage. They also can only handle smaller wattage solar panels. This means that one might only benefit from half of the watts a 240w array can produce if a PWM controller is used. PWM controllers function by acting as a switch, opening and closing many times per second, so as to mitigate the voltage flowing to the battery. They also perform within a much smaller climate band, basically in moderate to high temperatures.
MPPT controllers were developed to handle panels with more cells, the early panels having been fitted with 36-cell photovoltaics. This allows higher wattage panels, some with 60-cell configurations to be used. Their magic lies hidden inside. The complexity of MPPT controllers’ electronics drives their performance and their expense. The result is that unless you only plan to run a small panel, or are on a tight budget, the added cost of an MPPT controller will pay you back in how it more effectively achieves charging goals, as well as avoiding frustration at paltry charging performance.
How much more does this performance cost? First ask how much you need a controller that is effective across the extremes of low and high temperatures? How much do you want the capability of running longer cables? Are you willing to pay to have a controller with the capacity to add more panels? In the past, the cost difference was enough that for panels smaller than 200w in total, a PWM may have been the better option. Today, the prices and number of available MPPT controllers has made the difference in cost less significant. With either controller, however, be sure that you size the controller to your panel wattage, as well as thinking through your future needs.
Batteries
Batteries are the buffer and ‘savings account’ of photovoltaic systems. At their most basic, they resolve the high’s and low’s of power production from panels, helping you enjoy longer periods of consistent power to devices regardless of the time of day or whether you’ve been able to get your panels in the path of the Sun’s rays. For all our best intentions, the circumstances that conspire to keep you from harvesting solar energy are many. Clouds, trees and canyon walls are all your enemies in solar power production. More easily overlooked are winds, potential for theft, stop-n-go travel, and forgetfulness from any manner of camp distractions that mean panels are overtaken by shadows. In short, anything that keeps you from placing panels in the sunlight will result in your electricity coming from battery storage.
As a result, the power storage side of your solar system should have flexibility and a carefully thought out capacity. Similar to the adage about panel capacity, battery storage (i.e., amp hours of storage) should have an added margin that you budget for in estimating how long you will need to operate between reliable recharging. For instance, the ability to operate without recharging for 48 hours is plenty for one person’s habits, but may provide others far too little reserve capacity. You will also need to take into account future loads that could be added to the system.
A vehicle’s starting, or “ignition”, battery is the beginning point for electrical storage. Most people, in fact, rely solely on this battery. However, that solution offers little margin for extra capacity (or safety), and requires that the battery be a dual function design. There are batteries, such as the Odyssey line from EnerSys, that offer both deep cycle and starting capacities. However, the limitations of single-battery systems are numerous, with simplicity and cost being the only real arguments in their favor. Dual battery configurations are the most common alternative. They add significant capacity, as well as the potential for security and peace of mind.
For most off-road solar systems, a dual battery setup in the vehicle can permit the solar panels to regenerate the electricity stored in one or both batteries as loads draw down either, depending upon how they are isolated. Cost aside, the limitations of dual battery systems are primarily their lack of portability. Their flexibility can be improved through well thought out power ports and connections. For instance, Genesis Offroad’s smart system offers accessory cables for remote quick Anderson connectors, allowing ready plug-in options at different points on the vehicle for connecting jumper cables, a fridge, or a trailer’s battery/solar system.
Two rival solutions to the traditional vehicle-based dual battery system have recently grown in popularity: trailer-mounted auxiliary batteries, and, in particular, stand alone all-in-one battery/inverter/controllers. All-in-one products have been popularized by the likes of Goal Zero, Renogy and others who have vastly simplified users’ lives by packaging everything but the solar panel into one feature-rich box. Some are housed in military ammo cans, while others are handsome works of industrial design artistry. Their costs are not cheap if you wish to have meaningful power levels. Why? You are still paying for the same hardware—a battery, AC/DC inverter and a charge controller so that your solar panel can be plugged in directly—but the manufacturer is having to squeeze it all into a very compact enclosure. That resulting exterior simplicity spells R&D headaches and added costs all to overcome interior complexities that result from assuring a clean exterior package and simplified user experience.
Simplified versions of all-in-one’s have become popular as well. These cost-saving options include models ranging from little more than a battery box with pre-wired ports for plugging in accessories, to models with an integrated solar charge controller but no inverter (e.g., Flexopower’s Karoo battery box) or, vice versa, an inverter built into the battery box, but reliant upon an external solar charge controller. As you may have noticed, most of these products will exclude the battery itself. This reduces the cost, and allows the consumer to choose the battery quality s/he wishes to use. Regardless of what’s on the inside, most of these products require the buyer to devise a plan for physically securing the unit. That’s a very important consideration for a buyer, as that expensive and heavy power unit (20-80lb typically) could become a lot more costly if it goes airborne and strikes a window, an occupant in your rig, or the trail. Consider fixed methods, ratchets or quality load straps such as Nite Ize CamJams.
Trailer-Mounted Systems
While there is no denying the convenience of clean, condensed packaging in such systems, some users prefer a more customized configuration. Trailer-mounted set-ups epitomize this approach. Trailers typically have both the space capacity to more easily build in or bolt on the three separate components that make up an all-in-one, as well as the solar panels themselves. Configuring such a system is occasionally handled by trailer manufacturers to take the guesswork and pain out of the consumer’s hands. These pre-built systems can be very high quality, and have excellent protective enclosures. But DIY fans are well served by the likes of Solbian, Go Power! and others.
Your battery should be placed for convenient access, weight distribution (e.g., low CG) and protection. Unlike with dual battery installations under a vehicle’s hood, trailer mounted systems often can handle a larger battery, or even a bank of two or more batteries, and are much simpler to integrate. As a fixed weight, they are often situated on the tongue. This also allows relatively easy connections to a fridge in the back of a vehicle, as well as all trailer-based devices.
The brutal environments in which trailers operate means an onboard electrical system needs proper protections. Quality weatherproof enclosures are key, as are sealed plug-in ports to various receptacles. The benefits such power provides are numerous. Water from a remote tank can now be drawn from a simple 12v pump. Arriving late to camp only requires pressing a switch to illuminate 360 degrees with low wattage LED area lights. The effort put in to plan and set up such a system, while significant, pays back in simplicity later on.
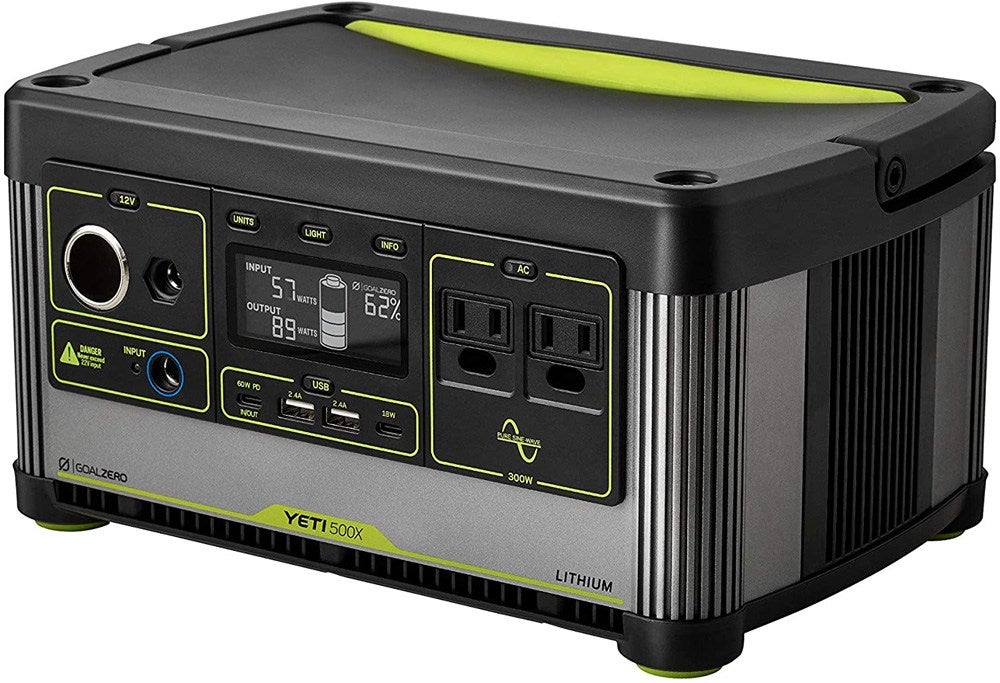
And finally, there is one other solar option that requires no installation at all. Small, portable devices available today have meant that energy need not be bolted into your trailer or truck. Goal Zero broke a lot of ground in this realm with products like the Yeti line of “solar generators”. Such products offer a foundation to pair with efficient LED lights, expanding their versatility. A new, more unique strategy has been the integration of such lights piggybacking into a modest battery. Gear Aid, long known for their repair adhesives and patches, broke into this portable power sector in 2016, offering three variable capacity rechargeable lithium-ion battery/LED combos. These compact devices can be mounted in innumerable locations and positions thanks to RAM and GoPro mounts. They also allow you to charge from their USB ports. With these simple devices you can easily add temporary light and power.
Shop for Goal Zero Yeti Products
The Takeaway
A revolution in off grid solar systems and their paired storage devices have opened a new era for explorers and travelers. The ability to not only have reliable electricity on the trail but to have it in abundance and in a sustainable fashion is reshaping how we spend time in the backcountry. Portable, affordable solar systems have become abundant, and are finally putting buyers in a competitive position to choose. The key is to understand your needs, and to honestly assess how much you value convenience over cost.
If you’re serious about selecting a solar power system, and want to be sure of the quality you’re getting, there are several proven manufacturers to consider in the 4×4 market. We’ve been testing some of the best over the last year, and will be sharing the results in a series of reviews in the coming months. Each of these Gear Doctor articles will feature products with different functions or targeted uses, and will give a glimpse into the company behind their innovations.
Leading Brands
Go Power!
PowerFilm
P3 Solar
Solbian
Flexopower
Genesis Offroad
Odyssey
CTEK Chargers
Goal Zero
Renogy
About the Gear Doctor
Sean Michael has been designing, abusing and testing outdoor gear since the 1980’s. He began reviewing for Off-road.com in 2000, and today lives in the Northern Wasatch Mountains, where he is Director of the Outdoor Product Design & Development program at Utah State University (opdd.usu.edu). Follow his trips and gear at thegeardoctor in Instagram.
We are committed to finding, researching, and recommending the best products. We earn commissions from purchases you make using the retail links in our product reviews. Learn more about how this works.