 Extreme Outback Products'
Tyrepliers and Tire Irons.
Extreme Outback Products'
Tyrepliers and Tire Irons. |
June 1998, I was ?wheeling in Big Bear, California, and I popped a bead on my Super Swampers. Twisted up in a gulley, and more crosshill than was wise, I was STUCK. I couldn't change the tire there, and there wasn't enough traction to move. Backing down wasn't an option for fear of rolling, and there wasn't enough traction for a friend to perform a dead pull. I ended up being strapped to a flat spot while I power-assisted the tow. This peeled the tire the rest of the way off the rim, and I ended up driving right over it.When I met George Carousos and talked to him about Extreme Outback Products' Tire Tools, I was more than a little skeptical. I pulled out one of the Swampers and turned him loose. I didn't tell him that this was no ordinary tire -- it was a Swamper 34x9.50-15R I had air leak problems with a year ago. My tire shop used BeadSeal rim cement to glue the rim to the tire. Yet the Tyrepliers separated the bead quickly, with very little effort. Extreme Outback Products' Tyrepliers use simple leverage to multiply your own strength and apply it exactly where needed.Later, in camp, I sat down with some friends (hecklers?) and proceeded to waste more than an hour trying to persuade that Swamper back onto my rim. We used small tire irons, a sledge hammer, dish soap, a hi-lift jack, and every swear word in all of our vocabularies. Still, that tire refused to rejoin its rim.
The next day, at the local WalMart, the tire tech spent the better part of another hour sweating and straining to get that tire mounted and balanced... and he had the right pneumatic machinery!
His opinion? "Damn Swampers have the tightest beads I've ever seen!"
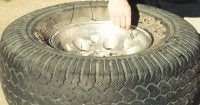   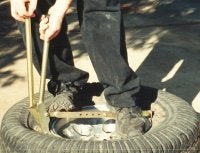   |
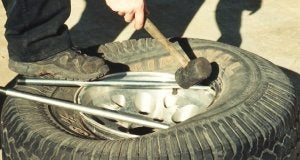
Let all the air out of the
tire.
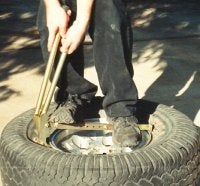
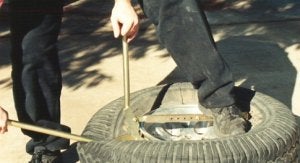
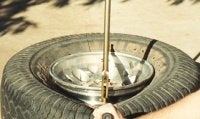
Set the Tyrepliers to the appropriate rim width. Rim sizes are stamped next to the adjustment holes for easy reference. Set the foot of the Tyrepliers on one side of the rim. It's easiest to hold this foot down by stepping on it with your foot. Set the nose (plier end) of the Tyrepliers directly across the rim from the foot. Work the jaws of the Tyrepliers open and shut a bit while you push the nose (plier end) of the tool between the rim and the tire. Stepping on the Tyrepliers crossbar weights it nicely. When the nose of the Tyrepliers is seated, hold the middle arm of the tool and push the outer arm away from the inner arm. This spreading action separates the tire's bead from the rim. Repeat this process as many times as are necessary to completely separate the bead. Start in one place and work your way around the rim. |
Tyrepliers break the bead much easier than a Hi-Lift Jack. When last I tried that trick, my jack skated around on the rubber and it was quite difficult to make it work. Sure, if you are big enough to muscle it, or have a few assistants, you could fight with your Hi-Lift and try to make it do something outside of its original design parameters... or you could pack the Tyrepliers and the matching tire irons, and be prepared for any eventuality -- without all those assistants.
The Product
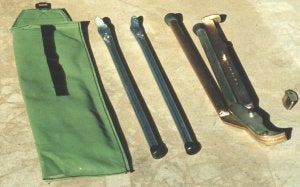
The Tyrepliers and tire irons are simple and well put together. After you use them, you?ll be smacking your forehead wondering why you didn?t think of them. The execution, however, is cleaner than most of us could have done. The design is elegantly simple -- perhaps that?s why SEMA awarded it runner up for best new 4x4 and Off-Road Product 1998. Pretty impressive, considering the overall prize in this category went to Warn's super-trick and super-$$$ coil spring suspension.The Tyrepliers generate a 40:1 compound ratio, multiplying compression at the handles to spread the forged jaws. It is so easy to break a bead with the Tyrepliers that women and children can get the job done with ease. Tyrepliers are made in Australia from Australian steel, not cheap Asian-grade steel, which is stress-relieved, shot-peened, and cadmium-plated for corrosion resistance. Made to military specifications, Tyrepliers are NATO-approved and carry a lifetime warranty for workmanship and materials.
The Extreme Outback Products' tire irons are made of spring steel, which is forged, stress-relieved, shot-peened, and electroplated for a long-life finish. The business end is forged, so that you can pry with it, but the other end is not -- so that you can strike it with a hammer. The tire irons come with a twelve month warranty. Extreme Outback Products is coming out with a new tire iron soon that has similar bulletproof construction, but a different compound curve to make the job even easier.
Even the storage bag is trick -- it is made of
super-thick military grade canvas. If the bag gets wet, it dries out easily
without retaining moisture. In an open-topped 4x4, quick-drying is essential. Use the Extreme Outback Products'
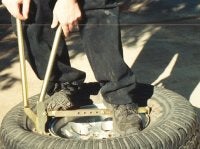
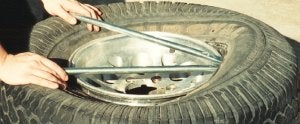
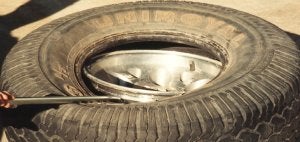
Tyrepliers to break the inner and outer beads lose from the rim. Insert a tire spoon between the outer
bead and the rim. Lever the outer bead up over the rim. (Hint:
push the bead opposite your tire iron down toward the center of the rim.
The rim has a smaller diameter in the middle, and this gives you slack
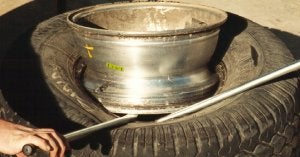
between the bead and the rim for your tire iron.) Insert the second tire iron next to the
first. Keep pressure on them both to keep the tire's bead between them
on top of the rim. Work the tire irons apart, in opposite
directions around the rim, pulling the bead over the rim. (Hint:
Use a rubber mallet.) Finish levering the bead to the outside
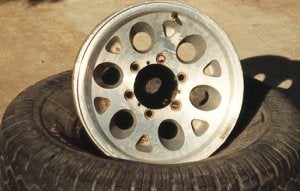
of the rim. Tilt the rim inside the partially removed
tire. (Hint: Use the technique noted above: push the
bottom-tilted side of the rim down and position the inside bead toward
the center of the rim. Insert a tire iron in the resulting gap
between the inside bead and rim.) Lever the inside bead up over the rim.
You should be able to pull the tire completely off the rim.
Let the air out of the tire.
Preparedness
You can patch many tires from the outside with plugs, but if the sidewall tear is too big for that, sometimes the only way to seal the tire is to remove it from the rim and patch it from the inside, or even insert a tube into the tire.Few 'wheelers carry the tools to break a tire bead, dismount the tire, then remount the tire and the rim. Extreme Outback Products puts these tools within the reach of every off-road aficionado. The process is easy enough that a 53-year old woman was breaking beads at SEMA. Do you want to count on her being in the next rig behind you on the trail?
Conclusions
The Extreme Outback Products Tyrepliers and Tire Irons are well-engineered and well-made. At a bit over a hundred bucks for the basic kit (Tyrepliers, an ATV rim adaptor, and the canvas storage bag), they are also well-priced. For under fifty bucks more, you can get the hefty tire irons as well.Having these tools can make the difference between a few minutes of easy, safe work and an hour of hard work, busted knuckles, and Hi-Lift hi jinx. Wouldn't you rather spend less time fixing... and more time 'wheeling?
extremeoutback@prodigy.net
3069 Alamo Drive
Suite 327
Vacaville, CA 95687
phone: 707-447-7711
fax: 707-447-7722
|
Off-Road.com Newsletter Join our Weekly Newsletter to get the latest off-road news, reviews, events, and alerts! |
Follow @Off-Road
 Your Privacy Choices