|
 Spidertrax
has been hard at work for several years designing a bolt-on panhard bar
kit for the Suzuki Samurai and their diligence has finally paid off. Being
the stuff of dreams for many hardcore off-roaders, the panhard linkage can
now be enjoyed by even strictly street-driven Samurais. But what is a
panhard bar? Is it nothing more than an exotic gimmick reserved for show
trucks, or is it something you can really use on your Samurai? Spidertrax
has been hard at work for several years designing a bolt-on panhard bar
kit for the Suzuki Samurai and their diligence has finally paid off. Being
the stuff of dreams for many hardcore off-roaders, the panhard linkage can
now be enjoyed by even strictly street-driven Samurais. But what is a
panhard bar? Is it nothing more than an exotic gimmick reserved for show
trucks, or is it something you can really use on your Samurai?
A panhard bar controls the lateral stability of the
front axle. Although a live front axle is great for ground clearance and
suspension travel, leaf springs are limited in how much lateral control
they can provide. Any Samurai owner who upgrades from a stock suspension
setup to longer shackles or a spring-over-axle conversion will immediately
noticed the changes in handling characteristics. These include mushy
handling, decreased turning radius, poor steering control off-road and
sway, wander and wobble at high speeds. Many of the modifications we do to
make our vehicles more capable off road--such as taller springs, Missing
Link shackles, softer bushings and oversize tires--compound the problem
and wind up really impacting the controllability and safety of the
vehicle.
Are you unsure of how much axle slop your Samurai
has? Park your truck parallel to a curb with one of the front tires
pressed right up against the curb. Take note of the vertical positioning
of the shackles and then have somebody crank the steering wheel. The
shackles will lean over to quite a degree as the steering system's drag
link pushes the frame to the side. This same movement happens both on the
trail and on the street, causing all of the problems listed above and
while a more off-road-oriented vehicle will typically have a worse case of
axle slop, even a mildly built Samurai will have a very pronounced lack of
lateral axle stability.
 The
sole purpose of a panhard bar is to solidly locate the axle in such a way
as to completely eliminate any lateral movement and to avoid any
interference with vertical movement. While the concept is simple, the
execution is very complicated because the geometry of the system must be
exactly right or else the panhard bar will cause more problems than it
cures. The
sole purpose of a panhard bar is to solidly locate the axle in such a way
as to completely eliminate any lateral movement and to avoid any
interference with vertical movement. While the concept is simple, the
execution is very complicated because the geometry of the system must be
exactly right or else the panhard bar will cause more problems than it
cures.
  The
panhard bar must naturally follow the arc of the suspension and steering
as the axle articulates up and down. Nowhere in the suspension's travel
may the panhard bar work against the springs or the drag link; otherwise
binding, bump steer and breakage will occur. The panhard bar must mount to
the same frame rail as the steering box, must be set to the proper length
and should be as close to horizontal as possible. Designing a panhard bar
kit for one vehicle is difficult enough; designing one for a range of
different lift heights complicates the design even further. The
panhard bar must naturally follow the arc of the suspension and steering
as the axle articulates up and down. Nowhere in the suspension's travel
may the panhard bar work against the springs or the drag link; otherwise
binding, bump steer and breakage will occur. The panhard bar must mount to
the same frame rail as the steering box, must be set to the proper length
and should be as close to horizontal as possible. Designing a panhard bar
kit for one vehicle is difficult enough; designing one for a range of
different lift heights complicates the design even further.
It is no wonder why the Spidertrax Panhard Kit spent
so much time in the design and testing stages. The end result is a truly
bolt-on, fully adjustable kit that is of the same top quality as the
company's other products.
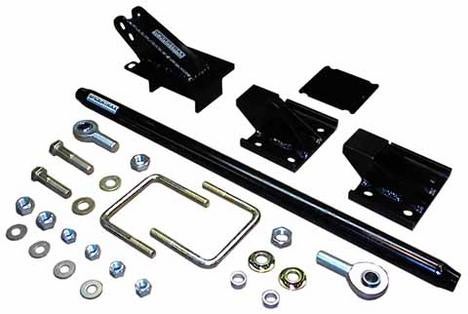
The kit consists of three main parts: the frame
mount, the panhard bar and the spring mount. Also included in the kit are
a backing plate to reinforce the frame, a matching driver's side u-bolt
plate and all necessary hardware to complete the installation.
Installation
Installation is straightforward, simplified by the concise set of
instructions that are complete with diagrams, a step-by-step walkthrough
and large full-color photographs. Should any problems occur while
installing the kit, Spidertrax' contact information is also included.
Vehicle Preparation
- Park the vehicle on level ground and chock the rear wheels. Jack the
front axle and support it with jack stands to allow for the front
wheels to be removed.
- Disconnect the driver's side front brake caliper's hose from the
hard brake line, being sure to plug the end of the brake line to
prevent fluid loss.
 Cut
the driver's side front brake line mount from the Cut
the driver's side front brake line mount from the frame
and grind flush to provide a
flat surface for the Upper Link Mount. This is the most difficult part of
the installation and the only permanent modification to the vehicle that
the kit requires to be made.
 Bend
the bottom of the wheel-well skirt up from the top of the frame rail to
provide sufficient clearance for the Square U-Bolts to slide through.
Paint the exposed metal to prevent rust from forming. Bend
the bottom of the wheel-well skirt up from the top of the frame rail to
provide sufficient clearance for the Square U-Bolts to slide through.
Paint the exposed metal to prevent rust from forming.
Panhard Installation
 Remove
the passenger's side front u-bolt plate and replace it with the new
Passenger U-bolt Plate. Take note that the U-bolt Plate is provided
with three spring centering pin clearance holes. A typical SPOA will
use the middle hole, but a setup in which the front axle has been
moved forward or backward may use either of the other holes (¾"
offset front or rear) as long as the spring perches have been drilled
to accommodate an identical ¾" offset. Remove
the passenger's side front u-bolt plate and replace it with the new
Passenger U-bolt Plate. Take note that the U-bolt Plate is provided
with three spring centering pin clearance holes. A typical SPOA will
use the middle hole, but a setup in which the front axle has been
moved forward or backward may use either of the other holes (¾"
offset front or rear) as long as the spring perches have been drilled
to accommodate an identical ¾" offset.
 Remove
the driver's side front u-bolt plate and replace it with the new
Driver U-bolt Plate, aligning it in the same manner as in Step 6. Remove
the driver's side front u-bolt plate and replace it with the new
Driver U-bolt Plate, aligning it in the same manner as in Step 6.
- Position the Upper Panhard Mount on the frame rail such that a
1/16" to 1/8" gap is left between the Mount and the stock
bump stop mount.
- Place the Backing Plate on the opposite side of the frame rail and
install the two Square U-bolts with the supplied nuts and washers.
 Assemble
one end of the Panhard Bar using the Rod End and the supplied
hardware. Mount it to the Passenger U-bolt Plate, but do not tighten
it yet. Assemble
one end of the Panhard Bar using the Rod End and the supplied
hardware. Mount it to the Passenger U-bolt Plate, but do not tighten
it yet.
- Measure the vertical distance between the top of the U-bolt Plate
and the bottom of the frame rail to determine which of the two holes
in the Upper Panhard Mount to use.
 This
panhard kit is designed for lifts ranging from approximately This
panhard kit is designed for lifts ranging from approximately five
to twelve inches, so
selecting the right height is crucial for optimal geometry of the
panhard bar. Shorter lifts (5-8 inches from frame rail to spring plate)
use the top hole, while taller lifts (8-12 inches from frame rail to
spring plate) use the bottom hole.
 Assemble
the other end of the Panhard Bar using the Rod End and supplied
hardware to mount it to the Upper Panhard Mount, adjusting the thread
depth to allow easy installation to the Mount, but do not tighten it
yet.
Turn the Panhard Bar so
that the exposed thread on both Rod Ends is equal and then tighten the
Jam Nut on each Rod End. Assemble
the other end of the Panhard Bar using the Rod End and supplied
hardware to mount it to the Upper Panhard Mount, adjusting the thread
depth to allow easy installation to the Mount, but do not tighten it
yet.
Turn the Panhard Bar so
that the exposed thread on both Rod Ends is equal and then tighten the
Jam Nut on each Rod End.
 Reconnect
the driver's side front brake caliper hose to the hard line using
the brake tab that is built into the Upper Panhard Mount, reusing the
stock spring clip. Bleed the brake line and ensure that the caliper
hose does not interfere with the movement of the Panhard Bar.
Inspect all the hardware and reinstall the wheels for a test-drive. Reconnect
the driver's side front brake caliper hose to the hard line using
the brake tab that is built into the Upper Panhard Mount, reusing the
stock spring clip. Bleed the brake line and ensure that the caliper
hose does not interfere with the movement of the Panhard Bar.
Inspect all the hardware and reinstall the wheels for a test-drive.
Impressions
Even before installing the Panhard Kit, the quality of the components
was immediately evident. The bracketry is made from up to ¼"
steel, while the panhard bar itself is the definition of the term
"beefy." The three-piece
chromoly rod ends are rated at 40,000 lb.
radial loads. The u-bolt plates have integrated bump stop mounts. Every
component is either powder coated or zinc plated to prevent corrosion and
the supplied hardware is all Grade
8.
 Before
the first test drive, we used the lift at Mild to Wild Suzuki's to test
the axle, steering and panhard travel for any binding. Although the bump
stop mounts on the u-bolt plates look like they are too far forward at a
normal parked position, they move rearward as the spring compresses and
align themselves perfectly underneath the bump stops. Satisfied that the
geometry was properly set up, we backed the truck out of the shop and immediately
noticed a change in the steering. Before
the first test drive, we used the lift at Mild to Wild Suzuki's to test
the axle, steering and panhard travel for any binding. Although the bump
stop mounts on the u-bolt plates look like they are too far forward at a
normal parked position, they move rearward as the spring compresses and
align themselves perfectly underneath the bump stops. Satisfied that the
geometry was properly set up, we backed the truck out of the shop and immediately
noticed a change in the steering.
Before the panhard installation, the steering was very rubbery; turning
the wheel at a dead stop would load up the front bushings so that when the
steering wheel was released, it would rotate back a half turn or more. The
addition of the panhard bar almost completely eliminates that, with the
remaining "spring" coming from the deflection inherent in tall
tires. Watching the Missing Link shackles confirms that the panhard bar
works properly: they refuse to budge either direction as the steering
wheel is turned. Parking lot maneuvers are easier as a result of a tighter
turning radius.
| Front steering
geometry with no Panhard |
 |
 |
 |
 |
| Front Steering
geometry with Panhard installed |
 |
 |
 |
 |
 Driving
on the road, the difference in handling is literally like night and day.
Steering input is more accurate than even a stock Samurai, despite eight
inches of lift and Missing Link
shackles. The steering has the accuracy of a truck with independent
front suspension! There remains a little bit of slop in the handling
from the tall sidewalls of the 33"
tires, but this is as close to a sports car as a lifted Samurai is going
to feel. Driving
on the road, the difference in handling is literally like night and day.
Steering input is more accurate than even a stock Samurai, despite eight
inches of lift and Missing Link
shackles. The steering has the accuracy of a truck with independent
front suspension! There remains a little bit of slop in the handling
from the tall sidewalls of the 33"
tires, but this is as close to a sports car as a lifted Samurai is going
to feel.
 On
rough city streets, driving over broken pavement no longer requires
constant steering corrections. Crowned roads don't affect the
direction of travel as the bushings settle to one side as they do
without a panhard bar. Highway cruising sees much less wander, requiring
less steering input to turn the same degree. But by far the greatest
improvement is on winding two-lane
highways, where S-curves and bumpy, sweeping turns require nothing but one
finger on the steering wheel to precisely guide the truck. High-speed
confidence is dramatically improved. On
rough city streets, driving over broken pavement no longer requires
constant steering corrections. Crowned roads don't affect the
direction of travel as the bushings settle to one side as they do
without a panhard bar. Highway cruising sees much less wander, requiring
less steering input to turn the same degree. But by far the greatest
improvement is on winding two-lane
highways, where S-curves and bumpy, sweeping turns require nothing but one
finger on the steering wheel to precisely guide the truck. High-speed
confidence is dramatically improved.
 Off-road,
the steering is also dramatically improved and articulation is
unaffected. Rocks that used to push my axle so far aside as to render my
steering useless now have absolutely no affect on my steering. Drooping
a wheel into a hole and letting the Missing Links unfold used to
automatically mean a loss of directional control as a result of the
major increase in leverage against the shackle bushings. With the
panhard bar, it steers like it's on flat ground. Off-road,
the steering is also dramatically improved and articulation is
unaffected. Rocks that used to push my axle so far aside as to render my
steering useless now have absolutely no affect on my steering. Drooping
a wheel into a hole and letting the Missing Links unfold used to
automatically mean a loss of directional control as a result of the
major increase in leverage against the shackle bushings. With the
panhard bar, it steers like it's on flat ground.
 There
is such an increase in the front axle's lateral control that both
on-road and off, I can now feel the slop from the rear axle. Thankfully,
bump steer is slightly reduced and low-speed steering effort is
minimized since less steering angle is required for the same maneuvers.
Overall the steering rate is much faster, which makes for twitchy
handling until the driver becomes accustomed to the newfound
responsiveness. There
is such an increase in the front axle's lateral control that both
on-road and off, I can now feel the slop from the rear axle. Thankfully,
bump steer is slightly reduced and low-speed steering effort is
minimized since less steering angle is required for the same maneuvers.
Overall the steering rate is much faster, which makes for twitchy
handling until the driver becomes accustomed to the newfound
responsiveness.
Recommendation
We were expecting a big improvement in Project Buster's steering
feel from this panhard kit, but the extent to which Spidertrax' kit
made a difference was beyond even our expectations. This upgrade works
equally as well on the street as it does on the trail
and we can say with
confidence that every Samurai should be equipped with this
panhard kit. Additionally, the integrated bump
stop mounts are engineered to work
perfectly with Spidertrax' own Bump Stop
Kit, which is extremely helpful in dialing in the suspension travel for
the perfect setup.
Will it work with every Samurai? Unfortunately not. The kit requires
a SPOA conversion and 2" wide
springs. It is also not compatible with inboard-mounted springs or
SJ-410s, but for the majority of lifted Samurais this kit is a must-have
item.
For only US$299 from your choice of Spidertrax product
distributors,
getting your own panhard kit is easy and affordable.
--Geoff
Beasley
|
 Bend
the bottom of the wheel-well skirt up from the top of the frame rail to
provide sufficient clearance for the Square U-Bolts to slide through.
Bend
the bottom of the wheel-well skirt up from the top of the frame rail to
provide sufficient clearance for the Square U-Bolts to slide through.
 Assemble
the other end of the Panhard Bar using the Rod End and supplied
hardware to mount it to the Upper Panhard Mount, adjusting the thread
depth to allow easy installation to the Mount, but do not tighten it
yet.
Assemble
the other end of the Panhard Bar using the Rod End and supplied
hardware to mount it to the Upper Panhard Mount, adjusting the thread
depth to allow easy installation to the Mount, but do not tighten it
yet. Reconnect
the driver's side front brake caliper hose to the hard line using
the brake tab that is built into the Upper Panhard Mount, reusing the
stock spring clip. Bleed the brake line and ensure that the caliper
hose does not interfere with the movement of the Panhard Bar.
Reconnect
the driver's side front brake caliper hose to the hard line using
the brake tab that is built into the Upper Panhard Mount, reusing the
stock spring clip. Bleed the brake line and ensure that the caliper
hose does not interfere with the movement of the Panhard Bar.


 Your Privacy Choices