Well, it's been a long time coming. Just over two years since Petroworks initially started the process to develop a larger fuel tank to replace the stock Samurai fuel tank. I was headed to Moab for the first time this year and called Petroworks to get some spare parts before I headed out. When I called Gary answered the phone and we got to talking about upcoming projects and he mentioned that they were going to have their larger gas tanks available at Moab, so without hesitation I claimed dibs on one of them to pick up in Moab.
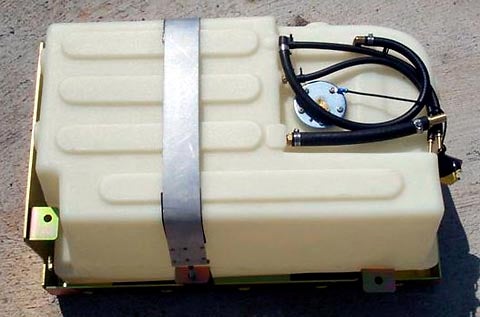
The tanks are made of polyethylene and are formed via a roto-molding process. The decision to go with a polyethylene tank was based on many factors. Weight being the biggest of those factors and the other was the overall cost of production. To get the tanks from the Samurai nine gallon capacity to fifteen gallons was a fairly simple task. They took the stock Samurai tank and squared out the corners, which gave the tank an extra six gallons of fuel.
To help protect the new fuel tank, Petroworks created a nice zinc-plated 3/16" thick skid plate. The tank is held to the skid plate by the use of a metal strap, similar in design to those used on my automobiles. The design of the skid plate allows you to mount the new tank and skid plate to the same holes as the old tank using the old bolts.
Tools Required
- 14mm socket
- Jack
- Ratchet
- New Fuel Filter
- Ratchet extension
- Phillips screw driver
- Pliers
- 10mm socket or box end wrench
- Liquid wrench or WD40
Estimated installation time
Less than 2hrs!
Installation
Swapping tanks is fairly simple and straight forward. Before you start the project you should make sure that you are almost out of fuel, and that you soak the four mounting bolts with liquid wrench or WD40. This would also be an excellent time to replace your fuel filter if you have not done it in a while.
Place your jack under the tank and situate it so that when you remove the four tank mounting bolts it won't come crashing down. Once the jack is in place remove the four tank mounting bolts. Two are located at the rear of the vehicle next to the bumper, and the other two are located near the rear shocks' upper mounts.
While you are removing the two bolts next to the shock mount go ahead and remove the soft line off the fuel filter input side.
In the right rear quarter panel there is a dust cover over the fuel filler. This cover is held in place by 3 10mm bolts. Remove them and remove the plate so that you have easy access to the fuel filler hose. Using a 10mm ratchet, loosen the hose clamp around the filler hose.
 Now
drop the jack a little at a time so that you can gain access to the hoses on top
of the tank. Once the top of the tank is accessible you will find four hoses:
Now
drop the jack a little at a time so that you can gain access to the hoses on top
of the tank. Once the top of the tank is accessible you will find four hoses:
- Fuel pick-up line
- Fuel tank breather line
- Fuel return line
- Top fuel filler line
Also remove the fuel sending unit wire from the top of the fuel sending unit. You can also remove the fuel filler hose coming into the tank from the side.
You can now disconnect the rest of the soft lines.
 The
new tank uses brass connectors to connect the existing hoses to the new ones.
Using the jack, jack up the new tank just enough so that you can start
connecting the hoses.
The
new tank uses brass connectors to connect the existing hoses to the new ones.
Using the jack, jack up the new tank just enough so that you can start
connecting the hoses.
 Use
the new fuel sending line to connect directly to the fuel filter. Since the
stock fuel sending unit does not have a ground wire you will have to locate a
grounding point to ground the new unit. Be sure to remove the fuel sending unit
wire from the top of the old tank so that you may use it again to reconnect.
Use
the new fuel sending line to connect directly to the fuel filter. Since the
stock fuel sending unit does not have a ground wire you will have to locate a
grounding point to ground the new unit. Be sure to remove the fuel sending unit
wire from the top of the old tank so that you may use it again to reconnect.


Jack
the tank up and align the skid plate mounting holes to the vehicle mounts, and
secure it in place.

The
only problem you may run into mounting the new tank is the location of your
exhaust. The rear exhaust mounting bracket on my vehicle rubs the side of the
skid plate, which required a little adjustment of the bracket to prevent any
annoying rubbing.
Impressions
I am quite pleased with the new tank, and can't wait to get it on the trail to see how it holds up to unforgiving rocks. The tank does hang slightly lower than the stock tank, but the added protection of the skid plate makes up for it.
I have noticed that I make a lot fewer fuel stops with the added capacity. I never thought I would ever put $20 worth of low octane fuel into my Zuk. A bonus to the design of the tank is that if you don't believe your fuel gauge you can always look at the tank and see how much fuel you actually have left!
|
Off-Road.com Newsletter Join our Weekly Newsletter to get the latest off-road news, reviews, events, and alerts! |
Follow @Off-Road
 Your Privacy Choices