|
"Race on Sunday, sell on Monday" has long been the philosophy of the auto manufacturers, who boldly promote their cars on the racing circuit to sell more of them to the public for use on the street. Until now, this quote has not been applicable to Suzuki 4x4s. Have you ever been out on the trail when you or a friend has bent or torn the stock transfer case mounts? This has become a more common occurrence as many Suzuki owners choose to upgrade to a 1600cc or larger engine. Even with an unmodified 1300, the 4.16 and 4.89 transfer cases provide so much torque multiplication that the stock mounting brackets can--and do--fail. Sometimes the problem is nothing more than one or both of the transfer case arms bending; other times, the transfer case has been known to completely fall out the bottom of the truck!
The problem is not with the quality of these other units, but with the way in which the mounts were designed by Suzuki to bolt to the transfer case. No matter how strong the new mounts are, existing designs have still utilized only the four stock bolt holes in the transfer case. Those holes can only handle a certain amount of torque until they shear or oval. Until recently, nobody had engineered a stronger mount design. When Rick Rogers, owner of Mild to Wild Suzukis in Grants Pass, Oregon, built a Samurai to race in the Tuff Truck circuit, one consistent problem he had while testing the truck was the transfer case mounts. High RPMs, jumps, and aggressive driving made even the aftermarket mounts useless. Racing caused so much torque--twisting the transfer case on its brackets--that it actually cracked the transfer case housing!
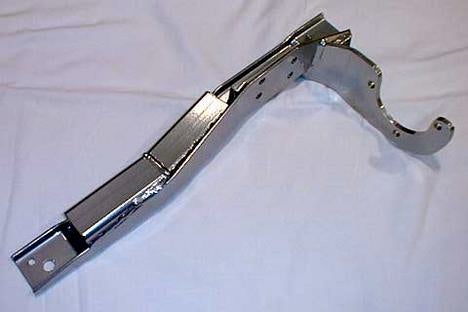
Despite the already compromised integrity of Air Zuk's transfer case housing, the bracket survived all the testing. In fact, throughout the entire racing season there was not one problem with the mount or the transfer case. The problem was solved! Mild to Wild had never intended to bring this bracket to market--until they realized just how often Samurais came into their shop with bent mounts, torn mounts, sheared mounting bolts, and even split transfer case housings. Their customers were begging for them to make more mounts to sell, so considering all the testing the original mount had backing it, that's exactly what they did. Even with standard aftermarket reinforced transfer case mounts (both the long and the short arms), my transfer case was always plagued with problems. The mounts themselves held up fine, but vibration caused by my steep U-joint angles combined with the torque from my 4.89:1 transfer case caused the four transfer case mounting bolts to back out every 1000-2000 miles, especially after rock crawling or high-speed sand dune climbing. At my first opportunity I ordered one of these brackets, only to find a slight delay in delivery since the first stock had sold out on the first day! Upon first holding the unit in my hands, I immediately got a sense of quality. First, this thing is much heavier than the reinforced bracket I previously owned. This is due to the fact that the bracing is really thick, and the additional bracketry is made from quarter-inch steel! Second, the quality of the welds is much better than anything I could do. And third, this thing looks just plain cool! Available with either a standard black-painted finish or high-tech-looking Alumicoat, I was glad that I had chosen the latter. It looks like a part off of a spaceship. So nice, in fact, that it made me feel bad to bolt it up underneath "Buster" where it will get all dirty! Installation
Once you unbolt the long and short transfer case brackets from each frame rail, you can carefully maneuver the transfer case to allow first one and then the other mount to clear the frame. Carefully lower the t-case to the floor. One person can do this, but you must be careful not to let the case slip and fall onto your head or chest! Once you have the transfer case out, inspect the housing, mounts, and bushings for any damage. Carefully unscrew the four bolts that attach the long arm to the housing. Thoroughly clean the seven bolt holes that the new bracket will use with liberal amounts of WD-40. Then position the new bracket on the case so you can loosely thread the four stock bolts into their normal location. This will allow you to thread the three supplied bolts into the holes around the rear output flange. The fit will be tight because the mount is designed to be very close, but all Mild to Wild mounts are installed and tested before being shipped to guarantee their fit. Once all the bolts are loosely threaded, evenly tighten them until all are at 20 foot-pounds of torque. After inspecting the stock rubber bushings for any tears, reinstall them on the new bracket before positioning the transfer case back underneath the truck. Bolt the transfer case brackets back onto the frame, reattach the drive shafts, speedometer cable, shifter boot and knob and you should be done. You should not see or hear any additional vibrations or noise during a test drive. Should you notice any vibration developing, be sure to check that the bolts are tight. You will also want to periodically check the torque on the transfer case bolts, a normal procedure for parts that have been powder coated. Impressions
With my old transfer case mount, I always used lots of lock-tight on the bolts and carefully over-torqued them to try to reduce the frequency of removal and retightening. With this new mount, I followed the included instructions. So far, no bolts have backed themselves out, but only time will tell if this problem is solved permanently. I suspect it will be, since the four standard bolts are less stressed than before and subject to less vibration. Although at $129.00 (or $149.00 including a reinforced t-case short arm) it is more expensive than other aftermarket transfer case mounts, it is plainly obvious that no corners were cut with the design and construction of this mount. In talking with Rick, I found out that the mount's additional bracketry and the time involved with its assembly necessitate the cost. For most users, it is worth the minor initial investment for the peace of mind that comes with the elimination of common problems and the possibility of cracking the housing on that $1,200 transfer case miles from the nearest pavement. For Mild to Wild Suzukis, the saying, "Race on Sunday, sell on Monday," definitely applies. Having proved the durability of their transfer case mount in one of the toughest racing series on Earth, it will undoubtedly hold up to just about any punishment anyone could put it through. |


|
Off-Road.com Newsletter Join our Weekly Newsletter to get the latest off-road news, reviews, events, and alerts! |
Follow @Off-Road
 Your Privacy Choices