Before the actual suspension and steering components were worked on, some critical parts had to be put in place. For example, the motor, the transmission and the two transfer cases had to be installed to make sure the suspension cleared them properly. Vehicle owner Wes Holmes also notched the oilpan and frame to allow for a lower ride height.
And, of course, many of the steering components were attached to the differential and frame in some fashion.
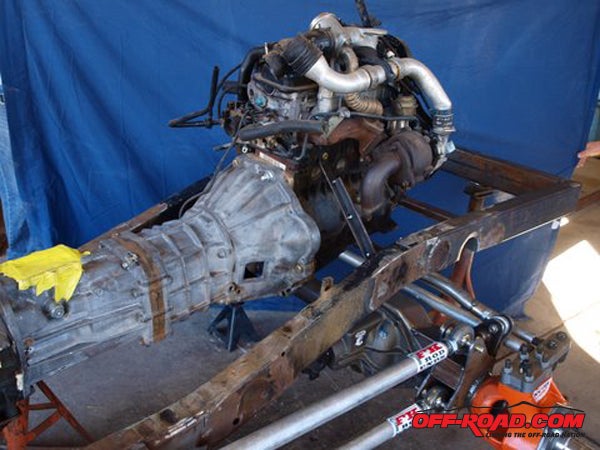
The Acme Adapter's kit for a 1.9L VW TDI motor was used, which includes motor mounts, flywheel and motor to bell housing adapter. The motor was then set into the chassis with the Toyota transmission and an Advance Adapters dual-case setup, making the motor, tranny and dual case transfers all one piece. With the motor now mounted up to the Suzuki frame where the stock motor originally bolted in, it was now known where the cross members needed to be for the dual-case setup.
Previous Project Samurai Stories:
Part 2: Fabrication Work Begins
Part 1: Project Samurai Outline
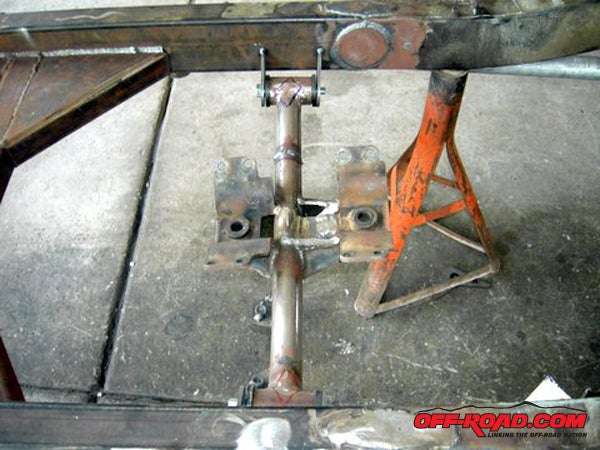
Urethane bushings were used on each side of the frame, using D-tabs to mount the bushings to the frame. A tube was then run from one side of the frame to the other, connecting the two bushings together. The rubber was then cut from the factory transfer case mounts and they were welded to the tube going from bushing to bushing. This insulated the drivetrain from the frame via urethane bushings. Synergy Suspension has a wide range of tabs and mounts that make the build easier, faster and cleaner.
The differentials were now assembled together.
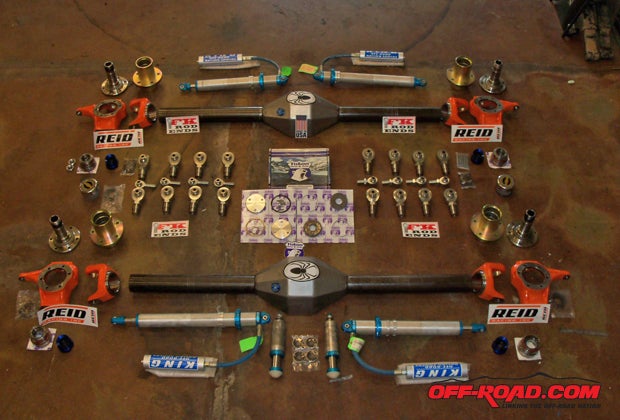
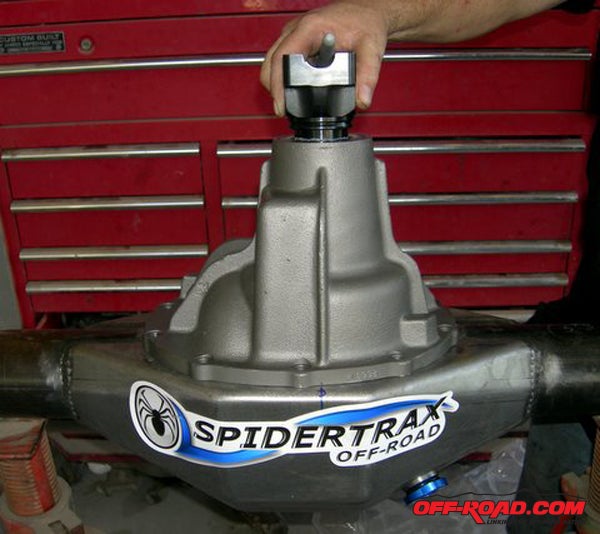
The Spidertrax housing was set on jack stands and the Yukon high pinion third member and the Grizzly lockers were installed. Then it was marked where the center will be when sitting in the vehicle, not where center is on the housing. In other words, the third member on your front end may sit all the way to the right or left, depending on the transfer case. Ours sets to the right, so our t-case is a right-hand drop.
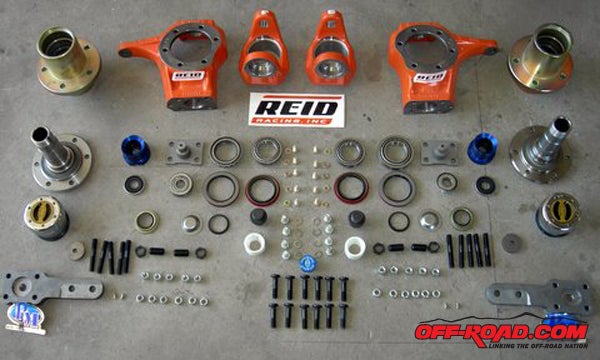
We found the center between the two frame rails and then marked that on our housing. Below is a photo of all the parts that need to be assembled first to determine our track width.
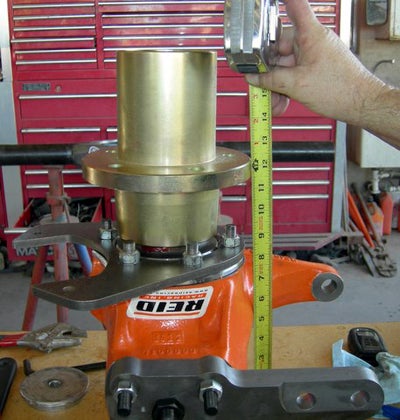
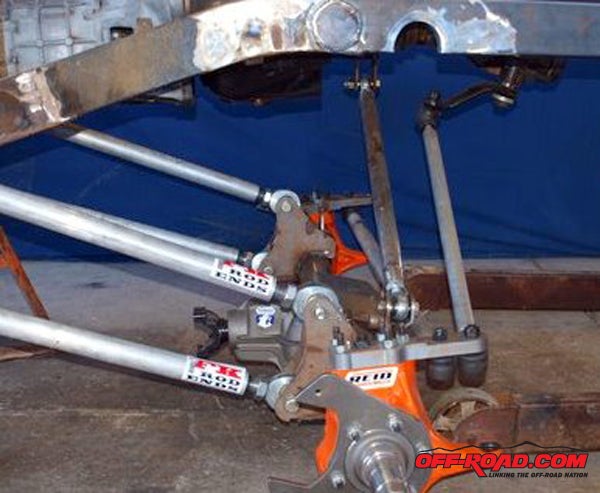
Once assembled, it was placed vertical and measured from the table to the wheel face of the hub. The measurement, using Reid Racing knuckles and Randy's Ring & Pinion spindles and hubs, came out to 12 1/4 inches.
After determining the track width that was divided in half and 12 1/4 inches was subtracted from that. However, don't make the cut there. You have to measure the distance from the outside of the knuckle to the inside of the knuckle, where the axle tube slips in the knuckle and add that amount to your axle tube measurement -otherwise you will come up about six inches short.
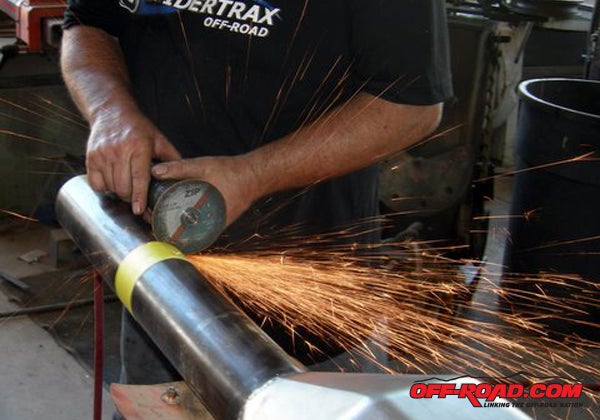
The axle tube actually cuts very easily. We used two-inch masking tape around the axle tube for a straight line and used a simple die grinder to make the cuts. Then slid the knuckle and hub assembly onto the axle tube and tack them into place.
The third member housing was set at 4 degrees on the jack stands and the caster at roughly 5 degrees using an angle finder, and tacked them into place. The same routine applies to front and rear axle housings. After building front and rear housings and tacking the knuckles into place, we were able to take the axle housings and set them into the frame where we want them positioned to create our wheelbase. These were tacked to the frame at full compression.
This is where Synergy can make life easy on you. Holmes suggests that you go online and check out their product line. He purchased front mounts that weld to the axle tubes for the 4-link, as well as mounts that weld to the frame for our upper and lower 4-links to help save many hours of fabrication.
Holmes temporarily bolted the FK Rod-ends into the 4-link mounts that were tacked to the Spidertrax housing. To determine the length of your link bars, this measurement gets very technical. There are articles all over the Internet on how to do this. Holmes notes that the best tip he can give you is tack, tack, tack! Do not weld anything yet. The vehicle will almost be built before you weld anything.
Cycle your suspension up and down, articulate and steer. If a tack breaks, most likely something is in a bind. It's very important to use quality rod-ends.
Holmes notes that hes seen more people broken down on the trail and race vehicles severely wrecked due to cheap rod-ends. That's why he used American-made, high-quality FK Rod-ends. Do not skimp here. Quality is so very critical.
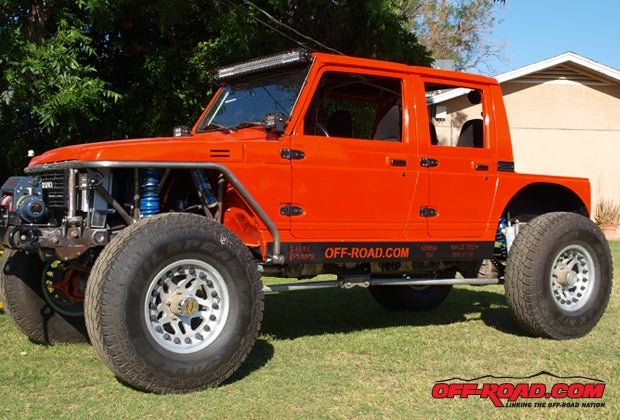
The tub was now set back onto the frame to determine how much material is needed to be removed for the rear steering. This is where the sawzall, torches and a die grinder come out. The fenders and wheel wells were cut out and Holmes used sheet metal to build new wheel wells, making sure that under maximum articulation he still had clearance for the Falken tires and Rock Monster Wheels.
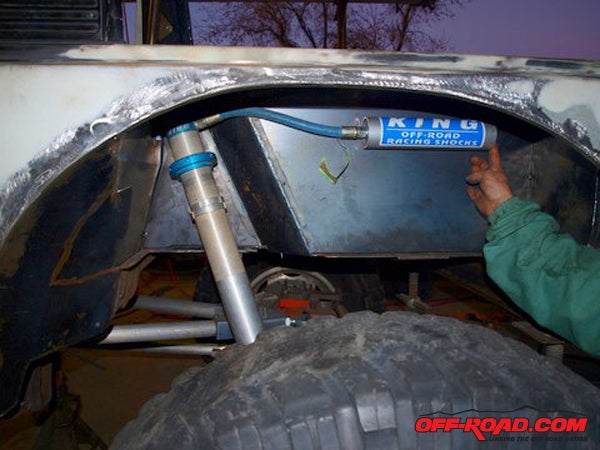
Holmes cut the fender and fenderwells allowing the suspension to be at full articulation. He could now tell where to mount the shocks. He built new fender wells incorporating shock mounts. That was then tied into the cage.
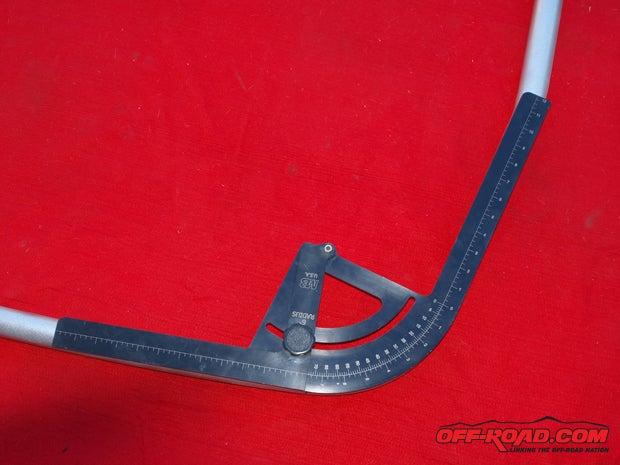
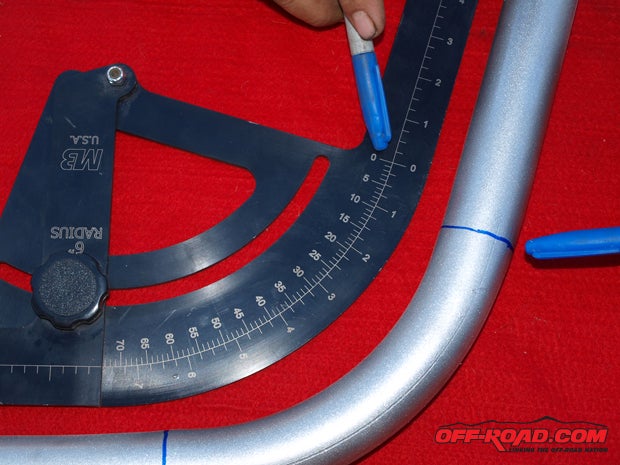

Now, its time to start the roll cage. For those of you who have never bent tubing before, and even for those who have, Mittler Bros has bend protractors that make this job simple. It tells you your angle, where your bend begins and where it ends, and how much material will be used in the bend.
The cage was built in the cab first. That allowed Holmes to come off the cage and tie-in to the firewall for the engine cage. With the suspension at full bump and the shocks tacked to the differential, this helped determine the height that our engine cage would need to be. Things like radiator height, steering linkage, exhaust, alternator and power steering, all need to be factored.
To help accomplish this we chose a custom-built Ron Davis radiator. The 1.9L TDI engine water outlets are both on the left-hand side of the motor. Ron Davis built a dual-pass radiator with outlets matching the size of the outlets on the motor (1 1/2").
This means our inlets and outlets are on the same side of the radiator, with a divider in between the upper and lower hoses, causing the water to go through the radiator twice, thus giving it the name "dual pass" radiator.
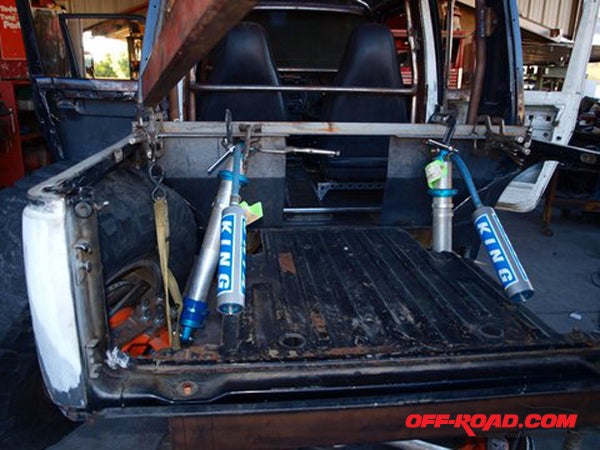
When it came to deciding which shock manufacturer to go with, it was hands down King Shocks. The technical support that comes with each purchase is second to none. Whether youre a big name racer or just the average Joe, they treat you the same.
The suspension was put at full bump and mounts and tabs were tacked on where Holmes thought the shocks should go. That helped determine what kind of shock length would work. He didn't want the shock towers sticking out of the hood or rear fenders, so he opted for King's 14-inch short-body shocks. What that means is the upper shock body and the shock mount is slightly shorter than a normal 14-inch shock, allowing 14 inches of shock travel while still keeping the shocks under the hood.
Now the process of cycling began again cycling the suspension up, down, left, right. An old steering box was hooked to the tie rod and relay rod and wheels turned full bump left and full bump right. Because of the RCV axles, Holmes cut off the steering stops from the Reid Knuckles allowing him to maximize the steering available. Not only do the RCV axles increase steering angle, they are stronger than a U-joint axle and they also help eliminate wheel hop, not to mention they also come with a lifetime warranty.
There is much to be learned on how to properly set up your steering. We would like to do a segment on the "how- to." This would be great for the pros and the backyard enthusiast both.
Previous Project Samurai Stories:
Part 2: Fabrication Work Begins
Part 1: Project Samurai Outline
SOURCES
Randy's Ring and Pinion
866-631-0196
10411 Airport Road
Everett, Wa.98204
Neal Hollingsworth ext. 5587
Kevin ext 5581
http://www.ringpinion.com/
nealhollingsworth@ringpinion.com
Trail Tough Products
877-789-8547
1031 Narregan St.
Medford, Or. 97501
http://www.trailtough.com/
supplier Brent Bradshaw
blbradshaw@msn.com
Ron Davis Radiators
623-877-5000
7334 N 108th Ave.
Glendale, Az. 85307
http://www.rondavisradiators.com/
Dennis
dennis@rondavisradiators.com
King Shocks
714-530-8701
12842 Joy St.
Garden Grove, Ca. 92840
Mike or Brett
http://www.kingshocks.com/
info@kingshocks.com
mike@kingshocks.com
Currie Enterprises
714-367-2676
714-528-6957
1480 N Tustin Ave.
Anaheim, Ca. 92807
http://www.currieenterprises.com/
brian@currieenterprises.com
RCV Performance
815-877-7473
611 Beacon St
Loves Park, Il. 61111
765-362-1909 765-307-7441
Owners Craig and John 815-877-7473
rcvcraig@gmail.com
http://www.rcv.com/
Rally Tops
800-664-8677
Los Angeles, Ca
http://www.rallytops.com/
Jerry Mancini - rallytops@gmail.com
Howe Performance
619-561-7764
12476 Julian Ave
Lakeside, Ca.92046
http://www.howeperformance.com/
Shake and Shoot Bedliner
Dominion Sure Seal
800-265-0790
6175 Danville Road
Mmississauga, Ontario,
Canada L5T2H7
Acme Adapters
971-212-2263
P O Box 2258
Clackamas, Or. 97015
Jeff Kerr
sales@acmeadapters.com
http://www.acmeadapters.com/
King One Winch
714-593-3400
18424 Mount Langley St
Fountain Valley, Ca. 92708
Rocky Road Outfitters
888-801-7271
1920 WendellLane
Heber, Utah 84032
http://www.rockyroadoutfitters.com/
gwbuild@rocky-road.com
Lithionics Battery
855-726-4204
727-726-4204
2449 McMullen Booth Rd
Clearwater, Fla. 33759
http://www.lithionicsbattery.com/
Steve Tartaglia
info@lithionicsbattery.com
Kerma TDI
877-537-6283
3000 Eaglebend Dr
Box 2142
Avon, Co. 81620
http://www.kermatdi.com/
Paul
info@kermatdi.com
Rigid Industries
480-655-0100
4641 E Ivy St
Mesa, Az. 85205
http://www.rigidindustries.com/
Paul and Damon
Advance Adapter
800-350-2223
4320 Aerotech Center Way
Paso Robles, Ca. 93446
http://www.advanceadapters.com/
Reid Racing
925-935-3025
1917 Oak Park Blvd
Pleasant Hill, Ca. 94523
http://www.reidracing.com/
Spidertrax
800-286-0898
7510 Hygiene road
Longmont, co. 80503
http://www.spidertrax.com/
FK Rod Ends
800-662-4003
860-628-8722
865 W Queen St.
Southington, Ct. 06489
http://www.fkrodends.com/
sales@fkrpdends.com
Yukon Gear and Axle
888-905-5044
10411 Airport Road
Everett, Wa.98204
http://www.yukongear.com/
AAPAK
602-467-3752
1845 Grand Ave
Phoenix, Az. 85007
Tawn Berman
http://www.aapak.com/
Mittler Bros. MAchine and Tool
800-467-2464
10 Cooperative Way
Wright City, Missouri 63390
Mike or Pam
http://www.mittlerbros.com/
FASS Fuel Systems
866-769-3747
|
Off-Road.com Newsletter Join our Weekly Newsletter to get the latest off-road news, reviews, events, and alerts! |
Follow @Off-Road
 Your Privacy Choices