DG's Baja Pipe 400EX Exhaust up-grade
Suddenly, a new contender enters the ring!
Our trusty 400EX is the test
bed for yet another exhaust system upgrade. Because four cycle
engines behave much differently than two cycle engines swapping out
pipe systems is much easier. In our case all the hard work was
already done. The jetting and airbox mods were changed for the
"other" pipe we reviewed. All that was needed to do was remove the
current pipe in use and replace it with the DG unit. This was
easily accomplished and we did not even have to remove the oil tank
to do it!
 |
DG's Baja
Pipe. |
When all else fails, read the instructions!
 |
|
This
"hook" holds the Clutch Cable off the hot pipe. |
Following the directions is always a good idea no doubt but after searching
high and low for them with my pipe kit to no avail I decided to
"wing it". No big stretch here as this system almost falls
together. One item, a small s-hooked shaped piece of stamped steel,
gave me some trouble as to just what its function in all of this
was . After some serious head scratching, I was able to determine
its use. More on it in a minute. One thing to remember, for a clean
installation you must replace the copper crush gaskets that go
between the pipe and the cylinder head. For about five bucks a pair
this is a must do and they will insure that the exhaust exits the
end of the pipe and not the beginning!
Insert tab "A" into slot "B".
If you are upgrading your system from stock the first step is to
remove the factory pipe. To remove the factory pipe you must
remove the oil tank. Prior to removing the tank you have to drain
it. If you're going to drain your tank you might as well change the
oil. Follow the instructions that came with your quad (owners
manual) for changing the oil, just wait to refill your
 |
|
The
workmanship on this pipe is outstanding. |
oil tank until the pipe install is complete. Once the oil is drained and the tank is out of the way extricate the stocker pipe as required. Be careful with the hardware on the exhaust studs as they might have seized in place over time. A good penetrating oil will help here. Just go carefully as a broken stud will ruin your day. Also remove the copper crush gaskets from the cylinder head exhaust port area. I used an O-ring pick to dislodge the gaskets on my 400, a small screw driver will work as well. I used a large socket (1&1/8) to help seat the new copper gaskets into place making it easier to install the headers. Installing the new pipe is an easy task and the only part that had me on the ropes was the purpose of the stamped S-shaped gizmo. After some careful consideration, I was able to determine it's use. It is installed under one of the nuts on the header studs and it holds the clutch cable from touching the exhaust pipe. This is a great idea and keeps the cable housing from going into melt down. The rear half of the pipe is an easy fit and all that is needed to be done prior to installing it is to apply some high temp sealant to the connection between the front and rear sections. Unlike the Big Gun exhaust system the muffler section bolts to the frame in three places and the hardware for the third mount is supplied. Once everything is in place you can tighten all the hardware.
Take a deep breath!
For any exhaust system to work it
has to efficiently move the exhaust gasses from the engine. The
more it can move the more efficient it is. The DG pipe has the
ability to move large volumes of spent gasses the question is how
much air can we get into the engine? To get maximum
performance out of your new pipe you must re-jet your quad and
install a high performance air filter. Because my 400 has already
been set up for an aftermarket exhaust no additional work was
needed on my part but for those of you who are doing this for the
first time I will offer instruction on re-jetting your quad and the
adding a quality air filter. In the finest plagiaristic fashion I
will "cut and paste" this information from a previous article I
have written.
 |
| Here is what you get your your money! |
(The following is an encore presentation)
"I'll take a few of dees and a couple of does"
Before I got started installing the new pipe I made a trip to the
local cycle shop to acquire a few odds and ends. I needed to re-jet
my carburetor. Expert advice said I will need to change my pilot
jet from the stock #38 to a #40 or #42 and my main jet from a stock
#148 to a #158 or #160. I opted to use the # 40 and the #158. I
also picked up some new copper crush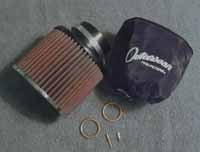 gaskets(Honda
P/N 18291-MN5-650) for the headers so I would have a leak free
installation. Because the engine will be able to breath better you
will need to get more air to the engine. Say adios to the air box
lid! Feeling that the stock air filter would be unable to handle
the additional debris that that will enter the airbox area because
of the lid missing, not to mention restrict airflow, I opted to
replace it with a K&N air filter(P/N HA-4099). I topped it all
off with an Outerwears filter cover just in case. Besides it is
cheaper than a new engine! After a SNAFU at the checkout counter I
was off with my bag of goodies to rip and tear at the respiratory
system of the 400. .
gaskets(Honda
P/N 18291-MN5-650) for the headers so I would have a leak free
installation. Because the engine will be able to breath better you
will need to get more air to the engine. Say adios to the air box
lid! Feeling that the stock air filter would be unable to handle
the additional debris that that will enter the airbox area because
of the lid missing, not to mention restrict airflow, I opted to
replace it with a K&N air filter(P/N HA-4099). I topped it all
off with an Outerwears filter cover just in case. Besides it is
cheaper than a new engine! After a SNAFU at the checkout counter I
was off with my bag of goodies to rip and tear at the respiratory
system of the 400. .
 gaskets(Honda
P/N 18291-MN5-650) for the headers so I would have a leak free
installation. Because the engine will be able to breath better you
will need to get more air to the engine. Say adios to the air box
lid! Feeling that the stock air filter would be unable to handle
the additional debris that that will enter the airbox area because
of the lid missing, not to mention restrict airflow, I opted to
replace it with a K&N air filter(P/N HA-4099). I topped it all
off with an Outerwears filter cover just in case. Besides it is
cheaper than a new engine! After a SNAFU at the checkout counter I
was off with my bag of goodies to rip and tear at the respiratory
system of the 400. .
gaskets(Honda
P/N 18291-MN5-650) for the headers so I would have a leak free
installation. Because the engine will be able to breath better you
will need to get more air to the engine. Say adios to the air box
lid! Feeling that the stock air filter would be unable to handle
the additional debris that that will enter the airbox area because
of the lid missing, not to mention restrict airflow, I opted to
replace it with a K&N air filter(P/N HA-4099). I topped it all
off with an Outerwears filter cover just in case. Besides it is
cheaper than a new engine! After a SNAFU at the checkout counter I
was off with my bag of goodies to rip and tear at the respiratory
system of the 400. . (The following is an encore presentation)
I am not a doctor, but I play one on-line.
I am not a doctor, but I play one on-line.
Time for some out-patient surgery. Remember the jets we bought?
Yep, that's right, we are going to install them. This means getting
access to your carburetor and removing it. I
was able to complete all the work needed without disconnecting the
throttle cable. I just removed the carb from the ducting and
flipped it over as required. Upon removing the float bowl you
will find the pilot and the main jets. Replace them with the new
jets and replace the float bowl. If you are unsure what jetting you
will need for your altitude and conditions give the boys at your
local bike shop a call. They are very knowledgeable and will get
you very close if not dead on.
float bowl you
will find the pilot and the main jets. Replace them with the new
jets and replace the float bowl. If you are unsure what jetting you
will need for your altitude and conditions give the boys at your
local bike shop a call. They are very knowledgeable and will get
you very close if not dead on.
The next thing to do is raise the
needle one notch (again, ask your local expert to guide you for
your particular conditions). I bet some of you out there did not
know you could raise or lower the needle. Some of you might not
even know there was a needle! The needle is tapered to a point and
acts like a metering valve. It slides in and out of the main jet
controlling the rate of fuel delivery to the engine. As the needle
moves up it allows
more fuel to flow. We want more fuel(to mix with all the extra air
we are now getting) and it needs it sooner. So, by raising the
needle one notch (lowering the 'c' clip one notch) more fuel is
added sooner. To get to the slide, remove the three bolts that hold
the top cover in the carb, and remove the slide. I will
not regale you with every step on removing the slide from the carb
so as not to bore everybody to sleep. Suffice to say it is a pain
to get the slide dislodged from the carb but if you work at it it's
no big deal. After you have the slide in hand look inside. You will see two screws, remove them and
you can remove the needle. Now just lower the clip to the
predetermined position and put it all back together. Take a close
look at the pictures and you will see everything I am talking
about.
allows
more fuel to flow. We want more fuel(to mix with all the extra air
we are now getting) and it needs it sooner. So, by raising the
needle one notch (lowering the 'c' clip one notch) more fuel is
added sooner. To get to the slide, remove the three bolts that hold
the top cover in the carb, and remove the slide. I will
not regale you with every step on removing the slide from the carb
so as not to bore everybody to sleep. Suffice to say it is a pain
to get the slide dislodged from the carb but if you work at it it's
no big deal. After you have the slide in hand look inside. You will see two screws, remove them and
you can remove the needle. Now just lower the clip to the
predetermined position and put it all back together. Take a close
look at the pictures and you will see everything I am talking
about.
 Once the
carb has its new jets, needle position, and has been reinstalled
the final step is upon us. It's time to remove the stock air filter
and install a high performance filter. We chose a K&N filter
complemented with a Outerwears pre-filter. The airbox lid is
removed to install the new filters and that is where it needs to
stay. It is no longer required and will degrade performance if it
is on. Just make sure you are running a good quality filter arrangement so you don't FOD your engine! Whew,
with everything back together its time for the fun part! The test
ride.
Once the
carb has its new jets, needle position, and has been reinstalled
the final step is upon us. It's time to remove the stock air filter
and install a high performance filter. We chose a K&N filter
complemented with a Outerwears pre-filter. The airbox lid is
removed to install the new filters and that is where it needs to
stay. It is no longer required and will degrade performance if it
is on. Just make sure you are running a good quality filter arrangement so you don't FOD your engine! Whew,
with everything back together its time for the fun part! The test
ride.
"Anit nothin' but a thing!"
 |
Looks
Good! |
Parting thought...
I feel the DG Baja pipe is an excellent value and would be a great
way to improve the overall performance of your quad. If you're
looking for a little edge on your buddies give the DG pipe a try
and leave them fellers in the dust! 'Till next time, ride safe!
|
Off-Road.com Newsletter Join our Weekly Newsletter to get the latest off-road news, reviews, events, and alerts! |
Follow @Off-Road
 Your Privacy Choices