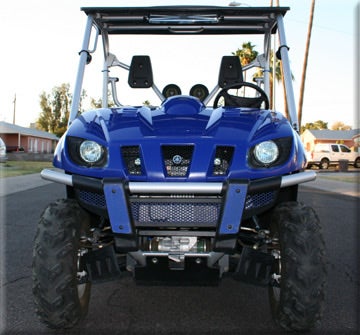
Project Blue Horn Yamaha Rhino - Takin' It to the Street
Make your side-by-side a go-getter AND a grocery getter

 In State of Arizona you can register your Rhino with the Arizona Department of Transportation as a motorcycle to be driven on the street (for any other state you will need to consult your local vehicle authorities). The equipment required beyond the factory supplied equipment are as follows; horn, license plate and tags, license plate light, rear view mirror, and windshield. If no windshield is installed on the vehicle, its occupants must wear glasses. Also be aware that all occupants must wear seatbelts at all times, this is a State Law. After a receiving the license plate for the Project Rhino I contacted Jim Chaney at Arizona Sports Center in Glendale, Arizona to see if he could help me out with some cool accessories. Jim was more than glad to contribute, he told me to give him a couple of days and he would be ready…When I arrived at the shop Jim was prepared, he met me with a big smile and an even bigger box of goodies. Not only did Jim set me up with the right equipment to legalize the project ride, he was generous enough to give me some of his newest products that were hot off the polisher!
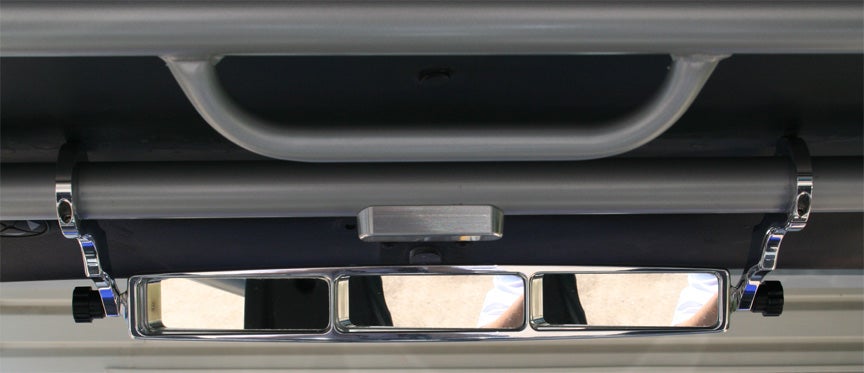
Once in the garage, the first pieces of equipment to emerge from the box were the polished billet 3 panel rear view mirror and a set of Molly Hatchet polished billet clamps. The hatchet clamps are for use with the factory cage as they project the mirror out far enough from the front bar to be able to actually see an object behind you. If you’ve got a top on your Rhino you’ll need to remove it so that you can install and adjust the arms at the preferred angle, then once you’ve got it right where you want it, you can reinstall your roof. These products provide great looking functionality in an easy to install package.
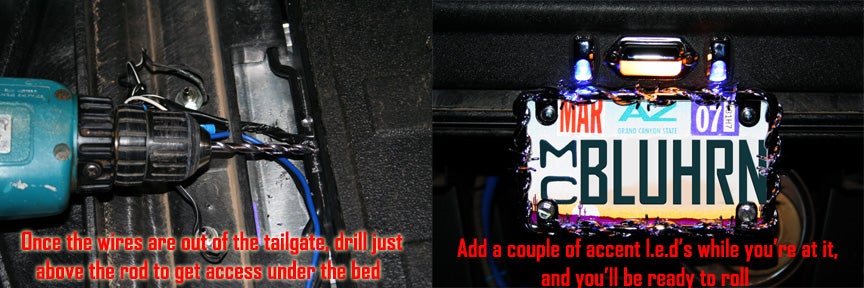
Next on the agenda was mounting the license plate and light, the light comes complete with wires, split loom, and connectors. To install the plate there are several pre-drilled holes in the plastic on either side of center below the tailgate that will perfectly accommodate the spacing for the license plate. Mounting can be accomplished by using two short panhead sheetmetal screws. One positive aspect of locating your plate in this location is that your plate will fold under with the gate when it is dropped down reducing the possibility of bending it. I mounted the light about an inch or so above the top of the plate on the tailgate and ran the wiring through the outer plastic portion of the tailgate just inside the metal backing panel. To remove this back panel you must lower the gate, remove the side support cables and Phillips head screws to expose the inside of the plastic gate. Once the hole has been drilled behind the license plate light the wiring can be routed to a point under the vehicle bed by drilling a hole through the bottom the gate, and then through the metal just above the black metal rod behind it. Be sure to clear the holes of burrs and wrap the wires with tape or loom to avoid electrical short circuits. Once the wiring is under the bed, the blue wire going to the rear taillights can be spliced into for access to the main lighting circuit, while the other wire can be grounded to the rear bed channel with self tapping screws.
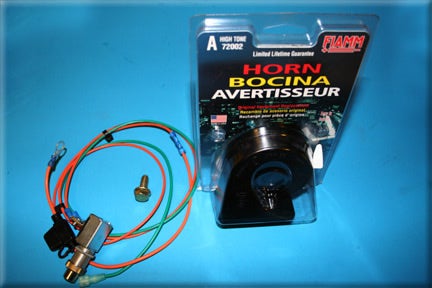
The horn kit is an easy install; the momentary pushbutton switch comes pre-wired with a fuse and connectors, while the horn contains its own brackets and connectors. A convenient location for the switch is the raised U shaped location about 4” below the red 2wd/4wd button. The orange wire on the switch can be connected directly to the positive terminal on the battery, while the green wire from the switch can be connected to one of the terminals on the horn. Once the horn is mounted using the supplied bracket, connect the short black supplied wire to the other horn terminal and then ground the other end to the vehicle frame. -Accessorizing- There is an ever growing selection of accessories for your Rhino that seem to appear daily. Some of these products are built for functionality, while others serve the purpose of beautification, so let’s take a look at some innovative and useful products available from Arizona Sports Center that are hitting the shelves as we speak.
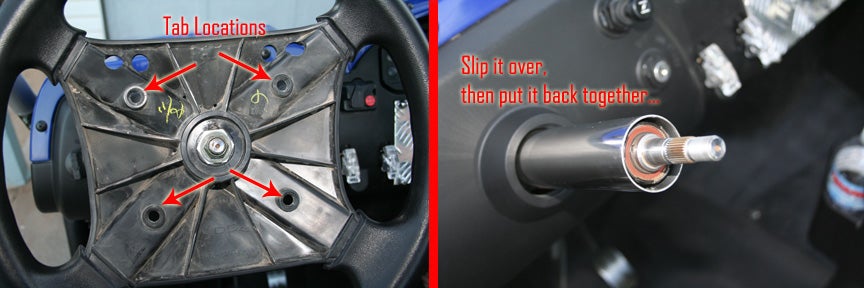
Stainless Steel Steering Cover We’ll start out with the polished stainless steering column cover; this polished tube adds that extra bit of shine contrasting brightly against the black dash. To install this tube merely remove the center steering wheel cover by pushing the 4 tabs together on the back of the wheel. Once the cover is removed, unscrew the center nut from the shaft. Before removing the wheel, mark the center shaft and surrounding splines on the wheel with a marker so that the wheel can be reinstalled in the same position. Now grasp the wheel with both hands on opposite sides and tug while rocking the wheel. Once the wheel is off, slip the cover over the shaft as far in as it will go. Now reassemble the wheel, nut, and cover…voilá.
Billet Light Clamps and Speaker Lites These handy clamps have as many as uses as you can imagine, they’re available in the two sizes that will fit the Rhinos’ 1 ½” and 1 ¾” tubing diameters. Not only are these clamps strong and sturdy, they’ve also been machined to hide the mounting nuts for fixtures like Arizona Sports Centers own light housing mounted speakers. These Speaker Lites and clamps allow you to mount speakers just about anywhere you can imagine on your ride. With this application you will no longer be forced to sacrifice valuable space for the sake of locating your great sounding equipment. So if you’re in search of a bar clamp or enclosed speakers with a flare of their own, look no further these babies have got you wired for sound.
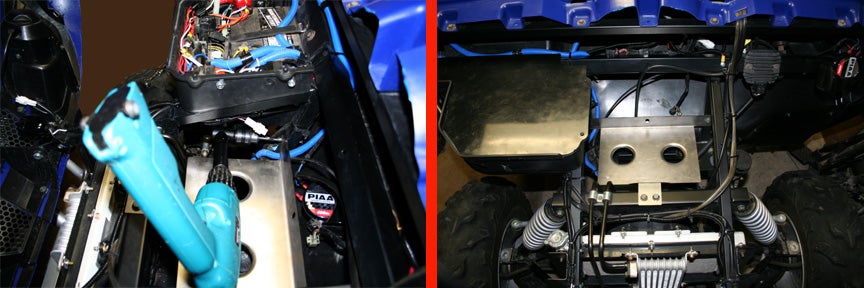
Battery Tray With all of current draining devices we add to our vehicles such as; high wattage lights, amplifiers, and winches, it’s a good idea to upgrade the battery to keep up with the load, but first we must have a convenient spot allocated for this upgrade. That’s where the battery tray comes into play; it mounts next to the existing battery, centered in the middle of the frame for maximum weight distribution. This steel tray fits right into position with only 4 holes to drill. To make matters easier when drilling 2 of the back holes I would recommend using an angle drill or an angle drill attachment. This attachment will allow you to maneuver the drill in at a 90 degree angle, creating a straight penetration through both layers of the tubing material. Once installed the tray can also be used to store other items such as a tool box, or maybe even a 6-pack cooler. For now the tray will be empty, but there are plans to fill it along with some other major electrical changes to the project Rhino coming very soon…
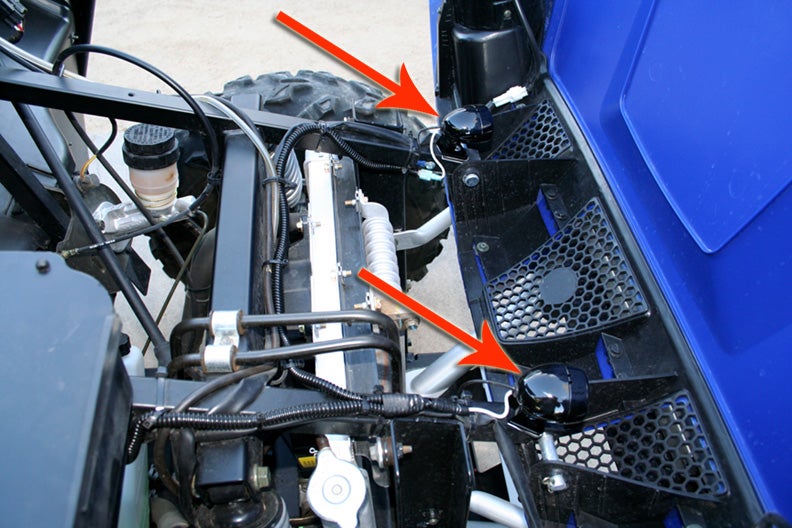
Driving Lights When I think of Rhino and lights I immediately think of front roll bar or front bumper mounted fixtures. I wanted something different, so when I pulled the driving light kit from the box Jim had packed, I immediately searched for a spot that was a bit more unique. Lo and behold I quickly located a stable out of the way spot that is easy to wire. The location for each of these fixtures is just behind the front grill between the headlights and the center section on each side. The lights are mounted with a self tapping screw on top of the steel tubing just behind the hinge pins for the hood. These fixtures are the perfect size for this application, and they blend right in with the black surroundings under the hood. Simply run the positive wires in a wire loom to the supplied switch on the dash, and ground the black wire on each light with a self tapping screw to the side of the tubing. Power the switch with the supplied fused lead from the battery and you’re ready to light ‘em up. I found it best to adjust these lights is forward and slightly down so that I could to take advantage of the lower lighting levels found in between the stock headlights.
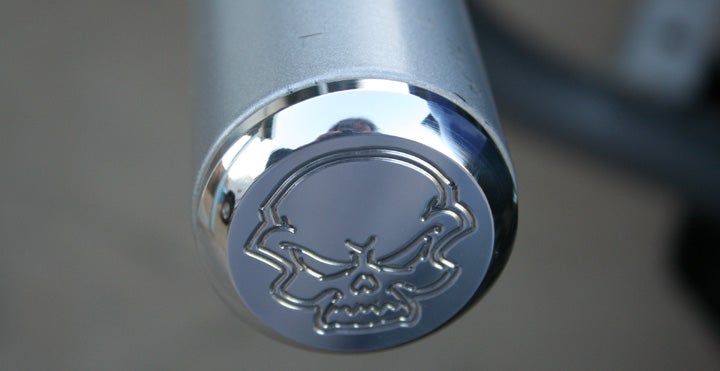
Billet, Billet, Billet, and Chrome These next 4 products are quick and easy to install, but they sure do add that extra eye catching flare. The polished billet bumper caps add that glare of mirror polished billet with a machined skull or several other choices available on the face. To install these caps; pop off the plastic stock caps with a screwdriver and simply push in the billet caps, built onto the rear of the cap is an o-ring for a tight fit that securely holds it in place.
Dome Light One device that should be a must for those night riders has got to be a dome light. Generally night riders are known to have elaborate lighting schemes mounted all over their vehicle to see the terrain around them, but most are not well known for having even one light mounted to see inside of the cab. Here we have a machined billet body combined with 6 bright l.e.d’s and a clear lens cover, very simple, very practical, and yet very useful. Consider this a call to all of you night riding Rhino fans to equip your rigs inside and out! This light is simple to install and built for the rough country. For tips on fishing the wires up from the battery box into the front roll cage, please refer to the article; “Light up the Night with Golight” in our February issue.
Winch Mount For those of you who plan a adding a winch in the future, check out this heavy duty plate. Here we have a plate that will accommodate Warn and Superwinch brand winches, and all you have to do is bolt it down using 4 existing holes in the bumper plate.
I would like to thank Jim Chaney at Arizona Sports Center for contributing his time, products, and enthusiasm to this Rhino Project. Please visit Arizona Sports Center for all of your Rhino and Off-Road Golf Cart needs. (623)842-1539
As always, ride hard, tread lightly, and travel often… Mike Martin
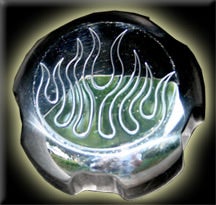
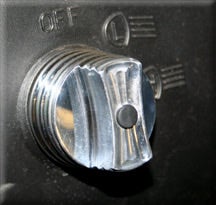
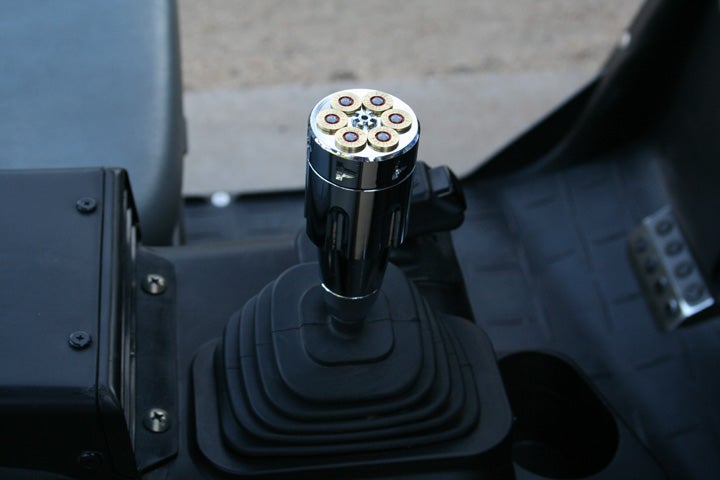
Products Listed in Article (Supplied by Arizona Sports Center) License plate light Polished stainless steering column cover Horn kit 2” 20w mini driving light kit Pair molly hatchet polished billet mirror clamps 3 panel polished billet mirrors Battery tray Pair polished billet skull front bumper end caps Billet ribbed headlight switch cover Polished billet flame gas cap Pair 1 ½” polished billet light clamps Pair 1 ¾” polished billet light clamps Custom billet l.e.d dome light Pair Speaker Lites Heavy duty winch mounting plate 44 Mag shifter
|


|
Off-Road.com Newsletter Join our Weekly Newsletter to get the latest off-road news, reviews, events, and alerts! |
Follow @Off-Road
 Your Privacy Choices