HEI Trouble Shooting
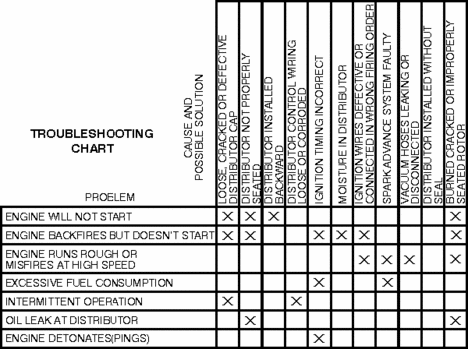
Coil:
Clean it up and look at the clear epoxy for signs
of arcing to ground.
(View of an upside down HEI
coil)
A - coil secondary output
terminal (where the carbon brush spring makes contact)
B - RED wire (BATT terminal connects here)
C - BLACK ground (held down by a coil mounting screw)
D - YELLOW (or WHITE) wire (TACH terminal)
Using this chart, make the
following Ohm Meter
tests. Any failing
test means replacing the coil.
Probe
Points
Expected Results
B-D
about 1.6 ohms
A-C
8.1-8.2 kiloohms
B-C
&
C-D
> 1.2 megaohms, but not infinite
A-B
&
A-D
infinite
Check if the ground
strap is in the coil. A broken or loose strap will arc, making a
sound like the advance weights clicking against the side of the
cap. Some new kits don't come with this strap and many forget to
put it on.
GM HEI (internal coil) 1974-1975
6k-30k ohms secondary GM HEI (internal coil) 1976-1979 Infinity GM
HEI (internal coil) 1980- (see text)
The resistance between the primary terminals of the coil
should be no more than 1.0 ohms. The resistance between the
secondary output terminal and the primary should be between 6k and
30k ohms. Integral coils on applications later than 1975 should
have infinite ohms between the secondary and the primary. However,
1980 and later applications should be replaced if there is infinite
ohms between both the primary and tach lead. This is also true of
applications later than 1980 with an externally mounted
coil.
Q: My question is why measure for DC resistance between one lead of the secondary and a lead of the primary anyway? Shouldn't this always be infinite?
It would for what you might think of as a regular transformer but the coil is an "autotransformer" -- no pun intended. It's like a transformer with a centertap and no secondary. The "primary" would be from the centertap to one side. The "secondary" across both sides like so:
Secondary -> ----)
|
)
|
)
| Primary ----)
|
| )
|
| )
|--> |--> ----)
So the primary and the secondary
windings aren't electrically isolated from each other.
Module:
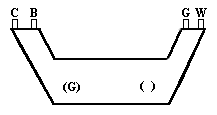
Modules I've seen have the terminals labeled. This may help if
yours
isn't. The (G) is the ground terminal, and it is one of the holes
that the
screw runs through to attach the module to the
distributor.
1.Remove the module
from the distributor. (watch out for that nasty dielectric grease
on the underside, It's relatively harmless, but goopy) Connect a
test lamp between the B and C module terminals and jumper +12 volts
to the B terminal and then ground the module at the (G) terminal.
If the lamp lights then the module is bad.
2.If the module passes step one, then jumper between the B and G terminals. The lamp will light if the module is ok.
If you suspect the module at this point, you might as well take it with you to the parts store if they'll test it for you, and confirm your diagnosis before you buy a new one.
Pickup Coil: 1.Remove the pickup coil leads (carefully) from the module. Connect the ohmmeter to the base of the distributor and the pickup coil lead. The book doesn't specify which one, so I assume either one will do. Personally, I checked both. Operate the vacuum advance through it's full range. (I didn't have my vacuum pump with me so I sucked on the vacuum line going to the advance. If you use that method you're likely to spend the rest of the day spitting. I don't recommend it, but it'll do in a pinch.) The meter should read infinite in all positions.
2.Connect the
ohmmeter between the leads coming from the pickup coil and operate
the vacuum advance through it's full range with a vacuum pump. The
meter should read 650 to 850 ohms in all advance
positions.
This information below was written with the
idea of a Chevy V8 engine's distributor. But then, basics are
basics.
Diagnosis of HEI
Ignition Systems;
Got the HEI No-Spark
Blues? Don’t worry, be happy. HEI’s are as easy as pie
to fix. You don’t even need kilobuck ‘scopes, module
testers, or computer interfaces.
Legal Disclaimer.
This is NOT the official factory diagnostic
procedure. This is shorter and simpler. It requires fewer special
tools. It is a little less thorough, but a lot faster. This is not
designed to locate everything that could possibly go wrong with an
HEI. It will locate the common problems.
General Assumptions:
You "know which end of a screwdriver to hold onto". You’ve even replaced a distributor cap and rotor and timed an engine at some point in your life, and the engine ran after you completed the job.
You have basic hand tools.
You have a non-computer controlled HEI (the module has only four terminals) with the coil built into the cap. If you have a separate ignition coil, the basics are the same, but the details are a little different.
You don’t have a pacemaker, ‘cause we are dealing with 50,000 volts and I don’t want anyone to have their ticker "vapor lock", if you know what I mean. You do not want to "catch a spark" even if you’re completely healthy. It hurts, especially if you are leaning over the fender and the spark grounds through your pants zipper. Damn, I hate it when that happens. Whenever I tell you to crank the engine, I’m assuming the ignition is ON and the car has the park brake engaged and the trans is in "Park". Your necktie is not wrapped around the fan blades.
Special Tools:
The most important special tool is a fully functional brain. Be sure yours is completely engaged. If the clutch plates of your mind are slipping, press "BACK" on your browser.
Spark tester: K-D tools 2756 (also available from Snap-On), A-C Delco ST-125, Mac ET 760H, or equivalent. Cost is about twelve dollars. Available at any well stocked auto parts store. This looks like a spark plug with an alligator clip soldered to it. If you’re a low budget dude, you can make your own, but I don’t recommend it. The real thing has a calibrated spark gap that will properly load an HEI coil whereas the homemade unit won’t present as much of a challenge to your coil. I have seen weak coils that would allow the engine to run at idle and light load, but could not produce a spark at the HEI spark tester like those I’ve listed. Toss the coil! If you do make your own, be sure to remove the side electrode from a new spark plug, as you don’t want false readings because your spark tester is oil fouled.
A spark plug boot: Needs to be a straight one. You’ll cut it so that when you slip it over your spark tester, it extends about ½ inch beyond the tester.
Jumper wire: Plain old 14 gauge primary wire about three feet long, with alligator clips on each end.
12 Volt test light: A cheap one is OK, but test it every time you use it. If the wire is connected to ground, (the usual arrangement) touch the probe to a power source and make sure it lights up. HINT: Use the alternator positive terminal if it is easier to reach than the battery positive terminal. On those occasions that the wire is connected to a power source, touch the probe to ground and make sure it lights up. It’s very frustrating to have to re-do an hour’s work because the bulb in the test light burned out and has been giving you false readings.
Ohmmeter/voltmeter: Even a ten dollar Radio Shaft unit will work. (but NOT for module testing!)
OPTIONAL TOOLS:
Soldering gun rated at 450 watts: Yup, that’s a big’un. (wv - a soldering gun is different from an iron in that it looks like a "gun" and has trigger that is used to cause it to heat up)
10 MEGOHM input impedance Voltmeter: This is required for module testing.
Remote starter switch: (or a buddy to crank the engine while you’re inspecting parts from over the fender) If you use a remote starter switch, be sure the ignition is ON when you’re cranking during testing. You’ll waste a lot of time if you crank the engine with the ignition off.
Basics:
You have an engine that won’t run properly, or won’t run at all. When you look down the carb throat and work the linkage, you can see fuel squirt out of the accelerator pump nozzle. The engine cranks at it’s usual speed. (wv - you may want to charge the battery over night, so that there is a full charge)
STEP ONE: Verify No-Spark. Select the easiest to reach plug wire and remove it from the plug. (on an inline six or four cylinder disconnect the coil wire from the cap and use it for this test) Connect it to spark tester and ground tester to any convenient chunk of nearby iron, such as a header bolt or the alternator bracket. Hint: face the sparking end of the tester so you can see it from the driver’s seat. Crank the engine with the car in "Park". If you have a good spark, check other plug wires. The HEI is OK, but perhaps your distributor cap or some of your plug wires are defective. If you have no spark, test a couple other plug wires. Still no spark? Reconnect the plug wires and go to step 2.
STEP TWO: Verify power supply to HEI.
Disconnect the power wire to the ignition coil. If the coil is built into the distributor cap, this wire will plug into the cap, at the "Batt" or "C" terminal. Probe the connector on the power wire with the test light or the voltmeter. With the ignition ON, but not cranking, you should have within one volt of battery voltage, or a very bright test light. With the engine cranking, you should have a minimum of seven volts on the voltmeter or a medium brightness on the test light. Poor voltage? Repair wiring from ignition switch. If you have good voltage, reconnect power wire. Go to step three.
STEP THREE:
Exploratory Surgery Remove the distributor cap and rotor from the distributor. If it is easier, label and remove the plug wires from the cap, but leave the other wires connected! Flip the cap upside down. Push the "Special tool" plug boot over the spark tester, and then push the open end of the plug boot over the center post of the distributor cap. This is the post with the carbon doohickey that rubs on the top of the rotor. The tip of the spark tester will be touching the center post of the cap, held in place by the cut-down rubber plug boot. Use your jumper wire to connect the spark tester to a good ground.
If you have a separate ignition coil (inline six or four cylinder) disconnect the cap and rotor, but just install the spark tester in the coil in place of the coil wire. Use the jumper wire to connect the tester to ground.
Make sure the advance mechanism of the distributor will clear the upside down cap. Crank the engine with the ignition ON. Watch the distributor so you know it turns when the engine cranks. This is a repeat of step one, but without the plug wires, rotor and cap in the circuit. If you now have spark, start looking at the wires, rotor and cap. If you have no spark, LEAVE THE SPARK TESTER IN PLACE and go to step four or five.
STEP FOUR: (only if you have the big soldering gun)
THIS IS IMPORTANT—don’t hold the hot tip of the gun next to the pickup coil, and most definitely don't touch the tip to the pickup! You want to hold the "body" of the soldering gun near the pickup. The idea here is that the pickup will sense the electrical "goings-on" (non-technical term!) inside the body of the soldering gun and cause a "trigger". YOU ARE NOT TRYING TO SOLDER ANYTHING! IF YOU DO THIS RIGHT, THE TIP OF THE SOLDERING GUN WON’T EVEN GET HOT.
Plug in the soldering gun, and with the ignition ON, hold the body of the soldering gun as close to the pickup coil as you can. Keep your arm away from the spark tester. Pull the trigger on the gun. (one second is enough) look for sparks at the spark tester. This is a repeat of Step three, but with the pole piece (reluctor) out of the equation. The alternating magnetic field in the body of the soldering gun will induce voltage in the pickup coil which should trigger the module, which should trigger the ignition coil. If the soldering gun is not big enough, or is held too far from the pickup coil, you won’t induce voltage in the pickup coil and the test is invalid. Experiment with this on a known good system, it’s a real time-saver! If you’re sure you’ve done this right, and you get no spark, LEAVE THE SPARK TESTER IN PLACE and go to step five. If you get spark here and you didn’t in step three, the pickup coil is defective in a way that is not common. Re-do step three to be sure.
STEP FIVE:
Eliminate the pickup coil. Disconnect the two very fine wires from the module. Connect the wire on your test light to a voltage source such as the alternator POSITIVE terminal. Touch the probe of the test light to the module terminal labeled "G". (Its the smaller of the two terminals that you disconnected the pickup coil wires from) The test light will not light up on this test. If you get no spark, go to step six or seven. If you get a spark each time you remove the test light from the module, but got no sparks in the other tests, your pickup coil is defective. Replace it, connect the pickup coil wires to the module and repeat step three. If step three produces spark, the problem is fixed. Put it all back together and go cruising.
STEP SIX: Only if you have a voltmeter/ multimeter with 10 megohm input impedance.
Unplug the connector from the "TACH" terminal, if there is one. Usually there isn’t. Set meter to lowest voltage scale that will accommodate 15 volts. Connect the positive voltmeter lead to "TACH" terminal on distributor cap (or separate coil) Connect the negative lead to ground. With ignition ON, repeat step five, except watch the voltmeter not the spark tester. The voltage reading should read high, but spike downward when you remove the test light from the module terminal. If it does, replace the ignition coil and repeat test five. If it does not, replace module and repeat test five. If you get sparks in test five, the problem is fixed. Put it all back together and go cruising.
STEP SEVEN: test ignition coil.
Remove the spark tester and all wires from distributor cap. Lift the cap out of the engine compartment for testing. Use ohmmeter set on a "high ohms" scale. First test: Connect between "Batt" ("C") terminal and "Tach" terminal. Resistance should be very low. If not, replace coil. Second test: Connect ohmmeter between Batt terminal and the carbon button in the middle of the cap. Read ohmmeter. Connect ohmmeter between ground terminal (the middle one of the three parallel blades) and the carbon button. Read ohmmeter. If BOTH of the readings in the second test are infinite, indicating an open circuit, replace coil. If you replace the coil, repeat step five. If the coil passes both of these resistance tests, replace module and repeat step five. Step five should produce spark, and the problem is fixed. Put it all back together and go cruising. If not, go cruising in your buddy’s car to clear your head, then start from Step Two and re-check all your work, making sure you have good connections at the spark tester, test light and volt/ohmmeter. Then verify that the wiring that connects the components is sound. If you’re ABSOLUTELY sure that everything tests good, and you still have no spark, replace the module and retest.
Other HEI problems:
A. Insufficient wire gauge to "Batt" or "C" terminal. Use 12 gauge!
B. Module MUST have dielectric silicone grease between bottom of module and distributor housing. WHEEL BEARING GREASE WON’T DO! The module transfers heat through the silicone grease so it doesn’t toast itself.
C. Windings in pickup coil open when underhood temperature rises. Car runs great cold but dies when hot.
D. Windings in ignition coil open when hot. Same symptom as C above.
E. Wires that connect pickup coil to module break inside the insulation. (they don’t look broken) When the vacuum advance moves the pickup coil, the broken wire opens the circuit, the engine dies. Vacuum is reduced, the vacuum advance relaxes, the wire reconnects and the engine runs. Cycle repeats.
F. Centrifugal advance
doesn’t get lubed and wears out the holes in the weights and
the pins that the weights pivot on. In addition to screwing up the
advance curve, all the metal dust from the worn out weights and
pins is now stuck to the inside of the cap and rotor, making a
possible path to ground for the spark.