It may be clichéd to say, but you can never have enough power. That goes for engines, flashlights, bow thrusters, sniper rifles, home audio, Frankensteins monster, and power outlets in your truck. If youre out and about in the wilderness and need to run a blender or a phone charger, or you just piled the kidlins in the back-back and want to plug in a proper light, theres always a use for another power point.
Folks of conspicuous... vintage... would know the power point in your vehicle as the thing delivering 12 volts to their cigarette lighter, but fewer folks are equipped with cigarettes nowadays. Hell, fewer vehicles have a lighter, per se, in the name of politically correct corporate smoking aversion, just a power outlet. That said, power outlets like your cigarette lighter, which appear in glove boxes, in center consoles, and in duplicate, are not always in the rear of large wagon-shaped trucks, or in older vehicles. An auxiliary/not-stock power point is not hard to install, once you overcome a few of the pitfalls of delivering hard-working amperage the full length of your vehicle, and provide some safeguards for the trucks electrical system.
12 Volts to Graceland
Early third-gen 4Runners power supply to the OE lighter runs through a 15-amp fuse in the cabin fuse panel. The Accessory fuse protects power to the single power outlet and other devices in the center console, like the stereo. In later third-gens, there can be up to three lighter outlets running through a dedicated 15-amp fuse, which is switched on by a relay when the ignition key is at the accessory position.

As a point of reference, the later third-gen 4Runners with three outlets run power to the outlets in parallel, each branched off that 15-amp circuit. We wanted to follow this scheme for the earlier third-gen, but because the auxiliary receptacle we planned was going to be at the back of the truck, running a long length of wire no matter the gauge off the smallish 18-gauge wire that powered the OE lighter would have overtaxed that short length of wire. If we were plumbing a second power point next to the first, we probably could have. That put us in a spot: where was another 12-volt power source for the rear lighter socket? Was there one that would shorten the power lead to the rear of the truck?
Yup.
Thinking our way through a few sandwiches and considering devices closer to the rear, we came up with the rear heater blower under the front passenger seat. Though it wasnt supported by a 15-amp fuse like the accessories and OE power point, it did have a 10-amp fuse dedicated to it in the engine-bay fuse panel. Even better, we never used the thing the original owner of the Foreigner Project had spilled some ketchup (catsup?) in it and then promptly ignored it, so whenever the rear heat was switched on, the whole truck smelled like sun-dried tomatoes and brimstone. That, and if using a rear power outlet on this circuit with the heater ever became an issue (in case we were caught in Hell when it froze over, for example), we could always unplug the rear heater and have the 10-amp circuit dedicated to that rear power outlet.
Ideas to Use: Wire Routing and Gauge
Worried about routing 12-volt power? Here are a few simplifications of electrical theory:
- The further a wire carries power, the more resistance builds up. Resistance is roughly cumulative, based on length of wire a short piece of wire has less than a longer piece of the same type of wire.
- Resistance means heat and wire fatigue, and it usually robs power.
- A cigarette lighter close to a fuse panel (or the power source) can use a smaller gauge wire to power it because that wire is shorter, and therefore has less resistance.
- You can avoid your wiring arrangement causing too much resistance over longer distances (to an extent) by using a larger-gauge wire.

As an example, the OE power wire to the front power point in this 97 4Runner is about 18-gauge, but that wire runs less than three feet. Because were going to be running power to the back of the truck, well use heavier gauge wire, 14 or 12-gauge, including the ground. Using power from the rear heater blower, we will route a 14-gauge wire carrying the power along the right-side cabin sill, straight back to the outlet. This is as short a route as reasonable less than 9 feet and will keep the wire out of harms way. In a pinch, we could run two smaller wires side-by-side, which will reduce resistance like one big wire.

Controls
There will be a master switch a cutoff or energizer, so to speak that will control power to the power point, but that switch will not haul the power itself. Because a 12-volt outlet might pull a lot of voltage, you probably want to avoid running power straight through the switch. Well be plugging in a relay thats easily accessed beneath the passenger-front seat, and it will work the circuit for the switch. If everything goes according to plan, well use a pushbutton defroster switch we stripped from a gen-two 4Runner (yay, junkyards!) to operate said relay. We remade the logo on the switch to display an electricity symbol (the universal zig-zag of getting zapped), and well pirate its lighting from illumination in the center console.

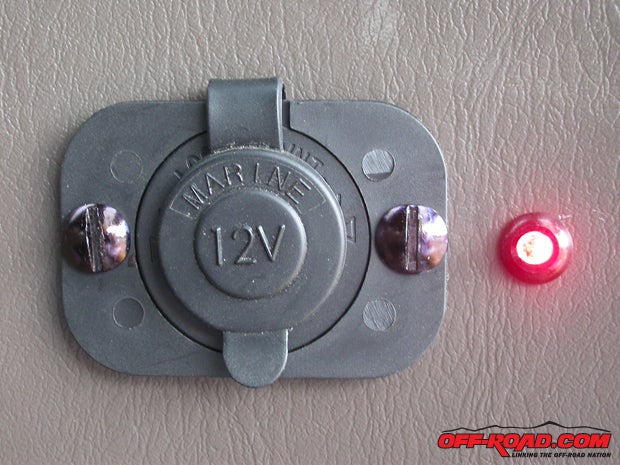
Indicators
In addition to the Im on! light on the old pushbutton defroster switch (and because its easy), well also wire an LED into the rear power point so that there will be a way to identify if the circuits energized from the back, at the outlet. The LED will be wired parallel to the rear power point circuit, taking power and ground from the tabs on the back of the socket. We bought a few of these pre-resistored LEDs from Parts Express a few years back [http://www.parts-express.com/cat/leds-lamps-lighting/70], and though they dont sell this exact unit anymore, Parts Express is still a useful resource for useful electronic bits and pieces. If you want a more expansive selection of LEDs (waaaaay more expansive), try an outfit like Mouser.
Ground
Keep the ground as short as possible. To an extent, the availability of a good ground may dictate where the power point is located. Find a body bolt, rough up the surface a little, and use a wire that matches the power wires gauge. Remember, electricity likes to flow, and if you skimp on the ground wire, the voltage necessary for a device say youre running a drop-lamp off your tailgate this could cause the power or ground wires to overheat.
. Not big, eh? Certainly not wire enough to send power to the back.")
. Had we run the power for this outlet all the way from the fuse panel, wed use both in parallel.")
Power Outlet Receptacle
What will we use for the power point? Its easy to grab el cheapo at Shucks or OReillys, but you can find a sweet vintage lighter outlet at the junkyard, or in the case of something like this one, which is being installed in the rough neighborhood that is the back of a hard-workin 4Runner, we went with the usually-more-durable option that is a marine part. Once again, Parts Express had a boatload of appropriate hardware, and there were several marine-based options close to chore.
Safety
The basics of keeping this rear power point from becoming a point of contention were the same youve always been taught:
- Run power from the battery through a fuse.
- Dont send too much power through too little switch or wire.
- Employ a relay to shunt power (and reduce wire length) if you can.
- Route wires and power so metal wont meet metal (or so metal or friction wont chew up a wire, like at a seam or underfoot).
- When possible, put wires in some sort of sheathing (either the OE-style stuff that looks like shrink-wrap after its shrunk, or the crackly wire loom that stores sell by the mile).
, we wouldve scraped it clean and started anew.")
More Power Means More Attention to the Battery
Now youve got a convenient new power point in the back of your buggy to run a compressor or the thingamajig charging your kids remote-control quad-rotor dog maimer, but its not running free. More amp-draw means more battery-fail, so how do you keep the juice from getting loose?
If youre playing it by ear while pulling power, monitor what low-draw items like dome lights, dash indicators or the radio do while youre using that power point. A light bulb might dim gradually, but when devices like the amps in your radio are suddenly unable to push a speaker and the sound dies off, you might be moments from a dead battery.
Playing by ear means the older that battery is, the more vulnerable it is to the big flop two or three full-drain moments will kill an old battery. That same old battery is more vulnerable in cold weather. A simple battery gauge or monitor (you frequently see them in motorhomes) will give you a close idea of how much power is left in the battery, but youd need to install one. Dont be afraid to start your truck and use a little gas to keep the battery topped off a dollar of gas is less costly than a five-mile hike to civilization. In case you are wondering if your battery is on its way to failing, pay attention to the pace of the starter motor when you turn the vehicle over. A slowing in the speed that the starter spins (that ruhh ruhh ruhh sound) is a good indicator that the battery (or a ground in the electrical system) is on its way out.

Consistently updating car batteries is a must in cold-weather climates, but warmer neighborhoods allow truck owners to ignore the battery until it curls up and dies (according to Mr. Murphy and his laws, at the worst possible time and place). However, if youre running a winch, air compressor or other heavy-draw device, youre already familiar with the need to attend to battery condition and might already be using a deep-cycle battery (or two), or taking advantage of a dry-cell unit like the colorful Optimas. If youre in the habit of using a 12-volt power point in your truck wherever its located the need to monitor battery condition should never be far out of mind.
|
Off-Road.com Newsletter Join our Weekly Newsletter to get the latest off-road news, reviews, events, and alerts! |
Follow @Off-Road
 Your Privacy Choices