ver the years, as I increased tire sizes, I found my stopping distance growing longer and longer. Also, swapping engines and converting to an automatic tranny greatly reduced my effective compression braking. As such, I decided to try installing rear disc brakes on my '85 Toyota 4WD truck.
Mounts designed to bolt calipers to the axle housing. Two pieces of flat bar were used for each mount. The pieces were welded together to obtain the proper caliper offset.
Each mount is held to the axle housing using two of the four flange bolts that are on each end of the housing. (Note: Two of the four bolts on each side are slightly longer. It may be necessary to obtain and use bolts of this length in all four positions.) The caliper is then bolted to these two mounts. The stock Cadillac pins are used and threaded into 7/16" UNF holes tapped into the fabricated mount plates.
Photo shows mounts (arrows) bolted to axle housing. Axle assembly has been modified (as described below) and installed into housing.
The center hole in the Chevy rotor must be enlarged to fit over the ring on the flange on the end of the Toyota axle. This should be done with some amount of precision as the mating of the axle and rotor at this point serve somewhat to align the two on center. The axles will have to be removed from the housing and the bearings pressed off. The drum brake assemblies and backing plates are discarded, and the bearings and bearing retainer flange pressed back on.
Photo shows completed rear disc assembly. Red arrow denotes the curved metal brake line leading to the caliper. Blue arrow denotes lower caliper pin threaded into lower mount.
To fabricate a set of e-brake cables, the Toyota cable was mated to portions of a Cadillac cable. There are many ways this can be done and there are also shops that can build custom cables and/or modify your cables to meet your needs. The unused e-brake cable brackets on the axle housing were cut off.
Photo showing '89 - '93 model cast iron master cylinder.
The reservoir is different, as is the connector mating the fluid level sensor to the wiring harness. I purchased a reservoir from a junkyard and the sensor wiring was modified by soldering the older ends to the newer model wiring.
There were no rear disc brake kits on the market for Toyota trucks, so I decided to devise my own. I studied some of the other kits available for other vehicles and spent a fair number of hours scouring junkyards for a combination of parts that would work well together.
I had seen a few show trucks running Toyota front brakes on the rear axle. However, I felt this method had two drawbacks: (1) there was no provision for an emergency brake, and (2) the Toyota rotors had to be mounted on the back side of the axle flange. This would necessitate removal of the axle and press-fit bearing to remove the rotor.
The stock Toyota emergency brake cable runs parallel to the axle where it meets the brake assembly. In trying to keep with this cable layout, I searched for calipers having an emergency cable connection in the same direction. Toyota Celica Supra calipers looked promising, as did some other single piston Mitsubishi calipers from a midsize Chrysler vehicle. These both mated to single plate (non-vented rotors) so could have worked with a stock front Toyota truck rotor mounted behind the axle flange.
After further searching, I found that Suzuki Samurai rotors had a large enough hub center to fit on the outside of the axle flange and work with the above mentioned calipers. However, the rotors would have been centered on the axle by the lug stud holes only, and five new holes had to be drilled in the rotor to convert the Suzuki lug pattern to the Toyota pattern. I did build a prototype mount (on a spare axle) using the Samairi rotor and Supra caliper. All the pieces mated well, but I feared the smallish Supra calipers would not provide enough improvement for stopping 33" tires.
I was not able to find any other suitable calipers with the same e-brake cable configuration. So, I decided to resign myself to readapting the e-brake cables later. After much searching, I decided to use mid 1980s Cadillac Seville/Olds Toronado rear calipers with the built-in e-brake levers. (Same calipers were also available on some Buick Rivieras.) These are large single piston floating pin calipers. While single piston calipers do not stop as effectively as fixed, multiple piston calipers, they are more common and easy to use. Also, for my project, using floating pin calipers meant the alignment of the caliper mount did not have to be machined to great precision.
I found that '88 up Chevy full-size 4WD truck (IFS) rotors (1/2 ton, non-extended cab model) would work well with the Cadillac calipers. These are the 1" thick rotors and are a vented design, having the same lug pattern as the Toyota.
I wanted my design to be fully bolt-on so that no axle housing modifications were required, and this design should work for all truck and 4Runner rear axles. Caliper mounts were made from 3/8" flat bar. Two mounts are required per caliper, one upper and one lower. The mounts have to be made with an offset to position the caliper correctly with respect to the rotor.

Mounts designed to bolt calipers to the axle housing. Two pieces of flat bar were used for each mount. The pieces were welded together to obtain the proper caliper offset.
Each mount is held to the axle housing using two of the four flange bolts that are on each end of the housing. (Note: Two of the four bolts on each side are slightly longer. It may be necessary to obtain and use bolts of this length in all four positions.) The caliper is then bolted to these two mounts. The stock Cadillac pins are used and threaded into 7/16" UNF holes tapped into the fabricated mount plates.

Photo shows mounts (arrows) bolted to axle housing. Axle assembly has been modified (as described below) and installed into housing.
The center hole in the Chevy rotor must be enlarged to fit over the ring on the flange on the end of the Toyota axle. This should be done with some amount of precision as the mating of the axle and rotor at this point serve somewhat to align the two on center. The axles will have to be removed from the housing and the bearings pressed off. The drum brake assemblies and backing plates are discarded, and the bearings and bearing retainer flange pressed back on.
On the stock Cadillac application, the brake lines leading to the rear calipers along the rear A-arms are entirely steel. They do, however, have a large strain-relief loop in them that curls up and around the back of the caliper. I decided to emulate this configuration by using all steel lines running from the tee near the center of the rear axle out to each caliper.
The Toyota brake lines use metric fittings while the Cadillac calipers use SAE fittings. I purchased two pre-made SAE steel lines with male fittings on each end. After bending the lines to the shapes and lengths I needed, I cut each line at the axle tee connection end and removed the fitting. I installed a metric fitting from one of my salvaged Toyota lines and reflared the tubing using a double flare tool.
Some local shops can do this type of flaring for several dollars an end. Metric-to-SAE and SAE-to-metric adapters are also available at auto parts stores. However, the result will not be as clean as having the metric fittings installed on the SAE steel lines, which keeps the number of connections to a minimum.

Photo shows completed rear disc assembly. Red arrow denotes the curved metal brake line leading to the caliper. Blue arrow denotes lower caliper pin threaded into lower mount.
To fabricate a set of e-brake cables, the Toyota cable was mated to portions of a Cadillac cable. There are many ways this can be done and there are also shops that can build custom cables and/or modify your cables to meet your needs. The unused e-brake cable brackets on the axle housing were cut off.
The stock truck master cylinder will work with the Cadillac rear discs. However, pedal travel is fairly long due to the high volume of fluid required by the disc calipers. I converted from the stock 7/8" bore master cylinder to an '89 - '93 4WD V6 truck 1" bore master cylinder. There were two types used during these years, a cast iron body unit and an aluminum body unit. The aluminum one is shorter than the original '85 unit and is somewhat larger in outside diameter. The cast iron unit is the same length as the '85 one. Both have the forward outlet for the metal brake line at a different angle (90 degrees off) than the original. The brake line was easily bent and repositioned to mate with the newer master cylinder.
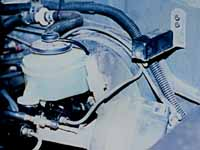
Photo showing '89 - '93 model cast iron master cylinder.
The reservoir is different, as is the connector mating the fluid level sensor to the wiring harness. I purchased a reservoir from a junkyard and the sensor wiring was modified by soldering the older ends to the newer model wiring.
Pedal effort with the larger bore master cylinder has increased somewhat, but fluid movement has also increased by about 30% for the same pedal movement.
It is possible to tune the stock load sensing proportioning valve to help properly bias the rear brake calipers. This can be done by changing the bracket height where the rod from the load sensing valve attaches to the rear axle housing, or by bending the rod itself. Raising the end of the rod increases fluid pressure to the rear. Lowering the end of the rod decreases fluid pressure to the rear. For even finer tuning, a variable brake proportioning valve can be placed in the line going to the rear brakes. These are available at most speed shops.
If you install rear discs using some of these ideas, or others of your own, please let me know the results of your swap. I'm interested in any refinements or other ideas you may have discovered.
Thanks........Ja
|
Off-Road.com Newsletter Join our Weekly Newsletter to get the latest off-road news, reviews, events, and alerts! |
Follow @Off-Road
 Your Privacy Choices