|


Solid
Front Axle Swap
|


As I tackle more difficult rock trails I have been having more and more problems with the IFS suspension the factory saw fit to put on my truck. Over the past two years I have broken 2 front axle CV joints and have damaged or bent 5 idler arms. It seemed that every time I took the truck out on the trail my alignment would be knocked out. I also wanted much more front wheel travel. I was able to take the truck through the Rubicon twice with the IFS but with more travel and strength I could take the more difficult routes. I often found that I needed to find the easiest way through a given section. I don't want to take the easy way anymore! I want more reliability, articulation, and strength. I looked at several other options including WCOR's 14" mega travel system and Downey's mega travel kit.  While giving 11"-14" of travel these and other similar kits utilize the stock 7.5 " diff, original outer CV joints, and idler arm.
These parts need to be replaced to gain any real improvement in reliability. While giving 11"-14" of travel these and other similar kits utilize the stock 7.5 " diff, original outer CV joints, and idler arm.
These parts need to be replaced to gain any real improvement in reliability.
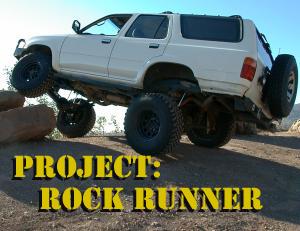
Before the swap my truck ramped 657 (forward with full tire pressure) and had only 6" of front articulation. Now it easily scores over 1,000 on a standard 20 degree ramp and has 20" of front articulation. I chose to use the front axle from a 1985 truck and to use a "basically Toyota way" of mounting it. The ''84-''85 housing assembly is a little stronger then earlier units as it is reinforced on the bottom. I wanted to do the swap with tested and proven components. I did not want something to take months of experimenting and tweaking to get right. Many people have already done this swap so it's not new or even radical. This design has been worked out, and is very similar to how Toyota built trucks prior to 1986. A few improvements were made including:
 With my rebuilt and "Marlinized" axle I was ready to see the folks at All Pro Off Road in Hemet, CA for the axle swap. I scheduled 4 days for the swap and made sure there was a rental car company in town in case we ran into trouble. I had to be back in Santa Barbara by Sunday night. I could not find anyone to help me get the axle into the truck so I ended up using my high lift jack, a floor jack and a come-along to get the axle into the
truck. I wish I had a picture of that!
With my rebuilt and "Marlinized" axle I was ready to see the folks at All Pro Off Road in Hemet, CA for the axle swap. I scheduled 4 days for the swap and made sure there was a rental car company in town in case we ran into trouble. I had to be back in Santa Barbara by Sunday night. I could not find anyone to help me get the axle into the truck so I ended up using my high lift jack, a floor jack and a come-along to get the axle into the
truck. I wish I had a picture of that!
The swap - day one I arrived at All Pro at 11:00 am on a Wednesday. The first thing we did was ramp test the truck. It ramped 657 forward with tires at 35 psi. Pete and Charlie immediately removed the IFS arms, diff, shocks, etc. These guys are fast workers. By lunch time the entire IFS was disassembled and laying on the ground. After Lunch Pete cut off the IFS brackets and Charlie ground down the old IFS bracket welds on the frame. Pete took the hubs that I had removed from the '85 donor axle and removed the rotors. He installed new longer and larger studs. The original brake calipers on this axle were a bit small. In order to keep the calipers from my truck it was necessary to replace the front rotors with Land Cruiser rotors. These rotors fit on the axle and had the wide vented design that allows the V6 style calipers to fit. 


A tiny bit of grinding on the backing plate was all that was necessary to get the V6 calipers on after that. The primary reason for using these rotors was for breaking but there is a second advantage: width.
In 1986, Toyota switched to a 3" wider rear axle and IFS. The rear axle on my 4Runner was 3" wider than the '85 rear axle, the front is a little wider but not the as wide as the rear. All Pro install their 1.5" spacer kit on the front axle. This kit contains (2) 3/4" spacers and new longer and larger lugs and nuts. With the spacer kit on the front the axle is now only 3/4" narrower than the rear. Looking from the back of the truck you
can't see the difference. I had to measure it to discover the difference.
|


|
Off-Road.com Newsletter Join our Weekly Newsletter to get the latest off-road news, reviews, events, and alerts! |
Follow @Off-Road
 Your Privacy Choices