Skyjacked Suburban
The USA's first factory dual-sport vehicle receives a suspension lift from ""The Bear of Suspensions""
Chevrolet introduced the Suburban in 1936 and, with
the exception of the war years when production was shut down to
produce tanks, trucks, and other military equipment, has been
producing them continuously ever since. Just when four-wheel drive
was introduced to the Suburban is unclear, but in many people's
minds the 4WD Suburban is very possibly the ultimate in
dual-purpose, dual-sport family vehicles. And the straight-legged
(a Special Forces term meaning non-jumping US Army personnel and
the heavy-weight Suburban is definitely a non-jumper) or
straight-axle Suburban is usually placed on top of the Suburban
favorites lists.
I admit it. I really dig dual-purpose vehicles. I
think it started with my first trail ride-and a muddy one at
that-in a gray-painted MB on a Naval preserve in Washington in
1948. The childhood memory of that first slog through a Washington
mud bath came back to me with the purchase of my first Jeep in
1965. But a Jeep CJ is very limited in size, so as my family grew
so did my interest in a 4WD Suburban. It took me several years and
several Suburbans (including one Chevy panel truck) before settling
on the 1987 K2500 ¾-ton four-wheel drive Suburban I'm now
building.
Since I live next to the Colorado River in the middle of the Mohave Desert, I need a vehicle that can slide its way along high-speed desert paths when I'm covering off-road races, or that can easily negotiate the Southwest's SUV trails to cover rock crawling events. I also need a camping vehicle (with room for two dogs) and something for towing my Jeep to the really technical stuff around the country. A Suburban is large enough to sleep in, small enough for desert trail riding, agile enough for some dusty canyon running, and it's also capable of towing a Jeep or a trailer.
 |
|
Want some serious suspension travel? Trophy Trucks
run almost three feet of wheel travel at each end!
|
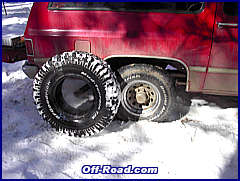
However, building a Suburban for trips into the backcountry requires some planning. First of all comes larger, more aggressive tires than the skinny-weenie LT235/85R16 BFGoodrich All-Terrains that equipped it when I bought it. For all-around Southwest desert use, I chose BFGoodrich LT315/75R16 Mud Terrain tires on 10-inch-wide Pro Comp Xtreme Alloy 1879 16x10-inch wheels. And since I plan on adding a rear locker later on, I decided on five wheels and tires rather than the usual four. These tires give good traction in all kinds of weather and trail conditions without undo highway noise and, hopefully, good tire mileage as well.
The 35-inch tall tires, while providing better bite and more ground clearance, create problems with fender clearance and turning radius on an unmodified Suburban. Having nearly 150,000 miles on its odometer, the '87 Suburban-or "Big Red" as I like to call it-had seen some rough duty over its 16-year lifespan. Although its ¾-ton factory springs had not started to sag noticeably, they needed replacement for what I planned to do with the Sub, and the shocks were not controlling rebound too well any more, either.
 |
|
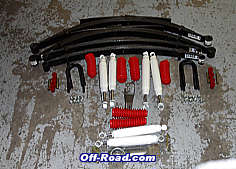
If you order Skyjacker's kit no. C140BKSS, you'll
receive everything you need to raise your straight-axle Suburban 4
inches.
|
Having installed several Skyjacker lifts already: a 4-inch lift on a Scrambler almost eight years ago (which my daughter's family are still enjoying), the same suspension kit on my own CJ-7 three years ago, and another 4-inch lift kit on my son's 1976 K1500 Suburban four years ago, I decided to stick with Skyjacker. As you may have guessed, I like Skyjacker's products and they have served me well over the years.
Strangely enough, the same kit (C140BKSS) that I used on my son's '76 Sub, is used on my 1987 K2500. Only the U-bolts are changed because of the ¾-ton's larger axle housings. Actually, that kit is used on all 1973-87 Suburbans. Even the Nitro shock absorbers (N8051 and N8053) are the same, as is the dual-steering stabilizer kit (7220WR) and the dropped Pitman arm (CA50).
Preparation
First of all, let me say that this is an install that a reasonably experienced home echanic with common hand tools can perform at home. I chose to have 4-Wheel Parts in Colorado Springs, Colorado, do the install because I was living in Colorado at the time and because of the company's and shop's excellent reputations, my previous experience with its technicians, and my personal time constraints. If you're working at home, follow Skyjacker's accompanying instructions and you can most assuredly do this. I also suggest having a friend help-these springs are big, long, and heavy-although I had installed the kit on the '76 Sub by myself-it's a huge help to have an extra set of hands helping. (Two people working as a team can install this kit in about a quarter of the time it would take an individual alone.) In addition, even though this installation was performed on a Suburban, the same basic instructions will work on all solid-axle full-size Chevys (i.e., Blazers, Suburbans, and pickups) and Skyjacker offers kits for all of them.
 |
 |
|
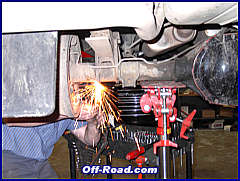
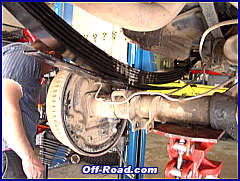
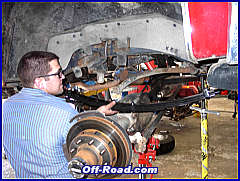
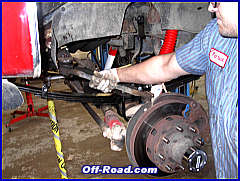
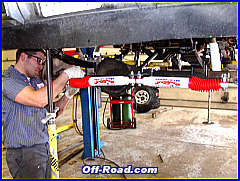
Colorado Springs' shop foreman Patrick McCafferty,
an extremely active off-roader on his off time, performed the
installation in about six hours. He was forced to use the "hot"
wrench to remove the factory U-bolts.
|
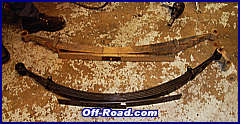
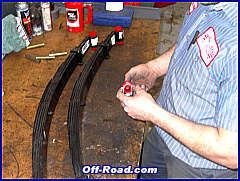
The difference in arch between factory and
Skyjacker rear springs are obvious.
|
My first task was to spend an hour or so at the nearest spray wash booth. Also, if you don't have an impact wrench or if your truck has seen its share of salty air and sandy beaches, you might want to hit all of the nuts and bolts that you'll be addressing on this installation with a liberal coating of Liquid Wrench. You might even want to start doing that about a week ahead of time. Give them a squirt each morning before leaving for work.
To dismantle the factory suspension, in addition to basic hand tools (see the accompanying list), you'll need two different sizes of jackstands (larger size for the frame and smaller size for the axles), and I strongly suggest an impact wrench (I used a Makita electric impact on the '76 Sub and saved hours of labor). The full disassembly and installation should take about 6-8 hours professionally, so figure on two full days at home for two of you.
Park your truck on a level paved surface. Measure all four corners at the centers of the fender openings directly above the axles-this will give you an indication of how much lift you end up with. Due to manufacturing processes in the Skyjacker springs (which are matched closely at the factory before shipping, by the way) and in the factory springs-including wear and tear-a difference of up to 2 inches can result in what you might expect from the kit. In my case, the Suburban was lifted 6 inches in front and approximately 8 inches in the rear by the new Skyjacker 4-inch lift kit and the taller tires. Skyjacker estimates the 4-inch lift using original factory heights-not the heights after 16 years and nearly 150,000 miles. The 1987 K2500 stock height was 37-1/4" left-front, 37-1/8" right-front, 34-1/4" left-rear, and 35" right-rear. After the Skyjacker and BFGoodrich tires were installed: 43-3/4", 43-3/4", 42", 42-1/4", respectively. As you can see, the Skyjacker lift is more closely matched at all four corners than the original 16-year-old factory suspension. (I plan on adding nerf bars to ease mounting up chores.)
 |
 |
|
Liberally smear white lithium grease on the
neoprene bushings before installing them in the springs'
eyes.
|
Be sure the locate the springs with the shims
facing in the correct direction to properly tilt the differential
toward the transfer case.
|
Lift the vehicle with the floor jack and place the jackstands in safe locations; i.e., under the frame rails, adjacent to the spring pivot brackets (both front and rear) -see the lift points in these pictures. The brackets keep the jackstands from sliding on the frame rails. I suggest you only work on one end at a time unless, of course, you're lucky enough to have five or six friends helping or you have a hoist such as 4-Wheel Parts used. (Remember, the new springs have a much greater arch than the factory leaves, so make sure you lift the vehicle high enough the first time-usually about 6 inches higher than your first guess.)
Disassembly
After removing the rear wheels, on some models you may have to
disconnect the parking brake cables (on this model we didn't, but
on some earlier models, you want to route them above the springs
for additional clearance). You may also wish to disconnect the
brake hoses. If so, clamp them with Vice-Grips before disconnecting
to keep fluid loss to a minimum and avoid having a mess under each
spring pad. On some models you may have to remove the brake line
splitter mount from the differential housing. If you straighten the
mount, you'll be able to reinstall it later and it will provide
sufficient slack in the flex line for the higher suspension (the
1987 didn't require this modification).
 |
 |
|
Be sure the locate the springs with the shims
facing in the correct direction to properly tilt the differential
toward the transfer case.
|
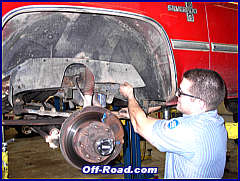
On some models, the splash shields will have to be
removed temporarily. Be sure to replace the plastic pins holding
them in place after the installation to keep moisture and debris
from the engine compartment.
|
Installation
With multi-use and reduced inventory in mind, Skyjacker supplies
the same U-bolts with every kit, depending upon axle housing
diameter. You may wish to cut the rear axle U-bolts down before
installing them. Remember, to do so, you'll need to dress the
threads so that the nuts can be threaded on easily without tearing
up the nylon locks in them. If you can't redress the threads, don't
cut the U-bolts. Since the Sub's suspension is a spring-over design
and the U-bolts go upward, it's a personal choice to cut or leave
uncut-we left them uncut.
I have a suggestion for the front installation: The shackles are mounted through the frame. This is a high wear point. On some older Suburbans, I've seen these become oval from the factory rubber spring bushings going away without the owner noticing. To avoid this, use factory front spring bushings from 1991 Suburbans (the last year straight axles were used). These are neoprene rather than rubber and will last for many more thousands of miles.
 |
 |
|
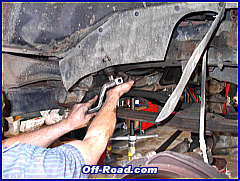
You may need a pickle fork to remove the drag link
from the factory Pitman arm.
|
Turn the steering gear shaft all the way in one
direction before installing the new dropped Pitman arm. There is
only one way the Pitman arm will go on the shaft.
|
You also have to use a dropped Pitman arm, such as shown in the pictures, or a raised steering arm to compensate for the lift. Otherwise, you'll experience a condition called "bump steer" during which every time you use your brakes the dipping front end will cause you to steer to one side. Severe bumps may also cause the steering to go from one side to the other. If the dropped Pitman arm contacts the leaf spring, a raised steering arm is the better bet.
Performance
So, how do I like the new suspension? I must admit, since this Suburban is my daily driver, there are two downside items that I must mention first-and they are both caused by the increased ride height. Climbing in and out of the Suburban is a chore, which will be handled by the nerf bar. The other item is the slightly decreased mileage. I use more fuel now because of the increased wind wave caused by the higher frontage measurement. But let's face it, a Suburban isn't a slippery sportscar, it's a truck. And it's not made for mileage; it's made to haul cargo and people.
 |
 |
|
Don't forget to replace all the earlier removed
plastic pins in the debris shields.
|
When all four springs are in place and secure,
finish tightening them with a torque wrench to the supplied
specifications.
|
With this in mind, I really like my new toy. It's fun to drive, both on the road and off. Since I kept the anti-sway bar and the springs are stiffer than the stock leaves, the Suburban corners better, feels more stable in traffic, and is more impressive to look at. Also, the new BFGoodrich Mud Terrains really work in the dirt around my house. Their aggressive shoulder cuts tend to keep the treads free of packed dirt or mud, allowing the tires to move the Suburban ahead better.
One more thing, the dual steering stabilizers (twin horizontally mounted shock absorbers) up front not only look impressive, they also perform impressively. During one of the test drives I hit some very heavy rain showers. With my first deep puddle I thanked the foresight of installing the stabilizers. Large tires and deep water usually cause the steering to become erratic, sometimes making the vehicle veer toward the deep side when the front tire is sucked in that direction. Not so with Skyjacker's dual steering stabilizer set-up. The steering remained firm and centered, and my breathing remained calm and steady.
 |
 |
|
Again, you'll want to use a liberal amount of white
lithium grease on the neoprene bushings before installing them in
the Nitro shocks.
|
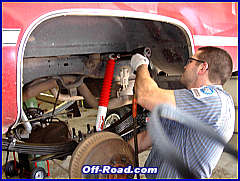
Install all four shocks. On the left rear shock,
you'll probably want to wait to attach it to the axle fitting until
after the vehicle is resting on its wheels-it's easier.
|
Off road, I obviously don't have to be so concerned about obstructions like I was before the lift. And my stock 40-gallon gas tank is much safer from gouging rocks. Even side hills don't really produce the pucker factor they used to, because it's much more stable now. On stair-steps, I do drive a bit more carefully, simply to avoid undue damage. This might be just personal, and really not necessary, but it'll take a few hundred more off-road miles to build my confidence to the level where I'll just drive it through obstacles at a higher speed.
 |
 |
|
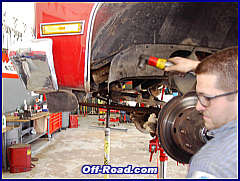
Follow the kit's instructions to install the double
steering stabilizer kit. Make sure the outer brackets are placed at
the stabilizers' half-way-out position.
|
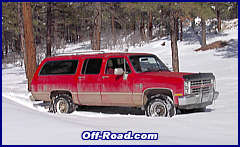
With kit, wheels and tires on, the Suburban is
ready for its test drive.
|
Tools You'll Need:
Liquid Wrench
WD-40
Assorted ½" drive sockets & drive ratchet
½" drive breaker bar
½" drive socket extension
½" drive torque wrench
Assorted combination wrenches
Jackstands (2 or 4)
Floor jack
Pickle fork
Hand sledge
Several pry bars of differing lengths
Metal hammer
Rubber hammer
White lithium grease
Brake cleaner
Multi-purpose grease
Loctite
Tape measure
Chalk or Sharpie pen
At least one extra pair of hands (preferably attached to a helpful and knowledgeable friend)
| • Contact Information • |
Skyjacker
212 Stevenson St., West Monroe, LA 71292
(318) 388-0816
www.skyjacker.com
4 Wheel Parts
1749 S. Academy Blvd, Colorado Springs, CO 80916
(719) 591-9400
www.fourwheelparts.com
|
Off-Road.com Newsletter Join our Weekly Newsletter to get the latest off-road news, reviews, events, and alerts! |
Follow @Off-Road
 Your Privacy Choices