Performance Accessories Premium Lift System for Chevy and GMC Trucks
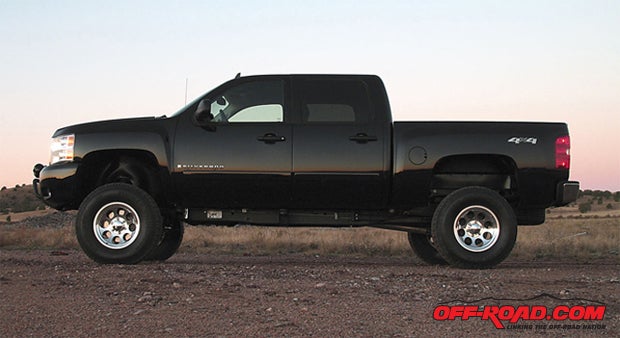
Adding a set of 33- or 35-inch tall tires to your Chevy/GMC pickup is essential for any off-road enthusiast. But the fact is that not everyone can afford the cost of a full-suspension system. So for those who want to raise their trucks to run a set of cool 20-inch wheels mounted on mud-terrain-style tires, theres a new, less expensive alternative to gain as much as 5-6 inches of lift without major suspension modifications.

Combining a two-inch leveling kit with a three-inch body lift was the idea behind Performance Accessories Premium Lift Systems. These kits range in price from as low as $220 to $800, depending on the vehicle make and model. This makes them a great alternative for those looking for raise their vehicles on a tight budget. Furthermore, the kits are designed to retain the factory ride and suspension geometry, so the truck maintains its comfort on the road while getting the extra ground clearance when driving in the dirt.

The Premium Lift System for 2007-11 model 1500 series GM pickups, PN-PLS109, retails for less than $725 and allows the vehicle to run 33-inch-diameter wheels and tires. So why didnt anyone think of this before? The reason is that most leveling kits and body lifts werent designed to work with each other. According to Chris Faustmann, R&D manager at Performance Accessories, the leveling portion of the kit is designed to split the front-end lift by using both a coil spring spacer and a strut assembly spacer. Faustmann says this eliminates excessive spring load and allows the coil spring to operate within its normal motion and retain the stock ride. It also limits the overall length of the strut assembly so that the ball joint angles remain within stock settings when the suspension is under full compression and droop.

The body-lift portion of the kit raises the vehicles body in relationship to the frame, so theres a direct increase in ride height when using larger diameter tires. The body-lift mounts fit on top of the factory body mounts and are made from nylon-reinforced body blocks. The kit also comes with powder-coated steel bumper brackets, high-grade hardware, a CNC machined steering extension and urethane Gap Guards. While the kit sounds simple enough to install, be forewarned, there are many parts to the complete kit, and it does take some time to do it properly. Faustmann recommends to set aside a full day (6-8 hours) to do the job.

Because the installation involves lifting the area around each body mount to install the Performance Accessories body blocks and hardware, wed recommend getting access to a hydraulic lift. It makes the job much easier than doing the work on your back with a floor jack and jack stands.

Both methods work fine, however, and once youve gone around all of the trucks body mounts and added the new blocks, the height of the body will leave a gap between it and the factory bumpers. Therefore, youll have to remove the factory bumpers, front grille and any bumper panels to install new steel bumper brackets. The instructions in the kit illustrate areas that may need trimming in order to add the brackets that raise the mounting point of the front and rear bumpers. Once this is done, however, everything goes back together nicely. In addition, the space between the body and frame that is visible within the trucks wheel wells, are hidden with the urethane Gap Guards. These serve to extend the length of the factory wheel wells and protect the engine from moisture, mud and dirt.

Installation of the top strut spacers and coil spring spacers requires that the strut assembly be removed from the vehicle. The coil spring must also be compressed to remove the factory urethane spacer. Therefore, make sure to use a proper spring compressor tool or have a professional shop do this part of the installation for you. The top strut spacer simply fits over the studs of the strut assembly and the reassembled coil spring unit is bolted back into position in the truck.

With the installation completed, the added lift will easily fit a set of 33-inch-tall tires to give your truck the custom appearance youve been craving. Furthermore, since theres no change to the trucks factory suspension, the ride is still smooth, stable and the modifications wont void the factory warranty.


Source:
Performance Accessories
P.O. Box 3450
Chino Valley, AZ 86323
928-636-7080
http://www.p-a-g.net/
|
Off-Road.com Newsletter Join our Weekly Newsletter to get the latest off-road news, reviews, events, and alerts! |
Follow @Off-Road
 Your Privacy Choices