When most people think of the New
Process 203 transfer case, two things come to mind: 1) 300 bulky
pounds of cast iron. 2) Undesirable full-time operation.
One of the biggest mis-conceptions about the NP203 is that it is weak, and prone to failure. The main reasons the NP203 fails are use of improper lubricant and chain wear due to full-time four-wheel-drive operation.
The NP203 is actually a very bullet-proof case, and when converted to part-time and lubricated correctly, will last almost forever. Ninety percent of chain stretch and wear is caused by the fact that the chain moves (under load) continuously. The problem with converting one to part-time, is that not all parts get lubricated correctly. The design of the NP203 is such that it relies on the spinning of the chain to splash oil around the case to lubricate all the components. When the case is converted to part-time, the chain no longer spins (unless you have the hubs locked, or the case in 4wd mode). The item that needs oil the most is the rear tail-cone. It has an oil catch which the chain throws oil into. This oil is pushed by a plastic oil pump gear into the rear output shaft bearing. This oil catch needs to be refilled occasionaly, and the only way to do this is to drive in 4wd (or lock the hubs). MileMarker recommends running the truck for aproximately 10 miles every 200 miles. This is most easily accomplished by simply driving to work one day a week with the hubs locked.
The NP203 uses 10w-40 motor oil. People severly hurt their 203s by using either gear oil (90w) or transmission fluid (18w) in their cases. The gear oil is way too thick for the 203 and will not lubricate the links in the chain. Transmission fluid is too thin, and will not properly lubricate the ball bearings used in the input and output shafts. If you have used these fluids in your case, you need to drain it immediately, and fill it with the correct fluid.
 We chose the
MileMarker NP203 Shaft Kit for our case. MileMarker also offers a
light duty crown gear conversion kit, but we do not recommend it.
The case you will see pictures of in this article is actually being
converted from the crown gear style to the shaft style. Our 1975
Chevy Blazer had developed a clunk from the rear end when putting
it in gear. At first we suspected it was a u-joint. After checking
them we discovered it was from the transfer case. Closer inspection
revealed the crown gears had worn down, and were allowing about
1/8" to 1/4" of movement. Rather than replace the gears, we decided
to remove them completely.
We chose the
MileMarker NP203 Shaft Kit for our case. MileMarker also offers a
light duty crown gear conversion kit, but we do not recommend it.
The case you will see pictures of in this article is actually being
converted from the crown gear style to the shaft style. Our 1975
Chevy Blazer had developed a clunk from the rear end when putting
it in gear. At first we suspected it was a u-joint. After checking
them we discovered it was from the transfer case. Closer inspection
revealed the crown gears had worn down, and were allowing about
1/8" to 1/4" of movement. Rather than replace the gears, we decided
to remove them completely.
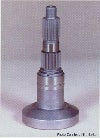 The shaft kit is a one
piece unit which elimnates the spiders gears (or crown gears in our
case), the ring gear, and the tail shaft. This extreme duty unit,
if kept lubricated (as instructed above) correctly, it will easily
outlast the rest of your truck. I guarantee something else will
break before it does if you subject your truck to extreme
wheeling.
The shaft kit is a one
piece unit which elimnates the spiders gears (or crown gears in our
case), the ring gear, and the tail shaft. This extreme duty unit,
if kept lubricated (as instructed above) correctly, it will easily
outlast the rest of your truck. I guarantee something else will
break before it does if you subject your truck to extreme
wheeling.
Installing the MileMarker Shaft Conversion
Before you install the MileMarker kit, we recommend you have the follow tools, and parts on hand: Sockets up to 1-1/2", NP203 plastic oil pump gear (GM PN 11801), RTV silicon sealer and a torque wrench. This will save you considerable frustration and having to run the dealer or the auto parts store in the middle.
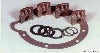
 Start by
unbolting and removeing the tail cones. On most trucks you will
need a 1-5/16" socket to remove the yoke and a 9/16" socket to
remove the 14 tail cone bolts. Remove the outer tail cone first,
followed by the intermediate housing. You will then need to remove
the differential gear assembly. Don't panic! Needle bearings are
going to fall out. Don't let them fall into the transfer case!
Discard these bearings, as they are NOT reused. Refer to the
picture at the right. This is what your case should look like when
you get everything removed.
Start by
unbolting and removeing the tail cones. On most trucks you will
need a 1-5/16" socket to remove the yoke and a 9/16" socket to
remove the 14 tail cone bolts. Remove the outer tail cone first,
followed by the intermediate housing. You will then need to remove
the differential gear assembly. Don't panic! Needle bearings are
going to fall out. Don't let them fall into the transfer case!
Discard these bearings, as they are NOT reused. Refer to the
picture at the right. This is what your case should look like when
you get everything removed.
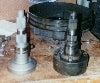 This picture
illustrates the difference between the assembled crown gear kit,
and the shaft kit. No screws, bolts, or moving parts to break on
the shaft kit. Both kits vary slightly for Dodge and Ford, as minor
differences in the t-case exist between manufactures, but the
basics are the same. Be sure to check the instructions in your kit
before you begin. I also recommend lightly oiling the shaft bearing
surfaces before installing it into the case.
This picture
illustrates the difference between the assembled crown gear kit,
and the shaft kit. No screws, bolts, or moving parts to break on
the shaft kit. Both kits vary slightly for Dodge and Ford, as minor
differences in the t-case exist between manufactures, but the
basics are the same. Be sure to check the instructions in your kit
before you begin. I also recommend lightly oiling the shaft bearing
surfaces before installing it into the case.
 Place the shaft
over the slpined shaft and gear on the t-case. Install the gasket
(lightly coat with RTV silcon sealer), and replace the intermediate
housing. Tighten all bolts, but do not overtighten, the tailhousing
is aluminum, and overtighting can crack it. Install the plastic oil
pump gear (you do have one on hand right?), the speedometer gear
and all ofthe factory shims. Replace the tail cone and install 2
oposing bolts and tighten. Do not yet install the rest of the
bolts.
Place the shaft
over the slpined shaft and gear on the t-case. Install the gasket
(lightly coat with RTV silcon sealer), and replace the intermediate
housing. Tighten all bolts, but do not overtighten, the tailhousing
is aluminum, and overtighting can crack it. Install the plastic oil
pump gear (you do have one on hand right?), the speedometer gear
and all ofthe factory shims. Replace the tail cone and install 2
oposing bolts and tighten. Do not yet install the rest of the
bolts.
 Grab the rear of
the MileMarker shaft and push & pull on it. You should feel
some movement. This is called endplay. The instructions do
not specifically say how much, but it should move a perceptable
amount. Remove or add shims till you feel endplay. When done,
install the remaining bolts and tighten.
Grab the rear of
the MileMarker shaft and push & pull on it. You should feel
some movement. This is called endplay. The instructions do
not specifically say how much, but it should move a perceptable
amount. Remove or add shims till you feel endplay. When done,
install the remaining bolts and tighten.
 Here is the
completed unit. All that is needed now is to install the
driveshaft. Now is a good time to service those u-joints you've
been neglecting too! The transfer case shift pattern has now been
changed from HI-LOC, HI, NEUTRAL, LO, LO-LOC to 4HI, 2HI, N, 2LO,
4LO. The first thing we suggest you do is to lock your hubs and
drive about 10 miles. This will refill the oil catch at the back of
the t-case. Remeber to do this every few hundred miles!
Here is the
completed unit. All that is needed now is to install the
driveshaft. Now is a good time to service those u-joints you've
been neglecting too! The transfer case shift pattern has now been
changed from HI-LOC, HI, NEUTRAL, LO, LO-LOC to 4HI, 2HI, N, 2LO,
4LO. The first thing we suggest you do is to lock your hubs and
drive about 10 miles. This will refill the oil catch at the back of
the t-case. Remeber to do this every few hundred miles!
Conclusion
After installing the shaft and taking the Blazer for a spin we found our driveline was the tightest it has ever been. When putting the truck in gear, all clunking sounds are gone! We have put about 500 miles on the shaft since the installation of this kit, and we are very happy with it. Originally we had planned on doing an NP205 swap on this truck and elimating the NP203 completely. But, the retail price of this kit is just over $200 from most 4x4 shops, and it makes for a much more reasonable alternative. While not as strong as the NP205, we have found the NP203 to run a very close second when well maintained.
[Main Page | About | Staff | Advertising | Inquiries] ©
OFF-ROAD.COM
"Off-Road.com" is a Registered Servicemark.
All Rights Reserved, All content with exception of private works and
corporate trademarked logos are property of Off-Road.com, Inc.
K-III Communications Corp, McMullen Argus Publishing, Inc.
or the "in-print" magazine titled "Off-Road".
One of the biggest mis-conceptions about the NP203 is that it is weak, and prone to failure. The main reasons the NP203 fails are use of improper lubricant and chain wear due to full-time four-wheel-drive operation.
The NP203 is actually a very bullet-proof case, and when converted to part-time and lubricated correctly, will last almost forever. Ninety percent of chain stretch and wear is caused by the fact that the chain moves (under load) continuously. The problem with converting one to part-time, is that not all parts get lubricated correctly. The design of the NP203 is such that it relies on the spinning of the chain to splash oil around the case to lubricate all the components. When the case is converted to part-time, the chain no longer spins (unless you have the hubs locked, or the case in 4wd mode). The item that needs oil the most is the rear tail-cone. It has an oil catch which the chain throws oil into. This oil is pushed by a plastic oil pump gear into the rear output shaft bearing. This oil catch needs to be refilled occasionaly, and the only way to do this is to drive in 4wd (or lock the hubs). MileMarker recommends running the truck for aproximately 10 miles every 200 miles. This is most easily accomplished by simply driving to work one day a week with the hubs locked.
The NP203 uses 10w-40 motor oil. People severly hurt their 203s by using either gear oil (90w) or transmission fluid (18w) in their cases. The gear oil is way too thick for the 203 and will not lubricate the links in the chain. Transmission fluid is too thin, and will not properly lubricate the ball bearings used in the input and output shafts. If you have used these fluids in your case, you need to drain it immediately, and fill it with the correct fluid.
 We chose the
MileMarker NP203 Shaft Kit for our case. MileMarker also offers a
light duty crown gear conversion kit, but we do not recommend it.
The case you will see pictures of in this article is actually being
converted from the crown gear style to the shaft style. Our 1975
Chevy Blazer had developed a clunk from the rear end when putting
it in gear. At first we suspected it was a u-joint. After checking
them we discovered it was from the transfer case. Closer inspection
revealed the crown gears had worn down, and were allowing about
1/8" to 1/4" of movement. Rather than replace the gears, we decided
to remove them completely.
We chose the
MileMarker NP203 Shaft Kit for our case. MileMarker also offers a
light duty crown gear conversion kit, but we do not recommend it.
The case you will see pictures of in this article is actually being
converted from the crown gear style to the shaft style. Our 1975
Chevy Blazer had developed a clunk from the rear end when putting
it in gear. At first we suspected it was a u-joint. After checking
them we discovered it was from the transfer case. Closer inspection
revealed the crown gears had worn down, and were allowing about
1/8" to 1/4" of movement. Rather than replace the gears, we decided
to remove them completely. The shaft kit is a one
piece unit which elimnates the spiders gears (or crown gears in our
case), the ring gear, and the tail shaft. This extreme duty unit,
if kept lubricated (as instructed above) correctly, it will easily
outlast the rest of your truck. I guarantee something else will
break before it does if you subject your truck to extreme
wheeling.
The shaft kit is a one
piece unit which elimnates the spiders gears (or crown gears in our
case), the ring gear, and the tail shaft. This extreme duty unit,
if kept lubricated (as instructed above) correctly, it will easily
outlast the rest of your truck. I guarantee something else will
break before it does if you subject your truck to extreme
wheeling.Installing the MileMarker Shaft Conversion
Before you install the MileMarker kit, we recommend you have the follow tools, and parts on hand: Sockets up to 1-1/2", NP203 plastic oil pump gear (GM PN 11801), RTV silicon sealer and a torque wrench. This will save you considerable frustration and having to run the dealer or the auto parts store in the middle.
 Start by
unbolting and removeing the tail cones. On most trucks you will
need a 1-5/16" socket to remove the yoke and a 9/16" socket to
remove the 14 tail cone bolts. Remove the outer tail cone first,
followed by the intermediate housing. You will then need to remove
the differential gear assembly. Don't panic! Needle bearings are
going to fall out. Don't let them fall into the transfer case!
Discard these bearings, as they are NOT reused. Refer to the
picture at the right. This is what your case should look like when
you get everything removed.
Start by
unbolting and removeing the tail cones. On most trucks you will
need a 1-5/16" socket to remove the yoke and a 9/16" socket to
remove the 14 tail cone bolts. Remove the outer tail cone first,
followed by the intermediate housing. You will then need to remove
the differential gear assembly. Don't panic! Needle bearings are
going to fall out. Don't let them fall into the transfer case!
Discard these bearings, as they are NOT reused. Refer to the
picture at the right. This is what your case should look like when
you get everything removed. This picture
illustrates the difference between the assembled crown gear kit,
and the shaft kit. No screws, bolts, or moving parts to break on
the shaft kit. Both kits vary slightly for Dodge and Ford, as minor
differences in the t-case exist between manufactures, but the
basics are the same. Be sure to check the instructions in your kit
before you begin. I also recommend lightly oiling the shaft bearing
surfaces before installing it into the case.
This picture
illustrates the difference between the assembled crown gear kit,
and the shaft kit. No screws, bolts, or moving parts to break on
the shaft kit. Both kits vary slightly for Dodge and Ford, as minor
differences in the t-case exist between manufactures, but the
basics are the same. Be sure to check the instructions in your kit
before you begin. I also recommend lightly oiling the shaft bearing
surfaces before installing it into the case. Place the shaft
over the slpined shaft and gear on the t-case. Install the gasket
(lightly coat with RTV silcon sealer), and replace the intermediate
housing. Tighten all bolts, but do not overtighten, the tailhousing
is aluminum, and overtighting can crack it. Install the plastic oil
pump gear (you do have one on hand right?), the speedometer gear
and all ofthe factory shims. Replace the tail cone and install 2
oposing bolts and tighten. Do not yet install the rest of the
bolts.
Place the shaft
over the slpined shaft and gear on the t-case. Install the gasket
(lightly coat with RTV silcon sealer), and replace the intermediate
housing. Tighten all bolts, but do not overtighten, the tailhousing
is aluminum, and overtighting can crack it. Install the plastic oil
pump gear (you do have one on hand right?), the speedometer gear
and all ofthe factory shims. Replace the tail cone and install 2
oposing bolts and tighten. Do not yet install the rest of the
bolts. Grab the rear of
the MileMarker shaft and push & pull on it. You should feel
some movement. This is called endplay. The instructions do
not specifically say how much, but it should move a perceptable
amount. Remove or add shims till you feel endplay. When done,
install the remaining bolts and tighten.
Grab the rear of
the MileMarker shaft and push & pull on it. You should feel
some movement. This is called endplay. The instructions do
not specifically say how much, but it should move a perceptable
amount. Remove or add shims till you feel endplay. When done,
install the remaining bolts and tighten. Here is the
completed unit. All that is needed now is to install the
driveshaft. Now is a good time to service those u-joints you've
been neglecting too! The transfer case shift pattern has now been
changed from HI-LOC, HI, NEUTRAL, LO, LO-LOC to 4HI, 2HI, N, 2LO,
4LO. The first thing we suggest you do is to lock your hubs and
drive about 10 miles. This will refill the oil catch at the back of
the t-case. Remeber to do this every few hundred miles!
Here is the
completed unit. All that is needed now is to install the
driveshaft. Now is a good time to service those u-joints you've
been neglecting too! The transfer case shift pattern has now been
changed from HI-LOC, HI, NEUTRAL, LO, LO-LOC to 4HI, 2HI, N, 2LO,
4LO. The first thing we suggest you do is to lock your hubs and
drive about 10 miles. This will refill the oil catch at the back of
the t-case. Remeber to do this every few hundred miles!Conclusion
After installing the shaft and taking the Blazer for a spin we found our driveline was the tightest it has ever been. When putting the truck in gear, all clunking sounds are gone! We have put about 500 miles on the shaft since the installation of this kit, and we are very happy with it. Originally we had planned on doing an NP205 swap on this truck and elimating the NP203 completely. But, the retail price of this kit is just over $200 from most 4x4 shops, and it makes for a much more reasonable alternative. While not as strong as the NP205, we have found the NP203 to run a very close second when well maintained.
Questions or Comments about this page should be
directed to: mmurray@off-road.com.
We cannot guarantee a response to every letter we
receive.
| Off-Road Products | Off-Road Motorsports | The Off-Road World | Off-Road News |
| Product Showcase | Off-Road Racing | Tales From The Trails | What's New |
| Vendor Showcase | Off-Road Motorcycles | Photo Album | Clubs & Associations |
| Off-Road Yellow Pages | Sand Cars & VW's | Feature & Project Vehicles | Event Calendar |
| Off-Road.com Store | ATVers Online | Computer Video Library | BBS& Guestbook |
| Free Classifieds | Off-Road Tech | Home & Theme Pages | Land Use Issues |
| Where/How to get Off-Road Trail Reports - 4WD Schools Off-Road Tours - Riding Areas |
4x4 Manufacturers Pages Chevy - Ford - Jeep - Hummer - Isuzu - Rover Suzuki - Scout - Nissan - Dodge - Toyota |
||
"Off-Road.com" is a Registered Servicemark.
All Rights Reserved, All content with exception of private works and
corporate trademarked logos are property of Off-Road.com, Inc.
Disclaimer
Off-Road.com, Inc., a Hawaii Corporation, and its Internet sites at "www.off-road.com" and "www.offroad-net.com"K-III Communications Corp, McMullen Argus Publishing, Inc.
or the "in-print" magazine titled "Off-Road".
|
Off-Road.com Newsletter Join our Weekly Newsletter to get the latest off-road news, reviews, events, and alerts! |
Follow @Off-Road
 Your Privacy Choices