Part
2 (Cont.
from Part 1)
H42-H55F
TRANSMISSION SWAP
Remove
Transmission Output Shaft Cover and Nut
Just take off the 6 bolts holding the cover on and using your nice
new $8 36mm Socket, bend the lock tabs out where they clamp on to
the shaft with a hammer and screwdriver and take off the nut.
Remove Rear
Output Flange
Bend the lock tabs out of this nut also, and use your awesome 32mm
Socket to get this nut off, and then take the flange off so the
transfer case can be split.
Remove
Spring and Locking Ball
Above the rear output flange there's a big nut that, once taken off,
reveals a spring and ball that set in indentations on the transfer
shift fork keeping the transfer case in gear. Remove the nut, spring
and ball, and don't lose them!
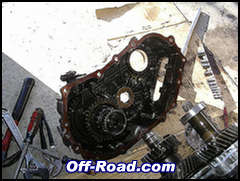
Split The
Transfer Case
Remove all bolts holding the two halves together. Should be 14 bolts
of various sizes. Remember how they go. 3 short bolts go next to the
PTO cover and the enormous bolts fit into the transmission.
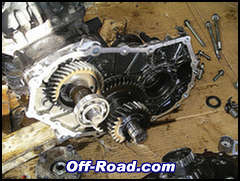
Remove
Gearsets
When I first heard you had to remove gears I was scared to death for
screwing something up. But the idler (middle) gears pull out without
any exertion, along with the transfer case output gears and shift
fork. Just wiggle them a little and they'll come off. The
transmission output shaft has a bearing and spacer on it that needs
to be removed, and the gear can be slid off with a few taps from a
rubber mallet. I stacked all of my gears on the floor exactly how
they came out to remember how they go back in.
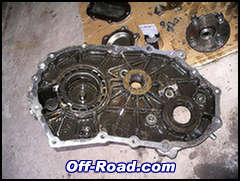
Remove
Transfer Case From Transmission
Remove the remaining 5 bolts holding the transfer case onto the
transmission and give it a couple taps and it should slide right
off.
Snap In
Oiler, Tap Hole
Now you can snap in your little plastic oiler, as the place is very
obvious. You can also tap the hole that is now unused. I put a bolt
I cut off into it with some thread locker and a lock washer because,
if it fell out, there would be big problems. Also make sure the bolt
does not protrude since the 5th gearset is spinning right there and
you obviously don't want any problems. These are the only two
modifications that you would need to do with your transfer case.
Replace
Front Case on Transmission
With your new H55F Transmission and gasket, fit the nipple of the
oiler into the center of the 5th gear, and install the 3 bolts
attaching the front case to the transmission. Only install the 3
bolts on the inside of the transfer case at this time.
Install
Idler Gearset
Install the idler shaft with new O-Rings, followed by the thrust
washer, with its protrusion in the grove in the transfer case. Then
install the caged roller bearings and then the idler gear to the
shaft.
Install
Transmission Output Gear
Using a rubber mallet, you can just hammer the gear onto the input
shaft. Be sure to put the square edge of the gear toward the
transmission, and the rounded, bigger side toward the rear.
Install
Spacer and Bearing
Just slide the spacer onto the output shaft, and use your 36mm
Socket to hammer the bearing onto the shaft.
Install
Transfer Case Output Shaft
With the shift fork in position on the hub sleeve, install the
output shaft on the front case, while putting the shift fork in its
hole.
Install
Rear Case
Put some white lithium or equivalent on the rear thrust washer and
stick it in place with the protrusion in the groove. If you look at
the idler shaft you will notice a squared off portion. On the rear
case you can see where that fits. Turn the idler shaft to the angle
of the rear case so it will fit when you install the case. Now you
can throw the case on there carefully, with the new gasket, making
sure everything is lining up. Install all of the bolts with the
correct sizes in the correct places and the correct metal clips in
the correct places (for routing the 4WD indicator wiring).
Install
Rear Flange
Torque down your new Rear Flange Nut to about 94 ft lbs using your
special socket. Jam a long screwdriver in the front flange to
prevent it from turning while you apply the torque. Then use a
chisel and bend in the sides where the groves on the shaft are, just
like it was before you took it off.
Install
Transmission Output Nut
Same as above using the other special socket, at the same torque and
pounding in the same tabs. This time, though, jam the screwdriver in
the rear flange as you torque it down.
Install PTO
Cover
Use a new gasket, preferably.
Install
Transmission Output Cover
Again, use a new gasket.
Install
Spring and Ball
Hopefully you haven't lost the nut spring and ball! Just throw the
ball in the hole and put the spring in there and tighten the nut
down. Shift the High/Low shifter a couple times to make sure it
works correctly.
Install
Crossmember Brackets
Steal the crossmember brackets from the old H42 Transmission and fit
them onto the new H55F.
Install
Transfer Shift Lever Axle
On the passenger side of the old transmission you can see the axle
that the shift lever uses to pivot on. You must take that off and
put it on your new H55F.
So now you're
done and your transmission/transfer case assembly is ready to be
installed. Now you must get the truck ready for the installation.
TRANSMISSION/TRANSFER
CASE INSTALLATION
Replace
Rear Main Seal
It's as easy to replace as it is to remove, but make sure it is
completely seated. You don't want to have to come back to this point
in a long long while. Use a blunt soft object to make completely
sure.
Replace
Pilot Bearing
Take your new bearing and a socket of the same outer diameter and
hammer it in there all the way. Make sure it turns silky smooth.
Install
Bellhousing
Just lug that heavy thing up there and install the six bolts.
Install
Flywheel
Make sure you put thread locker on the six flywheel bolts and torque
them to the correct setting (mine was 60 ft lbs). Use the same
screwdriver stuck in the gear teeth to keep it from spinning.
Install
Pressure Plate/Clutch Disc
Use your handy dandy clutch alignment tool to position the clutch
disc correctly on the flywheel and throw your pressure plate up
there. Hand tighten all of the bolts by spinning the flywheel
around. Then torque them little by little so the pressure around the
clutch disc is more or less constant. When they have reached their
recommended torque (14 ft lbs on mine) you can take out the clutch
alignment tool.
Install
Throw Out Arm
After disassembling the arm and hammering the old bearing off of the
hub and replacing it with a new one, apply some white lithium or
equivalent to anywhere that touches something else, such as the ends
of the lever, the ballstud socket, and the depression where the
release cylinder pushrod fits. Then clip the ballstud socket on its
stud and that's it. When installing the transmission the input shaft
will line the bearing up, but until then it'll just hang there.
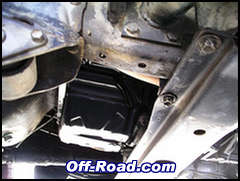
Install
Transmission
Having a transmission jack for this step is very important, since
you must get the correct angles to fit into the engine. I rented one
for $20 for 4 hours, and it was well worth it. It's difficult to get
the shift tower into its hole while trying to get the input shaft
into the clutch disc, but with some maneuvering it can be done. When
the input shaft meets the pilot bearing, though, it becomes
difficult. But here it should be close enough to thread the bolts so
you can bolt it the rest of the way in. just make sure everything is
lined up, and you install the exhaust pipe bracket on the drivers
side. Notice the crossmember brackets are not parallel with the
ground. This is normal since the crossmember itself is at an angle.
Install
Crossmember
Move the transmission jack out of the way (if it is) by using a
second jack to hold it up, and fit the crossmember back on. Note the
correct angle.
Install
Bellhousing Bottom
I had to put a new seal set on the bottom part of the bellhousing,
then I just bolted it on with the 7 bolts.
Install
Clutch Slave Cylinder
Make sure you put the hose on the cylinder first, before you attach
the cylinder to the bellhousing. Then once it's on make sure it's
tight. And, obviously, make sure the piston is placed in its
indentation on the throw out arm correctly.
Install
Transfer Shift Lever
Install the lever itself first on its axle on the transmission,
making sure the small plastic rectangle fits in the 4WD shifter,
followed by the arm that comes from the High/Low Shifter linkage.
Attach these two together by putting the end of the arm in the arm
coming from the lever. Install a new cotter pin to prevent it
slipping off. You can install the bracket at this time, but I chose
to leave it off since the only purpose it serves is to prevent
shifting into 2Lo. Sometimes 2Lo is appropriate, especially for
slow, tight maneuvering.
Install
Electrical Connections and Speedometer Cable
Install the same old 4WD switch on the side of the transfer case,
and plug in the new reverse switch from the new transmission into
the quick disconnect that was mentioned earlier.
Install
Front and Rear Propeller Shafts
Make note of the marks you made before detaching the propeller
shafts.
Install
Skid Plate
You could wait on this step if you want to make sure everything
works first.
Install
Transmission Shift Lever
Put the old lever with the new bushing on the bottom into the
transmission. Press down on the shift lever cap and rotate it
clockwise to lock it in. install the boots for the transmission and
the transfer case.
Fill
Transmission and Transfer Case
The H55F uses about 5.2 quarts while the transfer case uses 2.3
quarts. I refilled my differentials at the same time.
Bleed
Clutch
You'll have to bleed the clutch since you worked on it and
inevitably got some air in the lines. It's a good time to check the
quality of the fluid in the lines too. I would recommend a real
bleeder kit, one with a magnet on the bottle so you can put it at
the same height as the bleeder plug. Without the kit I got a good
amount of brake fluid in the eyes. Ouch!
Install
Wheels
If you remembered how they were before, you can go ahead and rotate
them, saving work down the road.
Connect the
Battery
Now you're ready to start it up and take it for a test drive!
Conclusion
After starting
my engine the first time I got a horrible squeal from the pilot
bearing, but after inquiring, I found it would probably disappear
after a while, which it did. The first time through the gears was
pretty tough, and I knew they had to be broken in. I guess that's
why when you buy a brand new car it already has miles on it! The
synchronizers and gears all made weird sounds, but after driving for
about 15 minutes, things were beginning to get smooth. I would
recommend pulling your truck out of the garage and letting the
engine spin the gears for a while with the transmission in gear and
the transfer case in neutral. Maybe go through the gears a couple of
time and make sure the 4WD indicator light and reverse lights work.
I knew, though, when I first hit the road, this was an excellent
choice. The gears seem better suited to the 2F, and on the highway
it is incredibly nice to be able to shift again into 5th! 1st gear,
Low Range also produced a considerably better crawl ratio. I would
recommend this modification to anyone with an April '85 or later
FJ60. I would also highly recommend purchasing your H55F from CruiserParts.net.
They included all needed Toyota parts for a very reasonable cost and
free shipping, which would have cost a ton. They also offered
excellent technical advice.
 |
|
Though
I may be smiling, I really have no idea what I'm doing.
|
If you do
decide to undertake this demanding but enjoyable project, don't
hesitate to contact me at C06Zachary.Rothe@usafa.af.mil. I also have
a lot more pictures and comments saved on my computer (about 200 or
) at a lot higher resolution that I could either send through e-mail
or send on a CD if you are interested. I will be as much help as I
can, being a 19 year old with little (but growing!) technical
skills. That said, anyone have any cute daughters out there they
want turned into a cruiser chick?? :)


 Your Privacy Choices