A write-up on performing an 8-lug swap on a TTB Dana 44 front axle for Broncos and F-150's
Here's my write-up on what I did to convert my TTB Dana 44 front axle from 5 lugs to 8 lugs using Chevy parts. At first, I tried going all Ford but after extensive searching and research, there wasn't any way possible I could see to adapt 3/4-1 ton Ford parts to the 1/2 ton TTB axle. After someone mentioned to me on the Ford Truck
Enthusiasts Boards how he got his to work using Chevy parts, I decided to look into this in depth. It took me several tries but I finally got it to work.
I'll give you the rundown on what I did but I can't give y'all any specifics on what truck to get parts from. First off- I bought an 10 bolt 3/4 ton axle from an early '70's Chevy K20 4x4 pickup (axle was laying on the ground by itself so don't know exactly what truck).
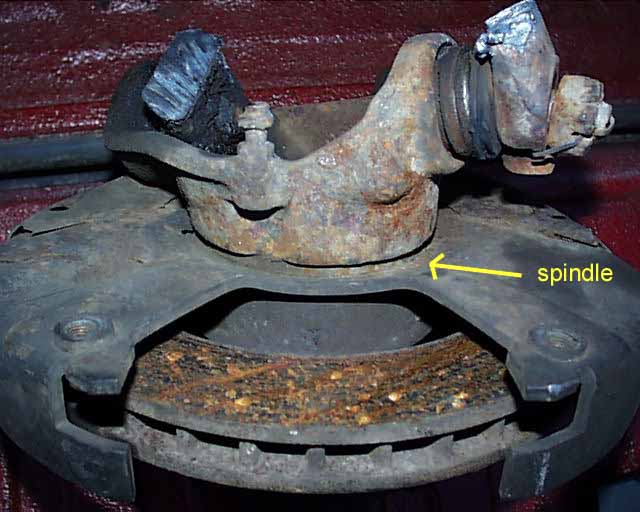
You can see in that picture that the spindle sits between the
knuckle and bracket, note the 1/4 inch space between the caliper
bracket and knuckle. I started by taking apart all the Chevy stuff
I had-
I then stripped everything off the Bronco knuckles and then
proceeded to cut the caliper mounting ears off. I already had both
axle beams out of the truck because I was installing a suspension
lift at the same time so it was easier for me to do.
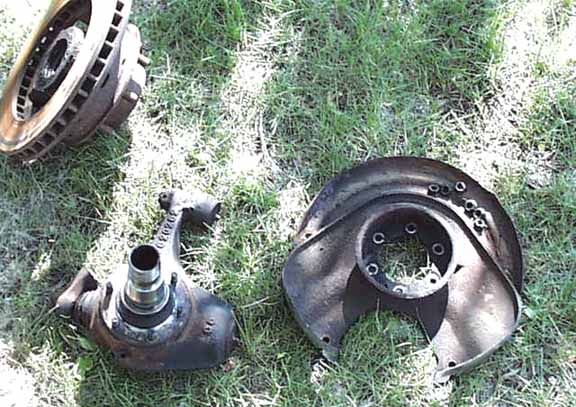
In those pics, you can see the 3/4 ton chevy spindle that I tried
on there to see how it fits. I then knocked out all the Bronco
spindle studs by threading on a spare spindle stud nut flush onto
each stud then hitting them with a sledge on a block of wood. I
then swapped the longer Chevy spindle studs over onto the Bronco
knuckle. Here's a pic comparing the stud lengths, Chevy on the left
and Bronco on the right-
You can swap studs with the knuckle still on the axle beams but it
is a lot tougher to do. Then I ground a little bit off the face of
the knuckle in order to get the caliper bracket to sit squarely
onto the knuckle but here's a tip- do NOT put the caliper
bracket on this way-
I found out the hard way when I was trying to install the calipers
and found that it hit that corner of the knuckle. I totally
overlooked the knuckle part when I did this originally so I had
take everything apart to rotate the caliper bracket one hole over
so that the calipers are at the 3 o'clock and 9 o'clock position
depending on what side of the truck you're looking at. I also ran
into a problem of the Chevy spindle studs being too long and
hitting the back of the rotor for some reason. I knocked out all
the studs on one side, reinstalled the Bronco studs and found out
they were too short.
If any of you attempt this swap, please keep in mind I take no
responsibility for any problems that may arise because this is an
unusual swap. I should also mention that I did some extensive
grinding to the outer surfaces of the caliper brackets and calipers
to make my 15" wheels fit and they do fit with very little room to
spare-
I highly recommend going to 16" wheels or larger if you can. Dustin
Siebert
I'll give you the rundown on what I did but I can't give y'all any specifics on what truck to get parts from. First off- I bought an 10 bolt 3/4 ton axle from an early '70's Chevy K20 4x4 pickup (axle was laying on the ground by itself so don't know exactly what truck).
If you are going to look for one, the main thing to look for is a straight axle 3/4 ton chevy 4x4, not the late '80's with the IFS. I had the yard cut off the knuckles from the axle tubes so
I could bring home everything from just the knuckles out along with the axle shafts (didn't need the trashed center section and axle
tubes). The biggest thing about this swap is that you have to make
sure that the axle you pull your stuff from has the caliper bracket
in front of the spindle, not in between the spindle and
knuckle.
- Items needed for the swap:
- spindles
- spindle studs
- spindle stud nuts and spindle nuts/washer
- rotors
- wheel bearings
- hubs
- calipers
- caliper backing plates
- extended brake lines
- outer axle stubs
 Chevy 3/4 ton setup with the caliper backing plate in front of the spindle. |
 Front view of the Chevy rotor/hub assembly. |
 Chevy 3/4 ton setup- rotor/hub assembly (left), knuckle and spindle (middle), caliper backing plate (right) |
 Side view of my completed cuts and grinding. |
 View of the cut caliper mounting ears. |
 Chevy spindle studs on the left, Bronco spindle studs on the right. |
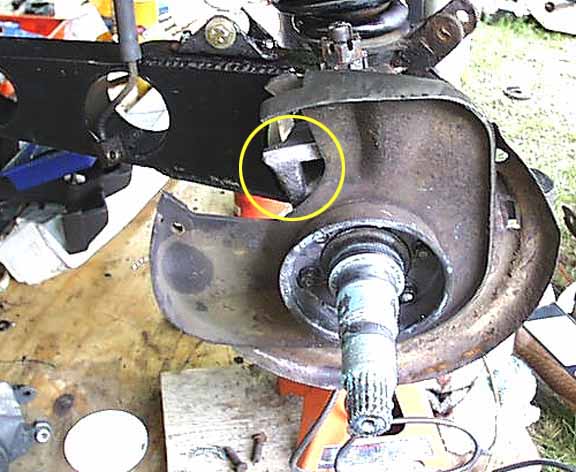 The wrong way to mount the caliper backing plate. The correct way is to have the plate mounted clocked one hole to the left. |
I then swapped the Bronco studs back to the
Chevy studs and cut off 1/16" off all the Chevy studs. Keep in
mind, this was with the knuckle still on the beam so I used an
impact hammer to get the studs fully seated (had to go in between
the gap between the knuckle and axle beams). I had a
driveline shop swap the outer Chevy axle stubs onto my Bronco inner
axle shafts and replace the u-joints. I slipped the axle shafts in
like you normally would with the stock Bronco setup then put the
spindles on. I put the caliper brackets on grinding wherever it was
needed to get the brackets flush and then threaded the nuts on and
tightened everything down. I had to grind the knuckle a little bit
so that the caliper itself would clear but nothing major. Calipers
bolt on like a normal Chevy truck and the hub locks went on
normally too. I bought a set of Ford extended lines and Chevy
extended lines because I wasn't sure which would work. I should
mention that I got the single piston Chevy calipers (1/2 ton) and
it turns out that the Ford extended lines work with the calipers.
Here's the completed swap minus the new extended brake
lines-
 Completed swap minus the new brake lines. |
 Extensive grinding required to run 15" wheels. |
|
|