Does your truck need a new antenna? Was the stock antenna bent by a tree? Did it snag a neighbor kid? A neighbor tree? Your factory antenna might not have been much good anyway. Reception was limp; so was the motor that erected it. You should yank that lousy factory antenna (particularly in the case of the third-gen 4Runner) and replace it with an effective low-profile unit that can be found at the junkyard for less than two Hamiltons.
Finding Factory-Awesome Parts
Some OEM parts stand out for their excellence independent of the vehicles they were sold in: Fords nine-inch diff, the double-DIN stereos Pioneer built for Scions, Fords roller-cam HO 302 and Chevrolets small-block V8, Isuzus diesel four-bangers, Mazdas rotary engines
well, Communism worked in theory too. More obscure but also full of good parts were Volvos 240s.

Manufactured in Sweden, and designed for a sensible Northern European consumer, the Volvo 240s were solid, reliable, refined (in a square-jawed fashion), and ideal for folks driving to and from distant communities separated by lots of mountains miles. Sorry, mountain kilometers. Whatever. Europe also tends to be an overregulated place (cough! Socialism!), so radio stations there are restricted to a minimum of wattage. If Volvo owners were going to stay in touch, they needed powerful radio reception, so Volvo designed a particularly receptive radio antenna (Volvo was so serious about keeping in touch; the 240 could be ordered with a factory CB radio).

The author, raised in a Volvo family, was told this story by a Volvo mechanic. Growing up in Chicago, it proved fact it was normal for the stereo in family Volvos to pick up Milwaukee, Rockford and Indianapolis stations. Years later, this tale of antenna awesomeness floated ashore while at the junkyard mining FJ parts with Off-Road.coms Jaime Hernandez. Having crushed the factory antenna on his billion-mile 4Runner while tiptoeing through some tulips (which may have been a tree), your author had eschewed the use of a floppy aftermarket replacement due to their reputation for lousy reception. The sight of several early Volvo 240s, stolidly refusing to join the dust in which they sat, set him on a course for an awesome new 30-year-old antenna.

Low-Profile = Off-Road Friendly
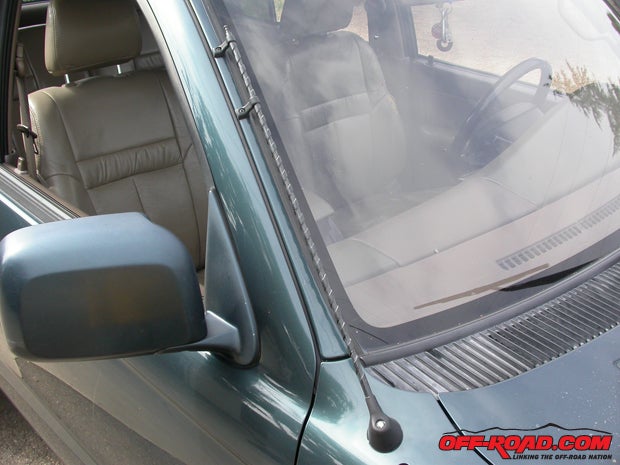
The main off-road benefit of the Volvo 240 antenna was its pre-ordained inclination to match the declination of the third-gen 4Runners A-pillar. With one hole drilled in the front fender, the 240 antenna laid back against the A-pillar with scant space to spare, offering a significantly reduced brush-interference profile. The near-100% ease of this antennas recovery and installation cannot be overstated: the interface of tractor-simple Volvo parts with Japanese-practical Toyota design was so simple, the whole low-pro Volvo antenna installation required the purchase of only one additional part not on the Volvo a $5 cable extension.

Necessary Antenna Parts for Volvo-Toyota Interface
Speaking of simple, there are four bits youll require from the junked Volvo. One is the 240-series Volvo antenna (as pictured), which removes with one big Phillips screw. There is a manually retractable inner rod in the antenna. Make sure its there and the inner dogs are tight, though you wont need to extend this antenna unless youre trying to pick up signals from Uranus. A single-piece/non-extension version of this antenna exists, and its just as good as the two-piece unit, with fewer moving parts, but if you find one you ought to buy a lottery ticket too.
 and the power cable (A) can be removed easily. We left the power cable in place for future actuation of a remote squirt gun.")
There is a single small bracket at the top of the antenna that anchors it to the Volvos A-pillar we grabbed it (be careful when sliding the antenna out of it), and then grabbed a spare bracket from another 244 to ensure we could guarantee serious purchase on the 4Runners A-pillar.

The third bit youll need from the donor Volvo is the factory one-piece antenna cable. When you remove the antenna, youll find it mounts to a big bolt that appears to be threaded directly into the fender. It is. Unplug the cable from the back of the Volvos stereo and pull it from behind the dash. When you unscrew that big bolt in the fender (standard thread), youll not only have the head of the whole cable (pull it out carefully), but youll know exactly how to reinstall it.
There is another awesome Volvo antenna option that we could have employed the 7- and 9-series Volvo wagons sport a concealed antenna in the D-pillar that can be left 100% within the D-pillar (its a swap some Volvo guys speak highly of). Unfortunately, there were neither 7- nor 9-series Volvos at the junkyard that day.
. Use an X-Acto knife to cut the paint where the hole will be to reduce the chances of chipping.")
Removing the OEM 4Runner Antenna
If theres a trickiest part to this grade-A oddball antenna swap, its excising the original 4Runner antenna. The factory antenna routed from the stereo to the antenna is one piece, so snip it in the cabin where it passes through the fender above the forward passengers right foot, whereupon you extract it from the stereo and behind the dash. As ours was equipped with the automatic antenna, the wheel-well liner needs to be removed to access the motor mechanism, which is unbolted and extracted after unscrewing the antenna masts angled fender grommet. The port and grommet used by the OEM antenna cable to pass through the inner fender will be reused; however, so carefully remove the Toyota cable so you can install the Volvo cable. We intend to use the OEM antenna hole thats left in the outer fender to install a floppy Firestick for our CB.

Drilling Holes in Perfectly Good Fenders
Get over it. While there is logic to not making new holes, the rush of poking a drill bit through a perfectly good fender is worth it so long as you do it right. Once you have the Volvo antenna off and can test-fit it, align it (using the small upper pedestal so its placement is correct), and circle where the base meets the fender with a grease pencil. Find the center, dimple it with a punch (not so hard that you deform the fender), and then mask off the fender to ensure surrounding paint is protected. Drill a shallow pinhole in the dimple to start, and then unbolt the fender along its upper edge. This will give you a good look at whats behind the fender. With the fender lose at its upper edge, pull it a few inches away from the body and stick a block of wood behind the fender to catch the next drill bit. Measure the diameter of the threads in the Volvo antenna cable bolt. Using a stepped bit, start building up the hole. Stop BEFORE youve drilled to the diameter of the Volvo antenna cable bolt you want to be able to thread the big bolt into the 4Runner fender in the same fashion as it was threaded in to the Volvo fender, so the hole needs to be just big enough to start the conical-threaded Volvo antenna cable bolt, but small enough that the threads will gain purchase in the new hole (BUT not so small that it distorts the new fender). If youre working on a 4Runner or Tacoma, once youve begun working on this new hole, youll note there is a sheet metal seam behind where the fender hole will go that will obstruct the path of the antenna cable. When the hole is finished, use a punch that fits through the hole and shape that seam away from the path of the new antenna cable.

Once the hole is in place, thread the Volvo cable into the cabin (through the bushing in the inner fender wall, reusing the metal stop-collar), and eyeball the fit of the Volvo antenna cable bolt. Before you drive it home (this is a one-shot proposition, folks), deburr the holes edges and get some primer on the raw metal. Also before setting the antenna cable bolt, eyeball the alignment necessary for the antenna to run along the A-pillar. Keeping that angle in mind, use a socket and extension (the extension enabling better alignment) and twist the Volvos antenna cable bolt into place. DO NOT overtorque its just sheet metal and do not change angles once youre turning the wrench. Dont worry if the bolt goes in slightly cocked from what you intended install a rubber washer around the bolt head to keep the antenna base snug with the fender.


We used two of the Volvo 240 antenna pedestals to support the upper end of the retrofitted antenna to ensure it stayed in place when attacked by off-road trees and shrubs. The bottom of the pedestal had to be narrowed to match this particular A-pillar, which only required a few minutes with a file and sandpaper (the pedestals are made of heavy ABS-style plastic found on pretty much every European car from the 70s and 80s). The upper mounts have a perfectly centered screw hole in their base, and once youve marked it on the A-pillar, youll only need one tiny hole (each) to send self-tapping screws into the A-pillars sheet metal. We checked within the A-pillar itself to be sure no wires would get drilled, and then we drilled. A dollop of RTF went into and on top of each hole before the pedestals were secured.


The last step was simple a thick rubber washer was cut to slip around the antenna cable mounting bolt so the Volvo antenna base would conform to the 4Runner fenders shape. The antenna then slid into place. Simple, right?
|
Off-Road.com Newsletter Join our Weekly Newsletter to get the latest off-road news, reviews, events, and alerts! |
Follow @Off-Road
 Your Privacy Choices