Installing a Windshield Fold-down Kit
| Actually they didn't forget it, they just left it
out of the Zooks bound for America. It seems most other countries in the
world got the option of folding down the windshield on a Suzuki, but not
the good old US of A. But if you have an hour or so and want to do it
yourself, Rocky Road Outfitters has the kit to do the job. And it's
genuine Suzuki equipment!
Replacing the hardware is much simpler if you take it one step at a time. Don't just pull off the windshield and then expect to fit everything in place by yourself. The whole installation can be done by one person with simple hand tools. |
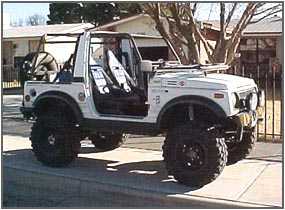 Only fold down the windshield when you have an additional form of protection installed - such as this front sport cage. |
Installing the tie down strap mounting loop on the hood is not difficult. But if you don't have any dings or dents in the hood yet, pulling out the drill may be a tough thing to do. Open the hood and you will see a pair of circular cutouts in the front of the hood bracing. You need to drill a hole in the center of each cutout. I used a pair of washers on the underside of the hood for added strength.
 Find the factory mounting bosses |
 The loop as seen from above, simple and unobtrusive |
Next we go to the windshield frame. The plastic caps that cover the windshield front brackets are held on with double stick tape. Use a flat blade screwdriver and ‘carefully’ pop them off of the bracket. Then remove the screws. Sound easy so far?
 The bracket cover is held on with double sided tape |
 First try a screwdriver, but don't strip out the threads |
This is one of those installations where it takes more of an effort to disassemble the stock components than it does to bolt on the kit. The reason for that is because Suzuki didn't want their vehicles falling apart, so they used a ‘lock tight’ type compound to secure the screws that hold it together. If you can't get the screws out with a #3 Phillips screwdriver, you may need to use an impact screwdriver. This is a hefty little tool that lets you use a hammer to force the screw to turn. Be careful not to hit it so hard that it bends the panel beneath the screw. If it starts to bend, then there are other, more drastic measures you can take… none of them pretty. But chances are very good that the impact screwdriver will do the job. Next replace the bracket with the new hinge using the same screws.
 Using an impact screwdriver |
 Replacing the plate with a hinge |
The two new snubber towers that attach to the top of the windshield also uses the stock screws that are already there. The screws might be painted, but a quick twist of the screwdriver will back them out easily. You will find the tie-down strap loop mounting bosses beneath the small rubber snubber that came stock on the top-center of the windshield. The original (centered) rubber snubber is held on by adhesive, so just be careful as you remove it. A little nail polish remover will take care of the remaining adhesive.
 Snubber tower using original screws |
 These mounting holes are hidden by the stock snubber |
Next we move inside. Take a look at the brackets on each end of the windshield where it connects to the side of the dashboard. Again, work on one side at a time. Remove the bracket and find the similar (but shorter) replacement to install in its place. Notice that this new bracket only attaches at the windshield end. The small hooked end is where it will meet the new clamp. Leave the bracket a bit loose.
 Remove the lower... |
 ... and upper screws |
| Mount the new clamp on the dashboard using the stock mounting bosses. The factory dashboard screws have a washer attached that won't fit into the fold of the clamp. I used some metric Allen-head bolts for an easy fit. Once the clamp is mounted, position the two components so that they fit against each other, then tighten all fasteners. |  The screw/washer was replaced with allen head bolts for fit |
 Install the upper bracket loosely |
 Secure the latch and tighten all fasteners |
At this point, the kit is installed. To fold down your windshield you only have to remove the top and the four overhead braces that connect the windshield to the targa, release the latches on both sides of the dashboard, and gently tilt the windshield forward until the snubbers rest on the hood.
 You will find the door brace attached inside and outside of the targa |
 ... and where the bar meets the windshield |
As you do this, there is a small plastic cover that hides the windshield wiper motor on the passenger side of the dashboard that will pop loose. Just pop it back in place after the motor comes forward. The supplied strap is used to hold the windshield securely to the hood when you are moving. Don't leave home without it.
 The wiper motor cover will 'pop' off when you ease down the window |
 After the windshield is secured, just pop it back into place |
There are a couple of things that you also want to consider when installing this kit. First, the plastic windshield washer tube that connects at the center of the lower windshield panel is too short. When you fold down the windshield, it will pop loose from the bulkhead mounting point on the windshield frame. There is no breakage, but it gets messy and inconvenient. Replacing or adding a small length of new tube to lengthen it is easy. Spend a buck at the local pet store and get some airline for fish tanks. It works well.
 Add some additional line so it doesn't disconnect |
 Use the supplied strap to hold the windshield down |
And probably the most important thing to remember… while folding down the windshield looks cool and provides a bit more of a view while wheeling, it removes what little overhead protection the Samurai gives you from the factory. This should be done in conjunction with, or in addition to some form of roll-over protection. In the photos you will notice this vehicle is equipped with a six point roll (sport) cage. Although it is nice to go all out and put in a full cage, you can do it a step at a time by starting with the front section. Many manufacturers make bolt in and weld in models that will give you more support than the original Suzuki equipment. It's great to look cool, but safety has to be your highest priority.
Once the safety needs are met, strap down the windshield and hit the trails! You will be able to see more of your surroundings and that will give you the edge when it comes to picking your line. Oh, and it looks really cool too! {grin}
|
Off-Road.com Newsletter Join our Weekly Newsletter to get the latest off-road news, reviews, events, and alerts! |
Follow @Off-Road
 Your Privacy Choices