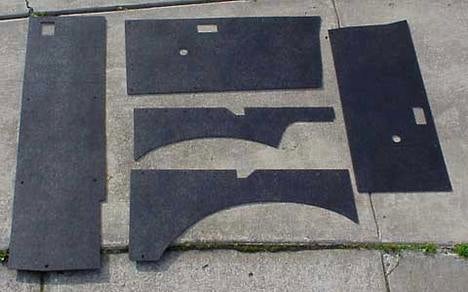
Suzuki 4x4 - Product Reviews: Keltec ABS Panels from Rocky Road Outfitters

Nov. 01, 2005 By ORC STAFF
Off-Road's reviews
Contact Rocky Road Outfitters
Dept. ORC
PO Box 681245
Park City, UT 84068
Orders
(888) 801-7271 Fax
+1 (435) 783-4355 Tech
+1 (435) 783-2990

An Off-Road.com Product Review

'Wheelin in Style?

Driver's door panel, before. When it comes to needing off-road performance accessories for our little Suzuki trucks, it seems that there are plenty of products to choose from. But, for us Suzuki guys and gals, there really aren't many products out there to help us spruce up the interior of our rigs. Like mine, the interior of your Samurai has probably seen a lot of miles and many years go by, leaving it far from it's original condition. One of the first cosmetic areas to show their wear are the interior panels. These are often stained by dirt and the vinyl tends to crack and peel away from the fiberboard, forcing many owners to "fix" them with a little glue and the ever-indispensable duct tape. Heck, some owners may not even have have any interior panels; I didn't have the three in the rear bed of my truck. Talk about being ugly... Rear quarter panel, before. You may think, "Hey, trail rigs don't need to be nice, inside or out." Well, with all that time sitting behind the wheel out on the trail, why not have a nice place to spend it? Or like mine, maybe your Samurai is also your daily driver. I know I sure got tired of looking at those ratty old door panels everyday. Tailgate panel, before. But, at last, a solution has arrived. Rocky Road Outfitters and Keltec Systems have come to the rescue by offering a complete set of interior panels made from tough, durable ABS plastic. When I opened the box after they arrived on my doorstep, my first words were to the effect of, "Damn, these things look cool!" I couldn't wait to get these into my Samurai. They are an attractive, shiny black and have just the right amount of texture to them. Included is a detailed set of instructions and all the fasteners you need. Also, the fasteners are separated into 3 plastic bags and labeled according to it's corresponding panel--a nice touch that makes installation even more painless. I should be 'wheelin in style in no time.

Installation

Tools Before any installation can take place, you first have to remove your old panels (if you have any). The only tool necessary for the job is a Phillips screwdriver, but a window crank clip remover is a nice tool to have also. Some people may need a door panel remover or putty knife to assist in prying the panels off, as well. Removing the window crank Old panel removed. The round, grayish "clip sockets" in the door must be removed. Start by removing all screws holding on the various trim, grab handles and door straps. Next, either using a window crank clip remover or a rag slipped behind the window crank, pop the clip off and slide off the crank. The panels can then be pried off. Now comes the hardest part of the installation: removal of the plastic sockets that remain in the door. I chose to cut them out with a utility knife. Fasteners New panel and fasteners in place, ready for the trim to be replaced. Next, you can test fit each panel by setting it in place. Check to see if all the holes line up properly and the outline of the panel is okay. Once everything is properly aligned, go ahead and insert the fasteners, starting at opposite corners and working inward. No tools other than your thumb should be necessary to push the button in on each fastener. Once all the fasteners are in place, re-install all the grab handles, trim, window cranks and door straps. What a piece of cake.

Impressions

After: Reassembled driver's door. Well, I finally have something nice on my truck to show off. Everyone that sees them is really impressed by how great they look and with the fit and finish. Also, given that they are made out of ABS plastic, they should out-live my Samurai. When that does happen, the panels are easily removed with a screwdriver to be put in my next Samurai. Driver's side rear panels installed. Passenger side rear panels installed. Unfortunately, I did have a problem with the holes in the tailgate panel not lining up, but Doug Kelsey at Keltec Systems was happy to send me a new one. After investigation, Doug discovered that the manufacturing die had shifted a little and about 15 panels had to be scrapped, but he assured me that it won't happen again. They were a wonderful company to deal with, and I look forward to using more quality products from them in the future. Tailgate panel installed. Overall, the panels are a very nice product that makes my interior much more inviting, and they should be durable enough to withstand years of off-road abuse, since they are impervious to water and dirt. I'm confident that they would be as welcome an addition to anyone's truck as they are to mine. Unfortunately, I'll have to make the rest of my truck look nicer so that the interior panels don't look out of place, considering that now I'm 'wheelin in style.'
--John Gehring
Click here for the best in off-road products

Suzuki Section Copyright ©1995-2002 by Petroglyph Computing, William Johnston, Geoff Beasley, Adam Leach, John Gehring, Aaron Andrews and the various contributors.
Suzuki, Samurai, Sidekick, Vitara, and the Suzuki 'S' logo, are registered trademarks of Suzuki Motor Corporation.
23 Jun 2000 01:53


Off-Road.com Newsletter
Join our Weekly Newsletter to get the latest off-road news, reviews, events, and alerts!