Product review: Old Man Emu Toyota Pickup Leaf Spring Suspenison Kit
Reviewer's Notebook
Old Man Emu Toyota Pickup Leaf Spring Suspension Kit
Author: Barney McNamara - barney@flowpoint.com
 79-85 Toyota mini-trucks
and 84-85 4-Runners utilize leaf spring suspensions. Old Man Emu
(OME) is an Australian company that designs and builds suspensions
for these trucks as well as many other makes and types of off-road
vehicles. They are especially well known in the US (in the Toyota
world) for their Land Cruiser suspension kits. I was interested in
a mild lift for my 1983 short bed pickup. I was interested in a
general purpose suspension system that would provide a stable ride
on washboard desert roads, as well as be flexible enough to ride
well over rocky Sierra trails. I was not interested in a lift
intended specifically for maximum articulation, nor was I
interested in a huge lift (the OME is rated at 50 mm). I chose the
OME brand based on its reputation and the fact that it was always
referred to as a system. The thought of a well-designed and field
proven combination of springs and shocks appealed to me, as the
cost of a new suspension setup is a healthy investment. The
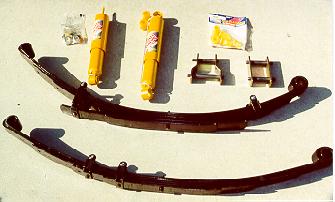
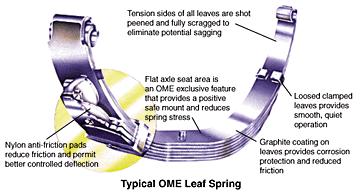
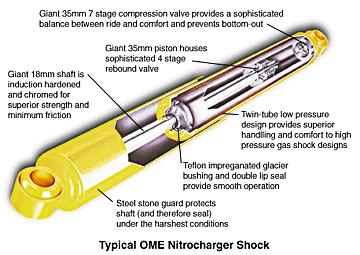
technical features of the OME parts are highlighted in the diagrams
below.
79-85 Toyota mini-trucks
and 84-85 4-Runners utilize leaf spring suspensions. Old Man Emu
(OME) is an Australian company that designs and builds suspensions
for these trucks as well as many other makes and types of off-road
vehicles. They are especially well known in the US (in the Toyota
world) for their Land Cruiser suspension kits. I was interested in
a mild lift for my 1983 short bed pickup. I was interested in a
general purpose suspension system that would provide a stable ride
on washboard desert roads, as well as be flexible enough to ride
well over rocky Sierra trails. I was not interested in a lift
intended specifically for maximum articulation, nor was I
interested in a huge lift (the OME is rated at 50 mm). I chose the
OME brand based on its reputation and the fact that it was always
referred to as a system. The thought of a well-designed and field
proven combination of springs and shocks appealed to me, as the
cost of a new suspension setup is a healthy investment. The
technical features of the OME parts are highlighted in the diagrams
below.
Ordering:
The first thing I found when I tried to purchase an OME "kit" was that there were a lot more choices and a lot less information available for Toyota pickup trucks than I anticipated. There is a general lack of real experience using this particular setup in the US. I started by calling ARB USA in Washington state, the US importer of OME equipment. I happened to choose the week the SEMA show was going on in Las Vegas, and all the technical people were there. I had the person who answered the phone fax me what I thought was a simple list of OME kits, but ended up being an incomplete list of the separate springs, shocks, shackles, and assorted goodies that all must be ordered individually to complete a "kit". Armed with that information, I started looking for a local distributor who could order the parts for me. ARB will not bypass their distributors and sell direct to end users. What I found was several local (San Jose, CA) discount 4x4 shops that sell a lot of stuff for American rigs, but know little or nothing about Toyotas or OME. I got a clue when I asked for help on OME springs, and several thought I was incorrectly pronouncing the acronym for Original Equipment Manufacturer (OEM) and tried to send me to a Toyota dealer. Giving up on the locals, I ended up searching my archives from the Toyota email list, and found a reference to a place in Arizona, Off Road Unlimited, who also sells OME products. While the person who had been familiar with Toyota trucks no longer worked at Off Road, I found Mario to be very helpful, and he and I learned a lot about Toyota pickup OME installations as we worked out my order. I faxed Mario the list of parts I had selected from the information I had received from ARB, and after talking to a rep at ARB and adding the parts I had left out, the following list was assembled:Front springs - OME-99A (driver's side) and OME-99B (passenger's side) - medium duty ($148 each)
Front shocks - OME-N84 - soft valved (qty 2 - $66 each)
Front shackles - OME-GS4 - greasable, stock length (qty 1 pair - $79)
Front bushings - OME-SB5 - poly bushing set (qty 2 sets - $15.50 each)
Front U-bolt - OME-U52 - flat-topped for drag link clearance (qty 1 - $16)
Pin and Plate sets - OME-GP3 - greasable front spring hanger pins (qty 2 sets, front and rear - $50 each pair)
Rear springs - OME-17 - medium duty (qty 2 - $205 each)
Rear shocks - OME-N94 - soft valved (qty 2 - $66 each)
Rear shackles - OME-GS3 - greasable, stock length (qty 1 pair - $79)
Rear bushings - OME-SB6 - poly bushing set (qty 2 sets - $16.50 each) I placed my order with Mario on 11-4-98, and the shipment was sent directly from ARB and arrived at my work place on 11-11-98. They drop shipped direct to me via Fed-Ex, and only charged me $68. I was impressed with the quick service after hearing about long lead times from others. Unfortunately several items were missing from the shipment. They were out of stock on the Pin and Plate sets, the Rear bushings, and the flat U-bolts. The rear shackle kit was missing a bolt. They failed to send me the A/B set of front springs, but sent me two A's instead. When I called Mario, he suggested I call ARB directly. The ARB technician assured me that the US petrol engine trucks were fine with the matched springs, but if I was unhappy with the ride, I could return one after the installation. He also told me I would not need the flat U-bolt. He told me about a small plate I needed to weld to the rear shackle to prevent inversion on full droop. He also told me that I needed a different bushing set for the rear shocks to match up with my pre-84 truck. He could not give me an estimate on the back-ordered parts, but told me that they were compatible with stock-dimensioned parts. They quickly forwarded me the missing shackle bolt, a set of FK09 anti-inversion plates, and a set of OME-B11 bushing conversions for my rear shocks, at no charge. I had Mario cancel the back-ordered parts, and had him send me a set of Energy Suspension poly bushings for the rear springs ($19). I ordered the greasable pins from NWOR ($59 per pair). The total cost with shipping was around $1390.
Installation:
The OME setup is designed to work with stock shock and spring mounts. This made installation pretty straight forward. I needed 24" tall jack stands to allow me to lift the frame of the truck high enough to move the axle around on a floor jack under the springs. I did not remove the brake lines so I had to be careful not to lower the axle too far and break the lines. (I had recently installed extended stainless lines, and didn't want to have to bleed them all again).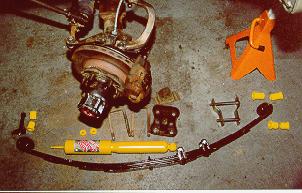 I started the
installation with the front. I collected all the pieces and made
sure that everything I needed was on-hand. I removed the swaybar,
disconnected the torque rod and the draglink. I then pulled off my
old springs and shackles. The springs I had were the originals
while the shackles were 3" extended Confer parts. I started with 2
1/4 inches of clearance between the frame stop and the rubber bump
stop on the passenger side and 2 3/4" on the driver's side while
the truck was empty. After the OME install, I have 4 1/2" on each
side. I am surprised that my original springs had drooped so much,
or maybe the OME's will settle a bit over time.
I started the
installation with the front. I collected all the pieces and made
sure that everything I needed was on-hand. I removed the swaybar,
disconnected the torque rod and the draglink. I then pulled off my
old springs and shackles. The springs I had were the originals
while the shackles were 3" extended Confer parts. I started with 2
1/4 inches of clearance between the frame stop and the rubber bump
stop on the passenger side and 2 3/4" on the driver's side while
the truck was empty. After the OME install, I have 4 1/2" on each
side. I am surprised that my original springs had drooped so much,
or maybe the OME's will settle a bit over time.I found after installation that the Flat U-Bolt is required for the rear U-bolt on the driver's side of the front axle. I ordered the U-bolt after it came in stock, the OME U52 cost me $18, plus $5 for shipping. The U-bolt they sent me was about 2 inches too long. I resolved that before installation with a hacksaw, and now I have a little more clearance for the drag link.
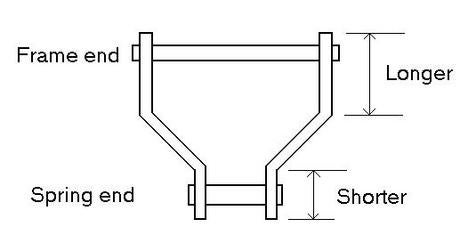
 One thing I wish
somebody had pointed out to me is that the front shackles are not
the same on the top and bottom. There is a bend in the shackle
which is off-center. The long end goes toward the frame, and
provides clearance for a lot of swing in the shackle. I discovered
this detail when I was installing the inside half of the second
shackle. Of course, the other side was wrong, and had to come
apart.
My biggest
problem came in trying to remove one of the upper bolts holding in
my old shackles. It must have been bent on one end, as my slide
hammer could not budge it past the point where the threaded end
pulled into the side plate of the shackle. Luckily the Confers were
installed with studs having a nut on each end. I was able to grab
one end of the stud with a vice grips, and turn the nut off the
opposite side and pound the bolt out the opposite way. The OME
shackles are made of two separate plates. The outside plate is
threaded and the pins screw into that side. Then the plate and two
pins is mounted to the frame and spring, and the inside plate is
installed. A large nut and washer fasten the inside, while a small
lock nut secures the outside. Zerk fittings screw into the holes on
the outside of the pins and allow grease to be pumped
in.
One thing I wish
somebody had pointed out to me is that the front shackles are not
the same on the top and bottom. There is a bend in the shackle
which is off-center. The long end goes toward the frame, and
provides clearance for a lot of swing in the shackle. I discovered
this detail when I was installing the inside half of the second
shackle. Of course, the other side was wrong, and had to come
apart.
My biggest
problem came in trying to remove one of the upper bolts holding in
my old shackles. It must have been bent on one end, as my slide
hammer could not budge it past the point where the threaded end
pulled into the side plate of the shackle. Luckily the Confers were
installed with studs having a nut on each end. I was able to grab
one end of the stud with a vice grips, and turn the nut off the
opposite side and pound the bolt out the opposite way. The OME
shackles are made of two separate plates. The outside plate is
threaded and the pins screw into that side. Then the plate and two
pins is mounted to the frame and spring, and the inside plate is
installed. A large nut and washer fasten the inside, while a small
lock nut secures the outside. Zerk fittings screw into the holes on
the outside of the pins and allow grease to be pumped
in.  An
interesting bend in the springs appeared after I torqued the
U-bolts. Squeezing the leaves together to around 85 ft lbs is an
aerobic workout for me, and flattens the center of the springs.
This causes a slight double curve in the spring. The stock drag
link is supposed to work, it looks like it will interfere with the
U-bolts at some degrees of compression or droop. I will need to
check this when I can get it out to some rocks to lift it on. The
stock torque rod lined up just fine, which was good, because my
Downey adjustable rod is frozen in the Heim joint junction. I left
the swaybar off, and my first road test felt fine. (I haven't taken
it over Hiway 17 yet.)
An
interesting bend in the springs appeared after I torqued the
U-bolts. Squeezing the leaves together to around 85 ft lbs is an
aerobic workout for me, and flattens the center of the springs.
This causes a slight double curve in the spring. The stock drag
link is supposed to work, it looks like it will interfere with the
U-bolts at some degrees of compression or droop. I will need to
check this when I can get it out to some rocks to lift it on. The
stock torque rod lined up just fine, which was good, because my
Downey adjustable rod is frozen in the Heim joint junction. I left
the swaybar off, and my first road test felt fine. (I haven't taken
it over Hiway 17 yet.)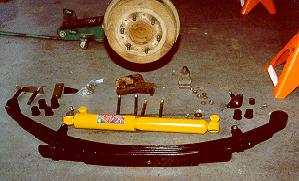 I then started on
the rear. I again collected all the pieces and checked the
inventory. The rear springs were also the originals and the
shackles were more 3" extended Confers. Here I started with 3 1/2"
of clearance between the frame stop and the rubber bump stop on the
passenger side and 4" on the driver's side while the truck was
empty. After the OME install, I have 6 1/4" on each side. Again I
am surprised that the truck is so much higher, but if the springs
are soft, they may compress with a little load in the
bed
.
I then started on
the rear. I again collected all the pieces and checked the
inventory. The rear springs were also the originals and the
shackles were more 3" extended Confers. Here I started with 3 1/2"
of clearance between the frame stop and the rubber bump stop on the
passenger side and 4" on the driver's side while the truck was
empty. After the OME install, I have 6 1/4" on each side. Again I
am surprised that the truck is so much higher, but if the springs
are soft, they may compress with a little load in the
bed
.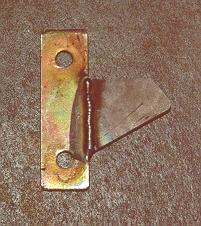 The ARB technician
provided me with some small stops (FK09) that had to be welded to
the inner shackle plates to prevent inversion of the shackles when
the spring starts to straighten out after full droop. They sent me
a couple of diagrams that tried to explain it, but nothing they
sent me was specific to my installation. One note claimed I only
needed to worry if my spring mounting holes were more than 1155 mm
apart. I calculate that to 45.47" and measured my frame and found
45 1/2". I explained that to ARB, and they told me to put these
things on anyway. The notes did not give any dimensions for
mounting the pieces together. I was told to mount the spring, then
eyeball the clearance at full droop, then weld the stops on to
prevent the shackle from swinging up towards the front of the truck
and pinching the end of the spring. After I had both rear springs
and shocks installed, I flexed them up and down a few times, and
all looked fine. The OME shocks limit the down travel of the
springs, both front and rear. Tightening the U-bolts really affects
the angles of the springs and shackles. So before I set my stops, I
had to virtually complete the installation. The shackles really
swing with these springs, from almost in line with the springs at
full droop, they swing way back when under compression. I marked
the mounting points on each side separately, then removed the parts
and compared them. I expected them to be about the same, as each
side is setup the same in the rear. However, I found one side
measured 1.5" from the end of the shackle to the flat of the stop,
while the other measured 1.8". I decided they should be the same,
and split the difference and welded them both at 1.7". I painted
them, then installed them and torqued everything
down.
The ARB technician
provided me with some small stops (FK09) that had to be welded to
the inner shackle plates to prevent inversion of the shackles when
the spring starts to straighten out after full droop. They sent me
a couple of diagrams that tried to explain it, but nothing they
sent me was specific to my installation. One note claimed I only
needed to worry if my spring mounting holes were more than 1155 mm
apart. I calculate that to 45.47" and measured my frame and found
45 1/2". I explained that to ARB, and they told me to put these
things on anyway. The notes did not give any dimensions for
mounting the pieces together. I was told to mount the spring, then
eyeball the clearance at full droop, then weld the stops on to
prevent the shackle from swinging up towards the front of the truck
and pinching the end of the spring. After I had both rear springs
and shocks installed, I flexed them up and down a few times, and
all looked fine. The OME shocks limit the down travel of the
springs, both front and rear. Tightening the U-bolts really affects
the angles of the springs and shackles. So before I set my stops, I
had to virtually complete the installation. The shackles really
swing with these springs, from almost in line with the springs at
full droop, they swing way back when under compression. I marked
the mounting points on each side separately, then removed the parts
and compared them. I expected them to be about the same, as each
side is setup the same in the rear. However, I found one side
measured 1.5" from the end of the shackle to the flat of the stop,
while the other measured 1.8". I decided they should be the same,
and split the difference and welded them both at 1.7". I painted
them, then installed them and torqued everything
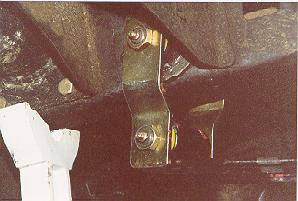
down.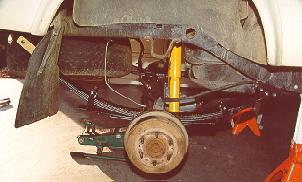 You can see the
forward swing of the shackle in this picture of the completed rear
side. This picture was taken before the U-bolts were torqued down.
The angle of the shackle brought it much closer to the frame then.
After the U-bolts were tightened, the spring did not flex from as
far forward, and the angle of the shackle is much less acute at
full droop.
You can see the
forward swing of the shackle in this picture of the completed rear
side. This picture was taken before the U-bolts were torqued down.
The angle of the shackle brought it much closer to the frame then.
After the U-bolts were tightened, the spring did not flex from as
far forward, and the angle of the shackle is much less acute at
full droop.Testing:
I finished the rear setup in the morning on the Sunday after Christmas. My first test was to drive the truck from Santa Cruz (my home) to Fresno, about 150 miles that day. I love the improvement in the road manners of the truck. Driving over cracked concrete is no longer a bone jarring experience. I can tell the springs are much moreflexible than my original ones, and I think the long shackles I had only amplified the harshness. It handles fine without the front swaybar. The passenger side sits about 1/4 inch higher than the driver's side when empty, and about 3/4 inch higher when I am in the cab. While this is an annoyance, I am not going to go to the bother of returning the spring which I feel they sent me in error.
 The initial tests I did were in the driveway
at Roger Brown's house. He has a set of small ramps that we used to
twist up the axles, and check for interference. We found that the
steering arm hits the bump stop pad, which is welded to the bottom
of the frame. There was about 1/8 inch of material sticking out
from the end of the stop. I ground that off and smoothed the edge,
as well as beveling to clear the arm. I then painted the fresh
grind, and put everything back together. On my first off-road trip,
some of this paint was scratched off, so I think there is still
interference. I think that now that the surface of the side of stop
is smooth, the arm should just slide along it without causing
damage. I will have to keep an eye on this spot for signs of wear
and tear.
The initial tests I did were in the driveway
at Roger Brown's house. He has a set of small ramps that we used to
twist up the axles, and check for interference. We found that the
steering arm hits the bump stop pad, which is welded to the bottom
of the frame. There was about 1/8 inch of material sticking out
from the end of the stop. I ground that off and smoothed the edge,
as well as beveling to clear the arm. I then painted the fresh
grind, and put everything back together. On my first off-road trip,
some of this paint was scratched off, so I think there is still
interference. I think that now that the surface of the side of stop
is smooth, the arm should just slide along it without causing
damage. I will have to keep an eye on this spot for signs of wear
and tear. Here is a picture
of the rear axle, while it is twisted up on Roger's ramps. While
there is pretty good articulation, the lower tire still lifts off
the ground quite easily. This may be due to the lack of load in the
truck, and may improve when I am fully loaded for my typical
overnight off-road trips. We measured the tire to fender clearance
on the rear when it was twisted up and found the low side, at full
droop (and the tire off the ground) to be 16 inches, while the high
side (with the spring still 2 1/4 inches from the stop) measured 8
1/2 inches. There is only 7 1/2 inches of travel in the rear. This
behavior was repeated in my testing at Hollister Hills a few weeks
later. I found the rear tires come off the ground quite
easily.
Here is a picture
of the rear axle, while it is twisted up on Roger's ramps. While
there is pretty good articulation, the lower tire still lifts off
the ground quite easily. This may be due to the lack of load in the
truck, and may improve when I am fully loaded for my typical
overnight off-road trips. We measured the tire to fender clearance
on the rear when it was twisted up and found the low side, at full
droop (and the tire off the ground) to be 16 inches, while the high
side (with the spring still 2 1/4 inches from the stop) measured 8
1/2 inches. There is only 7 1/2 inches of travel in the rear. This
behavior was repeated in my testing at Hollister Hills a few weeks
later. I found the rear tires come off the ground quite
easily. When I finally got a
chance to take the truck off-road, I took it to Hollister Hills
SVRA.Once there, I put the truck up on a rock on the obstacle
course and verified that the articulation in the front is
considerably better than the rear. At Roger's we had measured
the tire to fender difference when fully twisted and found that the
on the high side, the tire stuffed well into the fender, and had
about 4 inches clearance (while the steering arm was hitting the
bump stop, and the rubber was still 1/2 inch from the stop.) On the
low side, there was 16 inches between the tire and the fender,
giving about 12 inches of travel. The tire was still on the ground,
and may go even further.
Here are a couple more pictures I took of my
truck withthe left front and right rear tires in a small ditch. The
frontaxle twists up real well, while the rear axle does not flex
quite as much.
When I finally got a
chance to take the truck off-road, I took it to Hollister Hills
SVRA.Once there, I put the truck up on a rock on the obstacle
course and verified that the articulation in the front is
considerably better than the rear. At Roger's we had measured
the tire to fender difference when fully twisted and found that the
on the high side, the tire stuffed well into the fender, and had
about 4 inches clearance (while the steering arm was hitting the
bump stop, and the rubber was still 1/2 inch from the stop.) On the
low side, there was 16 inches between the tire and the fender,
giving about 12 inches of travel. The tire was still on the ground,
and may go even further.
Here are a couple more pictures I took of my
truck withthe left front and right rear tires in a small ditch. The
frontaxle twists up real well, while the rear axle does not flex
quite as much.

Conclusions:
I am very happy with the quality of the OME components, and quite pleased with the overall performance of the OME system. While it is not the most capable articulation setup available, it travels very nicely with good high speed cornering stability on the road. The nice feel of the setup on bumpy roads leads me to believe that it will drive well on the washboard desert roads where I love to go in the spring. The lack of articulation in the rear could probably be solved by using the longer, flatter springs available from Mazda junk yards or the custom Alcan setups popular with the rock crawlers. Since those require moving the spring hangers and shock mounts, they are beyond my capabilities until I become a welder. Short of that, I am sure this setup will increase my enjoyment of the rough trails I do drive, and will increase my confidence to try more challenging trails. The setuplooks like it will support my plan to add 33 inch tires, with possibly a little rubbing in the front at full compression. The OME system is well designed, especially in the front. The springs mount the axle in the correct position to allow the stock steering arm and torque rod to be used. This provides a neutral on-road steering geometry, and does not require an aftermarket drag link or torque rod to be added. The shocks limit the down travel, and seem to be set at about the maximum droop attainable without overstressing the steering arm (a known weak point in the Toyota.) I think the two inch longer brake lines I added are required to prevent stressing the stock rubber lines. It looks to me like any more travel in the front would require the switch to cross-over steering. The steering arm and draglink are already just interfering with the bump stop and U-bolts with the travel that the OME setup gives. Any more travel would require moving the steering arm out of the way with the crossover swap. For a simple installation on all the original mounting points, I believe the OME suspension provdes a great improvement in the truck's suspension.|
Off-Road.com Newsletter Join our Weekly Newsletter to get the latest off-road news, reviews, events, and alerts! |
Follow @Off-Road
 Your Privacy Choices