The quest for soft and flexy springs is sometimes
difficult. Everyone is claiming to have a soft ride spring these
days. How do you know it's that soft compared to other brands.
True, you could compare the spring rate on each manufacture but
everyone tests their own spring and there's different ways to test
the spring rate. Our project Blazer already had a so-called
"Softride" spring but trust me; it wasn't that soft… After
doing some research, we found a well respected manufacturer called
BDS (formally Big Dicks Suspension). A few recommendations from a
few local shops here led us to call them directly to get more info.
Usually when you call a huge manufacture of lifts, you get treated
like they could care less if you buy their product or not. With BDS
it was totally different. We talked to both Rene' and Glenn who was
more than happy to spend some time talking about their brand and
comparing to others. As a matter of fact, we called a couple times
with technical questions and we were always able to talk to
somebody knowledgeable who didn't mind spending some time giving
some advice. BDS has set out to accomplish one goal, that is
producing high quality products at affordable prices that you will
be happy with and recommend to your friends. BDS has a high level
of confidence in their products which is reflected in the warranty
(see below). BDS continues to increase and develop their product
line so if you don't see your application, give them a call. After
talking to BDS several times, we ended up ordering a set of BDS
Glide-Ride springs.
|
|
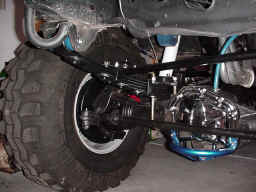
BDS Front Springs installed. Notice the multiple leafs and the
round teflon pads.
Click picture for
larger image
|
The best thing that stands out is their warranty:
-NO FINE PRINT WARRANTY-
IF YOU ARE THE ORIGINAL PURCHASER OF ANY BDS PRODUCT
AND IT BREAKS -
BDS WILL GIVE YOU A NEW PART. PERIOD.
Compare this warranty to the ones used by the other
major suspension companies. No questions are asked if something
does break. This is the best part about BDS. For those of you who
abuse your vehicle and are constantly breaking something, you might
want to check these out.
|
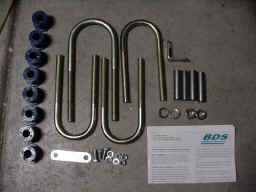
|
BDS carries all the necessary parts needed to install the
lift.
Click picture for
larger image
|
All BDS are well made and come shot peened with tapered ends, and
teflon pads installed to provide a soft ride and good articulation.
The Teflon pads actually make the springs move freely between each
other. BDS springs also have larger holes for bushings. This helps
a little with articulation and allows more flex on the trail. The
installation kits come with polyurethane bushings and the necessary
hardware.
|
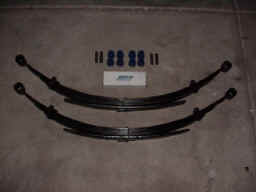
|
BDS rear springs.
Click picture for
larger image
|
Installation: Installing the springs was
easy. Fronts were done first. Since shocks will limit the axle and
will need to be replaced, they are removed. If the lift is 4" or
more, the brake lines should be replaced with longer ones or the
existing lines can be lowered with the brackets provided. We chose
to replace our lines with steel braided. The old lines are removed.
Now the truck must be supported on the frame so the leafs can be
taken off. The best way to do this was to jack the vehicle up and
set the frame on tall jack stands. Since our jack stands didn't
reach, we used large pieces of a railroad tie. Since we always
think safety when doing this, we placed extra stands next to the
main stands for added protection. The tires are stacked and placed
under the transmission for more safety. The rear tires are kept on
until the front is done. After the frame is on stands and the tires
are off, we used a floor jack to lower the axle. The u-bolts were
loosened a little. This helps show when the springs have drooped to
the fullest when a gap is seen between the spring and axle. Blocks
are then added to support the axle and the same should be done on
the other side. The u-bolts are then removed. Now the spring can
finally come off. Now is a good time to grease the shackle. This
will also have to be removed so that it can be lubed. Plenty of
grease was used at the bushings. We also purchased a set of
greaseable bolts so that the spring and shackle bushings can be
lubed over time. After the bushings and sleeves are placed in the
springs and greased, the springs are then installed. We found that
the axle had to be lowered more to compensate for the lifted
springs. After the springs are installed, the axle is raised so
that the springs centering pin aligns with the hole in the axle.
Our axle was off a little so a come-along was used to help. New
u-bolts are then installed that came with the BDS install kit. The
same thing is done on the other side. Longer brake lines and shocks
are installed. The axle is then raised and the front tires are
installed.
|
|
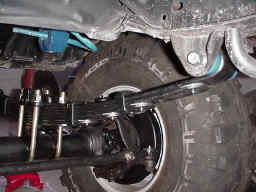
|
The front springs are
installed.
Click picture for larger image
|
The rear was done the same way. We did have a
problem with the rear shackles. The bolts were rusted to the
sleeves. This took many hours of heating and hammering the bolts
out. Penetrating oil did not seem to help either. We eventually got
them out and replaced the shackle bushings with new poly bushings
and greasable bolts. Others usually overlook the shackle and never
touch it. If the shackle is not free to move, it will hinder the
spring performance. A new bushing was installed in the shackle
along with plenty of grease. BDS bushings were then installed in
the rear springs. The rear spring is installed so that the axle
pinion is raised up. This will help with the drive shaft angle. Be
sure your t-case is close to the same angle as the axle pinion. If
the angles are off, vibration may result. BDS includes t-case
lowering bushings to do this. After the rear springs are installed,
the axle is bolted up with the u-bolts. A longer brake line was
installed in the rear along with longer shocks. The wheels were
then installed.
|
|
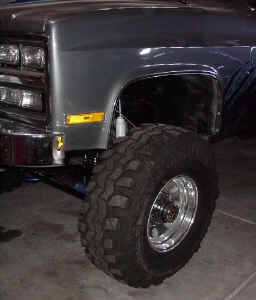
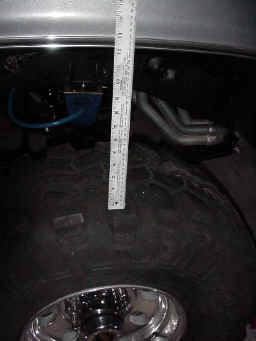
The BDS front and rear springs were taller than the previous
springs. Their 5.5" was more like 6.5". This was good since all
springs will settle a bit over time.
Click picture for
larger image
|
A final check for torque on all bolts was done in
accordance with the torque specs in the service manual. The last
step was to bleed the brakes. We finally got to test drive the
Blazer. The springs are much softer than the previous brand we were
running and the ride was much better. It's great to know these
springs have a great warranty behind them but I doubt we'll ever
use it. We will soon be taking it to a ramp for RTI testing. Keep
checking back to see the RTI results.


 Your Privacy Choices