Installing CJ Spring packs up front
For many years, off-road enthusiasts have found that if you replace your stock leaf springs with longer spring packs the ride becomes smoother and the articulation increases. While this sounds like an easy replacement, it becomes harder when you look at the mounting point relocation problem.
Rocky Road Outfitters has addressed this problem with two easy (bolt-on) methods. The first method uses the Missing Link (drop shackle) to move the front mounting point farther forward. This allows the use of a stock rear leaf pack to replace the front pack adding 3" in length. For those folks that wanted the smoother ride but don't need as much articulation, Rocky Road came through with a relocation bracket kit that moves the rear mounting point of the spring back 2.5". Since this moves the whole spring (including the axle locating pin) this kit also has an adapter that returns the locating pin to the stock position. Both of these methods are a great way to add stock rear springs to the front. But what if you want even more articulation? |
Many folks also add CJ front packs to the rear of the Samurai using the Missing Link method. We wanted to see if we could add The CJ packs to the front for even more twist! We contacted Glenn Wakefield at Rocky Road Outfitters to see if anyone had ever tried using both of his kits in one installation. Glenn told us that he hadn't heard of anyone using them both at once, but said the idea was sound. So we started gathering what we needed…
 All the components assembled for installation. |
 A CJ front pack sits behind the stock length Sammy front pack. Flattened out, there is about eight inches of difference. |
- A set of stock ('76) CJ front packs were acquired, cleaned and rebuilt with new bushings. When measured flat, these springs were 44.5" from eye to eye (center). This is approximately 8" longer than the stock Sammy fronts.
- Bolton Rear Spring Swap Kit which included the relocation brackets and hardware to get the job done.
- 1" Missing Link Shackle System. Here you can see the two sizes that are available. The size difference allows you to fit a variety of applications. Glenn can also work with you if you have special requirements.
- A pair of lower control arm bumpers. Generic Ford/GM units can be found at your local auto parts store.
 Missing Links are available in more than one size. |
Putting the vehicle up on jack stands was the first move. Safety is something you can't cheat when you are working on suspension, so make sure the vehicle is properly supported before removing any components!
 The frame safely supported on jack stands. |
 The axle gets its own set of jack stands as the spring packs are removed. |
The project vehicle had a spring reversal conversion done previously, so it was removed before any work was done. The disassembly was pretty straight forward, we just disconnected the springs from everything that they are bolted to. This means both ends and the u-bolts that hold the springs to the axle. Don't forget to support the axle before removing the springs… I know this is common sense, but I wouldn't mention it if I hadn't seen it happen (to someone else) with my own eyes!
 Enlarging the existing spring bolt hole. |
 The completed installation looks very clean. |
The first kit we put on was the Bolton Rear Spring Swap Kit. It is basically a longer plate that bolts to each side of the original spring hanger with a new position for the spring bolt. Here is where we made the only modification required for the kit. The existing stock spring mounting hole had to be drilled out to accommodate the larger 1/2" bolt, and a new hole had to be drilled through the stock mount for an additional bolt that strengthens the overall integrity of the mount. The new mounting location moves the axle back in the direction of the firewall, so there is an adapter that comes with this kit that sandwiches between the axle and the spring perch to relocate the pin forward, putting the axle back where it belongs. Since we are using CJ springs (much longer) we won't need it.
 Locating pin adapter |
 The Missing Links were an easy bolt in. |
Working our way forward we attached the axle to the spring packs. The longer CJ springs actually moved the axle forward about 2 inches from the stock location. In this case the stock steering components would bind because of such a large offset, but we were running a knuckle-over steering system so it was fine. A little fender trimming up front made things less critical, check out the photos for before and after shots.
 (Before) There is only about 1/4" of clearance between the tire and the leading edge of the fender. |
 (After) Carefully trimming away some sheet metal added more than an inch of clearance without looking ‘hacked’. |
Next came the Missing Link Shackle System. As stated earlier, we opted for the longer unit shown here. We may go longer still if it becomes a problem. The Missing Links were an easy bolt in. The only part that could be a challenge are the bump stops that are recommended to keep the folding (upper) portion from hitting the bumper. The mounting point will be different with every different type of bumper out there, so take a look at ours and make adjustments accordingly. Without the bump stops you would hear steel on steel as the shackles contact the bumper. Not a good thing.
 Closed, the Missing Link rests on the rubber bump stop. |
 As the spring droops, the shackle opens allowing much more travel. |
Rocky Road offers a nice set of bump stops that fit the bill, or you can do as we did and trim a set of lower control arm bumpers (about $4 each) from the local auto parts store. We drilled and tapped some square steel stock we had in the ‘spares’ bin and attached it to the bottom of the bumper. If the rubber bump stop gets ripped off in the rocks it is just a quick trip to the parts store to replace them. We will keep one or two in the parts box (just in case).
 Before... |
 After... |
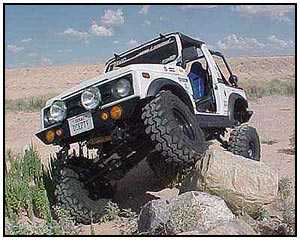
The overall look of the vehicle now has a more aggressive stance. The front bumper will eventually be moved out about four inches when a winch is installed. This will move the bumper out over the shackles again. Although the conversion took away some of the approach angle, you can see that moving the axle forward another two inches left the finished approach angle still very respectable. The CJ leaf packs have also added almost an inch of lift, but that is because they have some arch to them as opposed to the well-worn stock Suzuki flat springs. Time to check for Flex!
 Keeping the rubber where it belongs - on the ground! |
 The tire gets a chance to really ‘reach out’. |
As you can see by the pictures, the new suspension has plenty of articulation. This vehicle also has a panhard bar installed up front. When going to a suspension that is capable of this kind of flex, it is almost a ‘need to have’ option. This keeps the front end in check forcing the axle to stay put under the frame instead of sliding off to the side. One last suggestion… Longer brake lines. Ours are from a Honda Accord. At 26 inches, it more than doubles the stock length and gave us plenty of play - to play!
|
Off-Road.com Newsletter Join our Weekly Newsletter to get the latest off-road news, reviews, events, and alerts! |
Follow @Off-Road
 Your Privacy Choices