ARB Winch Bumper, Mile Marker 9,000lb 2 speed winch, Sway-Away Torsion Bars on a 1988 Pathfinder
The quality and workmanship of the ARB bumper is
unquestionable. I love it, am glad I shelled out the bucks and wait
time to have it special ordered, and would not consider putting any
other aftermarket winch-bumper on my Nissan.
January 7th - Straight Ride: Took it in and
had it aligned.
January 11th - The hydraulic story: They
were very courteous on the phone, but my not being a mechanic
coupled with their lack of any data on other Nissan setups took
some figuring. I needed to pull the bolts again, get a measurement,
reinstall, re-bleed and call MM back or photograph the
bolts/fittings, scan, and e-mail them to MM.
January ?19th or 22nd? - Sigh: The original
tech called me back and asked if I ever got the sizes or photos of
the bolts to send to him. Apparently tech two dropped the
ball.
Ordering woes: I ordered the winch and bumper from a major four wheel parts outfit. A month after I placed the order they called me to tell me the bumper wouldn’t take that winch. I had talked to Mile Marker before I placed my order and knew modifications would be needed, but also knew it would fit. I explained such and the order went on, (a month delayed, with the charges on my credit card for the entirety of that month). Despite the delay, they managed to get the bumper to me in record time.
Background: The Mile Marker winch runs off the power steering pump with a hydraulic valve system (electrically switched) to activate the winch. The valve system (on this setup, Mile Marker also makes a winch with the valves integrated into the winch body) is separate from the main winch body and is installed in the engine compartment. Two hoses run from the winch to the valve system, and two other hoses take off from the valve, one to the power steering pump output, and one to the steering gearbox input.
My winch choice was made because I intend to use it for events other than vehicle recovery (though I suspect I’ll use it for vehicle recovery all too often). I’ve been involved in several sinkhole cleanups, I spend a few days a year skidding fire wood, and I like to dig for undiscovered caves (which entails moving big rocks around in sinkholes). All of these activities require fairly continuous winch usage for several hours. I felt that a hydraulic winch would be more reliable, quieter, could handle near continuous use, and would give me less electrical complications. Most of this work was done evenings, so each day doesn’t represent a full days work. I didn’t log how much time I spent on this install, I suspect I could do it all in half the time (or less) now that I’ve done it once.
January 4th, 1999 - Setup & Planning: Connecting the hoses to the winch and the winch to the bumper was a snap. The roller fairlead came with two sets of predrilled holes, so modification of that unit (as called for in the ARB install instructions) was un-needed. There seems to be the possibility of the last wrap of cable rubbing on the inside of the bumper. Worst case scenario will call for cutting 5-10 feet of cable off. I read the install instructions (Ack!) for both the winch and bumper and thought about how this was going to work.
January 5th - Bolt It On: Bolting on the bumper/winch setup. It took two people, some 2x4 boards and a case of oil (to rest the bumper on) to get the bumper installed with the winch on. I took the grill off to make the install simpler. It was pretty easy, I don’t think I even skinned a knuckle. The winch speed control levers are largely inaccessible in the bumper so a 3.5 to 4 inch hole will need to be drilled in the top of the bumper to allow switching gears. One of the speed control levers impacts the AC radiator and will need to be shortened. Took it for a ride, holy body roll!!! January 6th - Torsion Bars: I installed the stiffer torsion bars. (That was a little harder than the bumper install, I skinned two knuckles, and got another to bleed profusely.) The drivers side torsion bar had rusted into the control arm and it took some percussive maintenance (hit it with a hammer) to get it loose. I didn’t go with the two stage, just installed Sway-Away stiffer bars. The Pathfinder now handles better than it ever did without the winch. The stiffer front bars, coupled with Rancho 1.5" lift rear coils, and fairly soft Bilstein shocks is really a great combination.
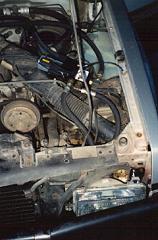
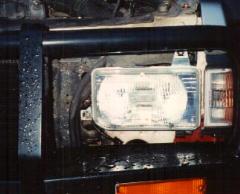
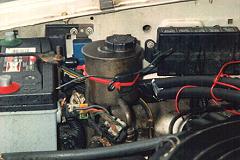
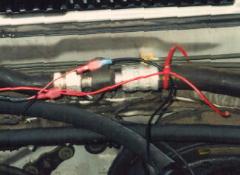
The hydraulic hoses route easily through the hole behind the drivers side headlight. Some padding of corners was needed to keep rough edges away from the hoses. I used 1000 denier cordura and ¼" neoprene for padding. Mounting the valve box under the hood proved to be annoying. With all the hoses connected it wants to sit over the air intake. No real opportunity to use the provided mounting bracket was present and the valve unit seemed pretty happy just hanging in space. I padded it with neoprene and left it where it wanted to be, eventually I’ll get a better setup fabricated. It’s been riding like that for 6,000 miles with no problems or wear on the components it’s sitting on.
 |
 |
|
| The valve box, happily floating in space. | Hydraulic hoses running behind headlight. Note rub points on adjusting screws. |
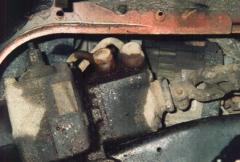
January 10th - Portents of Doom: Two days later I set about the final steps, hydraulic and electric connections. Getting the bolts off the power steering pump and steering gear box were easier than they looked initially. One bolt is easiest accessed through the drivers wheel well. Then trouble struck. The bundled hydraulic fittings were a total failure. Neither was even close. It seems that in 1988 Nissan had two power steering gear and pump setups. Mile Marker was unaware of such and bundled parts for a setup unrelated to mine.
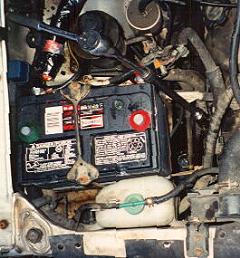
So I put my original setup back together and bled the system. (easy, just follow the bundled instructions) I also connected all the electrical hookups to the valve system. The circuit breaker included had cheesy plastic mounting points, due to the length of valve wires it had to be positioned on the firewall, with a long length of hot line running from the battery to it. The circuit breaker also had two metal, uncoated, no protective sleeve, terminals sticking out of it, I wasn’t thrilled to have a hot terminal unprotected so far from the battery and put it my list to coat with tool handle dip to prevent any unwanted short circuits.
 |
 |
|
| This is a view through the drivers wheel well. The left bolt is the hydraulic input to the gear box. | This rather disorienting picture shows the removal of the steering pump hydraulic output. |
January 12th - Fire!: The next day, !poof!, in a parking lot, at work, (I’m still taking a beating from my co-workers) the cheesy plastic mounting cracked, the positive terminal grounded against something, the wire insulation caught fire, and I barely averted a full scale engine fire. Bad things. Totally fried the resetable circuit breaker, apparently it’s not so resetable in case of a significant short.
January 14th - Measuring: Pulled the bolts and got the measurement for the hydraulic fittings. Called MM talked to a different tech, who assured me the parts would UPS out the next morning. January 15th - Recovery: I went to a local auto store, got a decent in line fuse, fire extinguisher, and a spool of wire so I could put it together like it should have been in the first place. Solder, Solder, Solder....
 |
 |
|
|
New fuse holder, not soldered in yet. |
Cheesy wire crimps. Note one of the ends already pulled off. When you get them correct for line in and out pull the crimps and solder. |
February 8th: Got the parts, they look good, postmarked Feb 5th, almost a full month from original call to delivery.
February 12th – It works!: Got the system together, works like a charm, had to unspool the cable and respool it under light (pulling with a hand) tension to make sure the cable didn’t rub on the inside of the ARB bumper. Power steering pump runs louder now like it’s under more load when being used normally.
February 19th – Final touches: Chopped gear lever that was impacting AC radiator to ½ length. Went to local hardware store, picked up a 4" hole saw that fits in a ½" drill chuck. Cut a hole in top of bumper so gear/speed levers can be reached. Re-installed grill. Winched Pathfinder up a hill.
April 1st - Winch's first major workout: Holy power, used it to rip rocks out of cave entrance in sinkhole. Learned a lot. Bumper flexes under heavy load, looks pretty scary, but seems to be harmless. (Time will tell.....)
Four Other Brutal Comments: The winch hand control was not at all ergonomic (far from weatherproof too), the exterior plug for the winch control looked so weather vulnerable (it wouldn’t survive one northern winter) I ran cable through the firewall and mounted it just in front of the stick shift. My last concern is rust. There seems to be a pretty extensive thin coat of it on the winch body and the winch has only been on for three weeks..... I think the factory paint job should be holding up better. I’m really hoping this thing performs very, very, well, because it sure seems like Mile Marker saved about $10 by cutting corners that will take quite a bit more that $10 for me to bring up to a acceptable level of quality.
Wrong fittings, useless mounting plates those things happen, but Mile Marker really, really, needs to improve the quality of the following components. Those shipped are either inexcusably cheap, inappropriate for the job, or just junk.
1. Circuit Breaker – Really bad, unsafe, throw it out.2. Weatherproof Exterior Plug/Plug Connection – Ridiculously cheap trailer wiring connection.
3. Paint Job – Eh, 20 cents worth of better paint would have helped the cosmetics a lot.
4. Hand Controller – I asked about this and Mile Marker said they were in the process of re-designing it. 5. Hydraulic hoses from valve to winch pass through a lot of tight spaces, stainless steel hoses would have been better suited and affected less severely by minor rubbing/chafing. This wasn't a big deal, but it would be a nice option.
Positive Comments: It works really well. Quiet. Smooth. Strong. I’m sure that by now I would have fried my power setup if I was running a electric. The two speed operation is great!!!! Undeniably a feature I wouldn’t want to live without.
Conclusion: I made the right winch choice, but was let down by quality cuts where Mile Marker saved very little $. If I were starting over I would have repainted it (or had it powdercoated) before installing it, bought stainless steel hydraulic lines to go from the winch to valve unit (now a royal pain to do since the winch is encased in the bumper), and would have thrown that cheesy circuit breaker out when I opened the box.
|
Off-Road.com Newsletter Join our Weekly Newsletter to get the latest off-road news, reviews, events, and alerts! |
Follow @Off-Road
 Your Privacy Choices