UPDATE December 2004
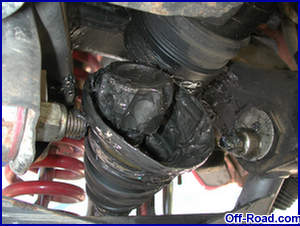 Does this look familiar? Breaking CV’s seems to be an unavoidable part ‘wheeling an IFS truck. We’ve already destroyed three Tundra inner CV’s in our long-travel Tacoma The last one actually let go while we were pulling into the Motel 6 parking lot in Lake Tahoe for the ‘04 TTORA Takeover. We had just finished installing
Superior 5.29 gears and an
ARB air-locker in the rear axle at
WFO Concepts earlier that morning, so we drove the truck up to Lake Tahoe in four-wheel-drive to break-in the new gears. A right-hand turn into the parking lot at about 5mph and… Bamm! Weekend over. That was a freshly rebuilt (right out of the box) Tundra inner CV. Bear with us as we work towards building a reliable IFS drivetrain. We have some new information to update this article with after examining each of these failures.
Does this look familiar? Breaking CV’s seems to be an unavoidable part ‘wheeling an IFS truck. We’ve already destroyed three Tundra inner CV’s in our long-travel Tacoma The last one actually let go while we were pulling into the Motel 6 parking lot in Lake Tahoe for the ‘04 TTORA Takeover. We had just finished installing
Superior 5.29 gears and an
ARB air-locker in the rear axle at
WFO Concepts earlier that morning, so we drove the truck up to Lake Tahoe in four-wheel-drive to break-in the new gears. A right-hand turn into the parking lot at about 5mph and… Bamm! Weekend over. That was a freshly rebuilt (right out of the box) Tundra inner CV. Bear with us as we work towards building a reliable IFS drivetrain. We have some new information to update this article with after examining each of these failures.
INTRODUCTION
Total Chaos Fabrication designed their long-travel front end to be 3.5” wider per side (the same track width as Tundra trucks), which allows Tacoma owners with automatic hubs to use stock (modified) Tundra CV shafts.
Manual locking hubs reduce wear by disengaging the front drivetrain (CV axles, front differential & front driveshaft) during 2wd operation. Unfortunately, manual hubs started getting hard to find on Toyota trucks around the mid-nineties, when Toyota began to phase out manual hubs in favor of ADD differentials and automatic (full-time) drive hubs. Manual hubs are an increasingly uncommon on Tacoma’s newer than 97/98, and Tundra trucks never even had the option.
Off Road Solutions manufactures manual hub conversion kits for Tacoma and Tundra enthusiasts that want to replace their automatic hubs. They have a range of conversion applications available to fit Tacomas, 4Runners and Tundra trucks, with or without ABS. We were lucky enough to find an early model truck equipped with manual hubs, so we didn’t need all of the conversion parts, but we are using their 4130 heat-treated intermediate shafts and outer CV’s with remanufactured OEM Tundra inner CV’s.
Installation
Because 2wd Prerunners and 4wd Tacoma trucks share the same suspension, we chose to write this second part of the Total Chaos (insert link to www.chaosfab.com) long-travel suspension installation as a separate article in order to keep the steps clear.| The front differential was removed along with the front driveshaft during the long-travel suspension installation. It is important to note that removing the front differential is NOT necessary, and is only shown here out of the truck for illustrative purposes. Also, because we are installing the CV shafts after the suspension, there are a few redundant steps. |

|
| Turn the locking hub dial counter-clockwise to the free position, remove the six bolts from the outer face of the locking hub and then remove the outer half of the locking hub. |

|
| After removing the outer half of the locking hub, remove the six nuts that secure the inner half of the locking hub to the spindle. Under each nut is a split tapered seat cone washer, and they can be difficult to remove with without damaging them. Penetrating liquid and a combination of tapping/prying with a flatblade screwdriver should persuade the lock-washers. Remove the bolt and washer from the end of the axleshaft (shown here in the middle of the picture) before removing the inner locking hub assembly. |

|
| The CV axle spindle rides on sealed needle bearings within the spindle hub and is held in place by a C-clip retainer. With the locking hub removed to expose the retainer, the C-clip can be easily removed. It will be reused with the new axle shafts. |

|
| If the CV axles are being installed at the same time as the front suspension, the axles must be installed before the upper A-arm is bolted to the spindle. If the axles are being installed after the fact, the only redundant steps are to remove the locking hubs and the upper A-arm spindle bolt. | 
|
| With the vehicle is supported by the frame on jack-stands and the front wheels removed, remove the upper A-arm spindle bolt and then pivot the spindle away from the frame on the lower ball-joint. Remove the outer end of the CV shaft from the backside of the spindle, being careful not to strain or kink the flexible brake line. The inner CV joint is held in place by a simple snap-retainer and is easily removed with a pry-bar (shown here with the differential removed for clarity). The snap rings are considered a single use item, and should be discarded after removal. | |
|
| 
|


| 
|
|
The new ORS CV axle shafts are shown here next to the stock Tacoma CV shafts. Note the difference in length, design, and construction. The Tacoma tripod-type inner CV’s are inferior to the 6-ball Tundra true Constant Velocity joints. The additional strength and range of operation should allow the Total Chaos Tacoma long-travel front suspension to run the full 13” of available wheel travel, retaining 4wd. | |
|
| 
|

| Pivot the spindle away from the frame on the lower balljoint, and remove the outer end of the CV shaft from the backside of the spindle at the same time, being careful not to strain or kink the brake lines. The inner CV joint is held in place by a simple snap-retainer and is easily removed with a pry-bar (shown with the outer CV axle shafts & differential removed for clarity). The snap rings are considered a single use item, and should be discarded after removal.? | |
|
| 
|

MODIFICATIONS
We were mistaken when we first wrote that stock Tundra CV shafts could be used with the Total Chaos long-travel suspension without any modifications or additional parts. In order to allow the Tundra inner CV to operate through the entire range of the suspension travel, the sheet-metal where the stock inner CV boot mounting surface needs to be trimmed back and the stock CV boot must be replaced with a high-angularity Porsche CV boot that is available from Kartek (part number: KTKBAT101).
|
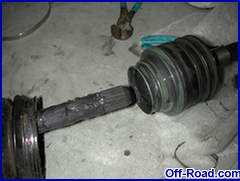
First, remove both of the clamps that hold the inner CV boot on. Slide the boot down the axle and wipe away excess grease to expose the inner retaining ring. Use C-clip pliers to remove the retaining ring and slide the inner CV off of the CV shaft. | |
| 
|
|
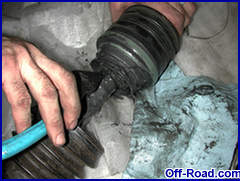
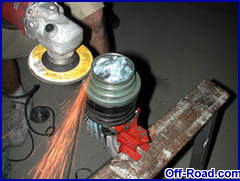
Clamp the inner CV into a vise and stuff a clean shop towel into it to keep grinding dust and debris out of the CV balls. Then remove the sheet-metal lip (where stock inner CV boot was fastened to the CV housing) using an abrasive cut-off wheel or hacksaw. Smooth any burs or jagged edges left behind with a file or emery cloth. | |
| 
|
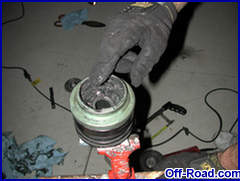
| Slide the new boot over the axle and then slip the inner CV onto the splines and reattach the retaining ring. Pull the Kartek boot over the inner CV and fasten with new clamps. | 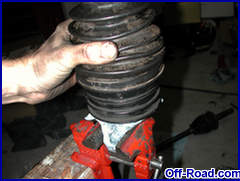
|
|
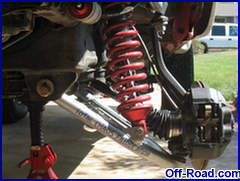
Installing the new Off Road Solutions Tundra CV shafts is as easy as removing the old parts, in the reverse order of the steps we just briefly covered. Consult an owner’s manual for further details and torque specifications. Here you can see the completed installation, from the front and rear view at full extension. | |
| 
|
Contact Information: |
303.278.6267
www.offroadsolutions.com
Kartek Off-Road
909.737.7223
www.kartek.com
offroad@kartek.com
Talk about our Tacoma Project in the
Tacoma BBS
Send us
Email about Project Tacoma
|
Off-Road.com Newsletter Join our Weekly Newsletter to get the latest off-road news, reviews, events, and alerts! |
Follow @Off-Road
 Your Privacy Choices