Project Chevy Tahoe: Project Tahoe PIAA Driving Lamps
Lights, Action
|
Last month we
installed a new RCD Light Hoop on the front of Project Tahoe and it
was looking pretty bare hanging out there without anything on it.
To fix that problem we ordered a set of PIAA 520 ION Crystal
Driving Lamps.
Why driving
lamps?Driving lamps are designed to be
mounted above the bumper and at a height of 14" to 30". That is
right where our mounts are on the new RCD light hoop. Driving lamps
supplement your high beams to increase the range and brightness.
They must be turned off as you dim your lights and are too bright
to leave on when facing oncoming traffic. You need to check your
local laws and regulations as to usage of driving lamps.
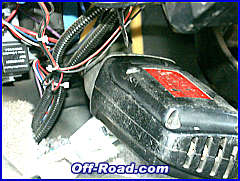
ION Crystal Technology The ION crystal technology transforms white light into amber light without reducing the strength of the beam. This greatly enhances your visibility when driving in bad weather. The amber beam reduces reflectivity and glare meaning less eye strain for the driver. 520 ION Crystal Since we are now located in a part of the country that experiences it's share of bad weather in the winter the PIAA 520 ION Crystal Driving lamp seemed to be a perfect fit for our new RCD Light Hoop. The 520 uses a 12 volt H3 85 watt bulb and comes in either black or chrome plated housing with a mesh style cover. The dimensions were a good fit given the 14" between mounting holes on the RCD hoop. Included in the kit are two lamps, wiring harness, relay, switch, and mesh style lens covers. Installation
First step was getting the lamps mounted on the hoop. We found that we had to adapt the mounting just slightly as the front of the lamp hit the bar without a spacer. We found a new bolt and a couple larger nuts to space the lamp up about 1" from the mounting hole. The gave the Lamp plenty of room for adjustment.
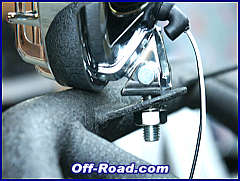
With the lamps mounted we turned to wiring. I have not mounted a set of lamps in quite some time but recalled the wiring headache that always goes with it. PIAA changes that with the complete wiring harness and kit included. First thing was to run the harness to the lamps. I had to separate the grill slightly so that I could get the harness run down behind the battery and out to the lamps on the font bumper.
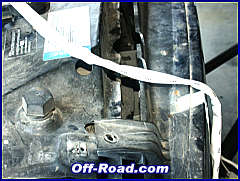
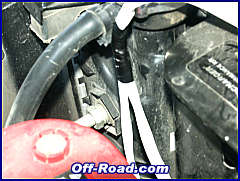
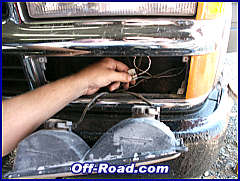
With one end of the harness connected to the lamps we located a ground bolt on the firewall of the Tahoe right beside the battery. We connected the ground wire from the harness and also the relay switch to this bolt. Next we connected the white wire to the positive terminal of our battery to power the relay. Now we just needed to run the harness through the firewall so it could canned to the switch. It would have been nice to have a little more wire to route the wires but we were able to make it reach. You may be able to find a hole in your firewall but we ended up drilling a new one in ours. Once through the firewall simply snap together the harness and switch. Only one more connection is needed to finish the wiring. You need to connect into your parking lamp wire. We removed our driver side parking lamp and spliced in there with the splice provided in the kit. That's it, we were done. The installation was MUCH simpler than rigging your own relay and harness. I am now a big believer in the PIAA installation kit. Aiming Your new PIAA Lamps Now that the new lamps were ready to go we needed to wait for night to aim the lamps. We marked out a spot 30' from the shop door. (The box shows to use 30' while the instructions on the PIAA site say 25'.) We then marked a spot on the door the same height as the lamps. Once it was dark we aimed the hot spot from the lamps at the height we had marked on the door. 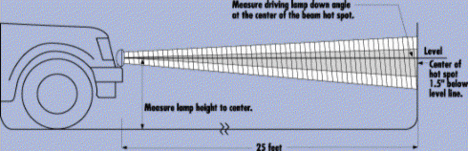 Testing
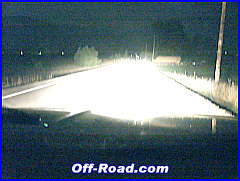
We did not
have any inclement weather to test with since our installation so
good weather would have to do. The ION Crystal lamps produce a
noticeable amber light that gives a much clearer picture of what is
ahead of you on the road. We like it and can not wait for some bad
weather. Well maybe we CAN wait for the bad weather, but in the
mean time we sure are enjoying the extra light and clearness
provide by the PIAA 520 ION Crystal driving lamps.
Testing
We did not
have any inclement weather to test with since our installation so
good weather would have to do. The ION Crystal lamps produce a
noticeable amber light that gives a much clearer picture of what is
ahead of you on the road. We like it and can not wait for some bad
weather. Well maybe we CAN wait for the bad weather, but in the
mean time we sure are enjoying the extra light and clearness
provide by the PIAA 520 ION Crystal driving lamps.
PIAA Corporation, USA
|
|||||||||||||||||||


|
Off-Road.com Newsletter Join our Weekly Newsletter to get the latest off-road news, reviews, events, and alerts! |
Follow @Off-Road
 Your Privacy Choices