After many knuckle-busting nights and several
articles, it's about time for a current update on the things we've
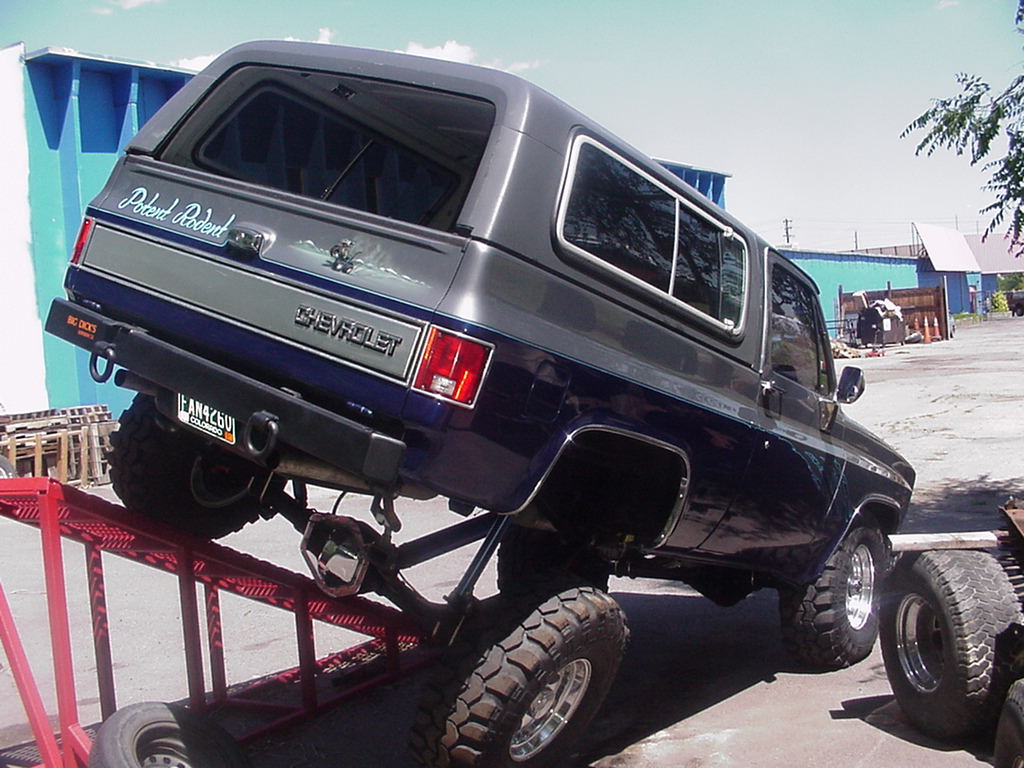
done and how everything is holding up on Project Potent Rodent. For
those of you who are in the dark, the Potent Rodent Project is a
full-size 87 K5 Blazer. Though it may not squeeze through every
super-narrow trail, it does fit a family of five with room to spare
for gear and coolers. This project has all-purpose intentions
behind it. Basically, we want something that can wheel hard and
also be capable of hauling a few heavy loads if needed. Future
plans include a boat behind this rig so it’s got to be able
to haul a load while sporting large tires.
See you on the trail! For more info email: sspickler@off-road.com
Return to Project Potent Rodent
Return to the Off-Road.com Projects Page
Return to the Off-Road.com Chevy/GMC 4X4 Page
Click picture for larger image
|
|
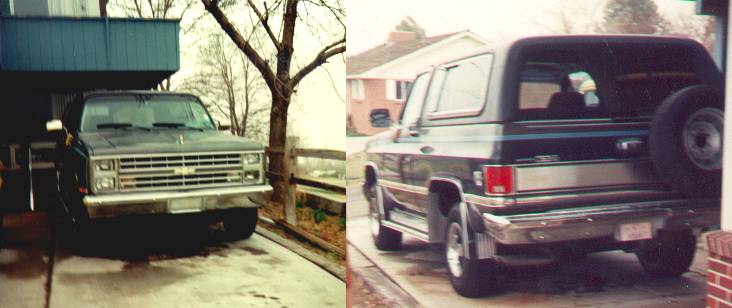
In the beginning... a very stock K5 Blazer. The running boards were the first to go! P235 tires, GM 10 bolt axles, 208 t-case, 465 4 speed, and a TBI 350 exist under the sheet metal. |
History
This Blazer had begun as a daily driver and has proven to be reliable transportation. It's been everything from a stump puller to a moving van (you would be surprised what you can fit in a Blazer). The only major problem encountered was the a toasted ring and pinion in the rear 10 bolt axle. This K5 has been through quite a bit. For example; smashing the front in the side of a mountain, crashing through two fences, smashing in a house going backwards (forgot the parking brake), small incident with a Fiero (those Fiero's body panels just peel right off) and a few other things a Blazer should never have to through. Since then, this Blazer has gone though many changes over the years.
Engine
The stock fuel injected 350 engine had decent power but it didn't take long for the power bug to bite the owner and a 383 was soon installed. Unfortunately, the stock fuel injection couldn’t supply enough fuel without doing a major injection update so a standard carburetor was used as a temporary solution. The 383 didn't last long though. Somebody was too stupid to weld the oil-pickup tube and the oil pressure gauge was never installed. Can you say idiot? After the 383 became a boat anchor, a used 454 rat was found and it was just screaming to be installed.

Click picture for larger image
|
|
This is engine number four. It's currently being modified with a stroker crank, aluminum heads, roller valvetrain and fuel injection. |
Despite having a flat camshaft, the 454's cam problem was fixed and hoisted in the Blazer. The torque and was unbelievable with the 454. These engines have so much power! What we didn’t know was the main bearings were also bad. After 3000 miles, we lost oil pressure going to an 4x event. Unfortunately, this is the risk you take with any used engine. Along came engine number four (this engine replacement stuff is getting old). Since we were so impressed with the 454's torque, we stayed with the big block and acquired a remanufactured GM engine. The GM reman engine seemed the way to go for durability.
The only thing we didn’t realize was the fact that this
remanufactured engine had small peanut-port heads and a low
compression ratio resulting in low horsepower and torque. Compared
with the old big block, this engine was weak! With Colorado's
power-robbing altitude, it just makes it worse. With the altitude,
large tires and heavy loads, we need an engine that’s
basically going to haul ass and never wimp out on us when heading
towards the mountains going up steep passes. We figured it was time
to bring it alive and add some real power to the rat. The old
saying "there’s no replacement for displacement" is used
here. The 454 will eventually be made into a 496 stroker with the
addition of aluminum heads, Comp roller valvetrain and multi-port
fuel injection. Can we say power? More to come.
See Comp Cams review and installation
Body & Paint
Click picture for larger image |
|
|
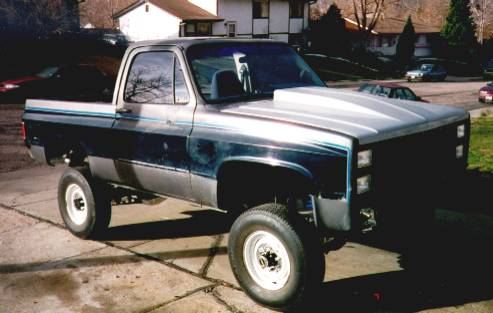
The body is rust free but the stock GM paint had seen better days. This was taken before the paint shop. |
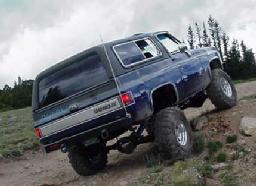
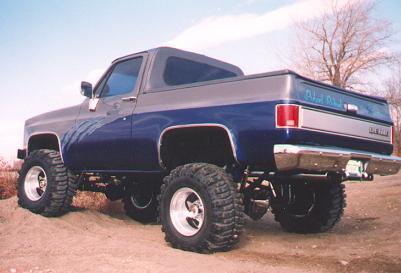
It looks nice but now the rocks and trees seem to attract the body like a magnet! We've already gotten a few dings and scratches from the trail. Oh-well! |
The body on the K5 had a little surface rust from a after market tire carrier that mounted on the tailgate but that was about it. The floor and rocker panels were rust free which is really important since major rust can cost you more than the vehicle is worth at the body shop. The old GM paint was faded and peeled in some areas. This is common for mid 80's GM paint to do this. A trip to the body shop and the paint was chemically stripped and new PPG paint was applied along with a few graphics. It's not something that belongs on a trail rig, but it sure gets attention going down the road. A clear coat helps protect the paint. We've taken it though a few tight trails and the branches never seem to scratch the paint (aka-Mother Nature pinstriping). We have received a few dents from the trails already not to mention those fabulous garage blunders. Stay tuned for a future paint and body article.
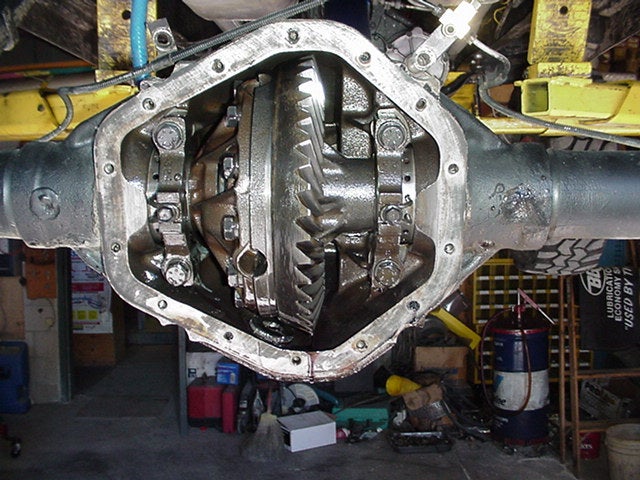
Dana 60 and 14 bolt Axles
For a large high torque engine,
front and rear lockers, and large tires (36" or larger), the stock
10 bolt axles are just too weak. For a take no prisoners setup, 1
ton axles are usually desired. A 14-bolt full float axle with 10.5"
ring gear and large 1.5" shafts is used in the rear. This axle is
almost unbreakable. The downfall is less ground clearance at the
pumpkin but we would rather live with a few snags on rocks than a
broken axle out in the middle of no where. For the front, a
¾ ton Dana 44 8 lug was first used to replace the front 10
bolt. We could have converted the stock 10 bolt but the 3.42 ratio
didn’t match the 14-bolt 4.10 ratio. The donor truck we got
the 14 bolt from had an 8 lug 10 bolt front but poor maintenance
and water in the differential had destroyed this axle. The Dana 44
axle had matching 4.10 gears but this axle isn’t much
stronger than the stock 6 lug 10 bolt. After a couple years, a Dana
60 was located and replaced the Dana 44. This kind of gradual
upgrade works great for people on a budget that may not be able to
afford everything at once. The Dana 60 has a 9.5" ring gear and
1.5" 35 spline shafts. The Dana 60 knuckles and u-joints are huge
and can easily handle large tires and a good amount of torque. The
outer stub shafts have recently been upgraded to 35 spline shafts
and 35 spline hubs to match the inner shafts. Every stock Dana 60
come with 30 spline stub shafts and hubs.
Dana 60 Install

Click picture for larger image |
|
|
Even though it's an expensive upgrade, the Dana 60 front axle offers the ultimate strength and can handle the stress of large tires and high torque engines.. |
The big and bad 14 bolt FF is affordable and easy to find at most salvage yards. With 10.5" ring gear, 1.5" shafts, full float design, it can handle loads of abuse. |

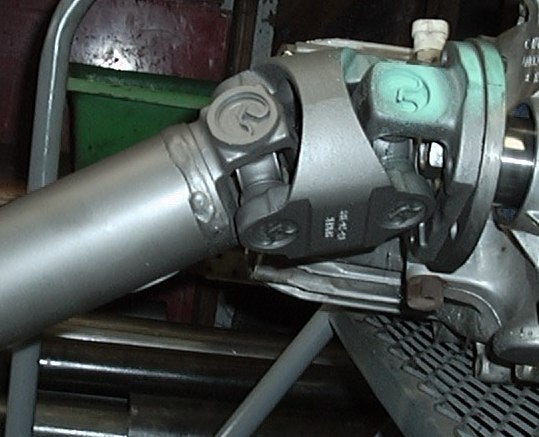
NP205 Transfer Case
Click picture for larger image
|
|
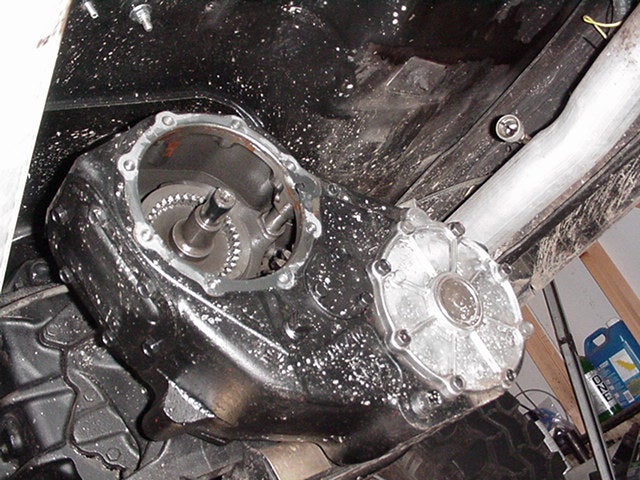
The NP-205 transfer case is another heavy hitter. Here is our 205 getting converted to a fixed yoke. |
The Blazer came stock with a NP208 but was upgraded to a stronger NP205 t-case. We never had problems with the 208 but we wanted something that could take the abuse and handle the 454. You really can't find a stronger t-case that the NP205. Another benefit the NP205 has is it's widely available. Go to any salvage yard and you’re guaranteed to find one. Since the 208 is made of aluminum, it is lighter than the cast iron 205 but it can’t take any hits from rocks. The NP208 has a chain while the NP205 have a stronger gear to gear design. Our NP205 came from an 1980 truck which means it had the slip yoke on the rear output shaft. A fixed yoke is more desirable so we converted from the slip to a fixed yoke. Though the 205’s low range might not be as good as a NP241 or NP208, its brute strength definitely makes up for it. We’ll soon be giving it a lower range by installing ORD’s Doubler plus a twin or possible triple stick setup in the future.
465 4 speed Transmission
From the factory, the Blazer came with the Muncie 465 4-speed and it has been proven a very stout transmission. We’ve actually tested a different 465 on a 120-mile trip to Buena Vista, CO with no gear oil! Don’t ask about how that happened! Anyway, the 465 is not the original transmission since the output shafts are different going to the 205. We’ve never had any problems with this 4 speed. With a cast iron case and huge internal gears, this transmission has no problems holding up to the big blocks torque. We've dropped the clutch so many times at 6000 and it never gave a fuss. The 465 is used from 1968 to 1988 which replaced the older SM420. It has an overall length of 12” with the following ratios: 1st gear ratio is 6.58:1; 2nd 3.58:1; 3rd 1.57:1, and 4th gear ratio of 1:1. That 1st gear is awesome for crawling on the trail. The 1968-79 4WD transmission used a 10 spline output shaft while the 1980-88 4WD tranny used a long 32 spline output shaft. Another thing we really like about this setup is the hydraulic clutch. The older GM models used a rod which sometimes kinks or comes loose on the trail. The hydraulic clutch doesn't have problems like the rod plus you can install a high tension, heavy duty clutch without giving your leg a work out. The clutch we're currently using is a Center Force Dual Friction model. It grabs hard and despite what others have said, yes, you can feather the Dual Friction clutch like any normal clutch.
Fuel Injection
Click picture for larger image |
|
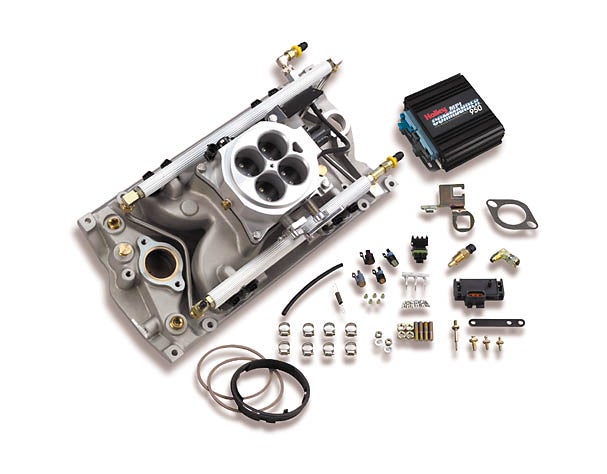
Fuel injection that will soon be added to the engine. |
The 87 Blazer came stock with fuel injection (first year) but after going to a 383 followed by a 454, the stock injection isn't adequate for either engine. A Quadrajet carburetor was used as a temporary solution. Even though Quadrajet carbs are known to be great off-road performers, we were still able to flood the Quad on a few ultra steep trails. This isn’t a good thing and could pose serious problems when the engine stalls on a dangerous hill. We’ve actually encountered body damage from the Blazer stalling and rolling back in a tree. Lets not forget the dreaded cold start and poor gas mileage carburetors are known for. We’ve had enough of the carb blues and will soon be doing a multi-port injection on the big block Chevy.
Offroad Design Shackle Flip
Click picture for larger image |
|
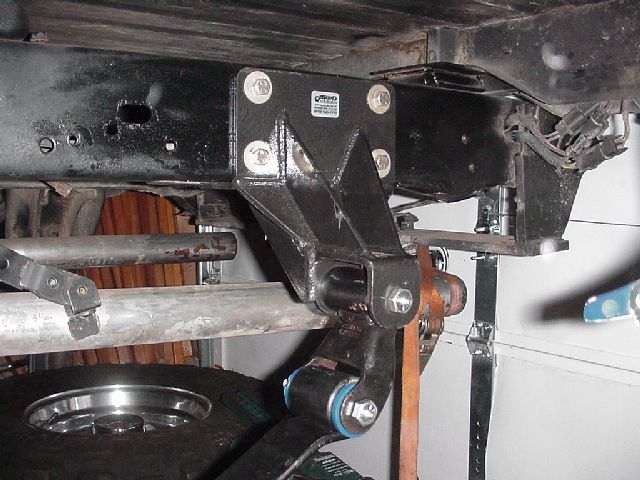
Offroad Design's shackle flip. |
The rear shackle flip totally
helped smooth out our ride by getting rid of the old super stiff 6"
rear springs in the back. The 6" rear springs had so much arch to
them that they resembled a half circle. The shackle flip is a stout
replacement for the stock shackle bracket. It basically replaces
the bracket, flips the shackle around, and gives more lift. We
chose the 4" version so we only needed 2" springs. This system also
replaces lift blocks, which will eliminate axle wrap caused by
blocks. The ORD flip also moves the shackle foward a little to
compensate for the increased lift. We haven’t had a single
problem with this kit and it’s definitely worth it. Also
check out the front heavy duty shackles Offroad Design carries. The
front shackles are much thicker and a little longer to help
eliminate some of the problems associated with taller springs. The
greatest thing Offroad Design has to offer is their service. You
just can’t beat Offroad Design’s excellent customer
service.
ORD Flip Install & ORD HD Shackles
Kayline Soft Top

Click picture for larger image |
|
The Kayline Fastrac top is the way to go for sunny skies. |
The Kayline Fastrac top is holding
up great. We were really surprised how simple it was to install and
how it does on the trails against the trees. It really took some
good hits from some branches. The windows zip out with ease and we
really like the option going topless by just folding it down.
Another option, that most top makers don't offer is the tinted
windows. The rear corner windows almost eliminate the blind spots
that the factory top had. Wind noise is almost non existent and it
rides pretty quiet going down the highway. The top also sheds some
major weight since we were able to loose the hard top. For any
Jeep, Blazer, or Bronco, Kayline is the way to go.
Kayline Review
Anti-Shock Stereo
Click picture for larger image |
|
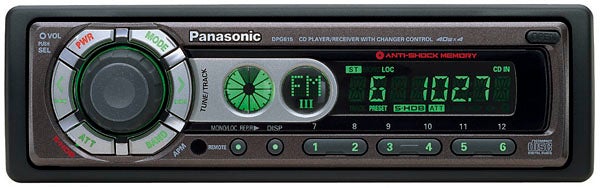
The Anti-Shock Panasonic stereo provides skip-free operation on any trail. |
Our deck is a Panisonic anti-shock
unit. This thing takes a beating and keeps asking for more! With
the 10 second buffer, you can still listen to your CD and rock
crawl at the same time. The Infinity component speakers sound great
but need a little more power behind them so an amp will probably be
installed in the future. The Bazooka makes the thing thump hard. We
haven't had any problems with the stereo system. All components are
from Crutchfield. You can't ask for a better company to get audio
products from. From the great tech support to the products they
carry, it's tough to beat this company.
Stereo Review
Gears
Click picture for larger image |
|
A gear upgrade is mandatory when running huge meats. |
Without a doubt, huge tires and a
stock gear ratio just don't work. Usually when you increase the
size of tire past a certain point, a lower gear ratio is required.
This means if your vehicle came with 3.07 gears and you're
installing 38" meats, you better plan on changing to a ratio of
around 4.88. National Drivetrain is THE place to buy any drivetrain
related part. The installation was more difficult than we
originally anticipated. After watching a professional do this, it
was a good thing that we had a specialized shop install the gears.
We went from 4.10 to 4.88 gears. The Blazer is definitely much more
responsive with the 4.88 gears. This will also give us a better
crawl ratio on the trail. The swap isn't cheap. You can easily
spend $1000 with 2 sets of gears and installation so think twice
before switching to those 44" Boggers!
Gear Install
Detroit Locker (rear)

Click picture for larger image |
|
14 bolt FF Detroit out of the box. |
Detroit lockers are well known for
the strength and durability. Since the only locker made for the GM
14-bolt FF axle is the Detroit we didn’t have any choice.
With the Detroit replacing the spider gears and utilizing the stock
carrier, this piece of hardware is actually simple to put in. You
shouldn't have to set the gears but it's always a good idea to
check. For the 14 bolt FF, the locker replaces the spider gears but
keeps the stock carrier. This keeps the price of the Detroit
affordable. The rear locker made the Blazer a beast off-road. Now
we hardly spin a tire with this in the back. Street driving isn't
too bad but you have to realize the characteristics of this locker.
When it goes around a corner, it disengages to let the tires slip.
But as soon as power is applied to the rear axle, you will
occasionally get a loud BANG. When the first time this happened, we
were preying for the cars behind us! This is normal with the
Detroit so it's just something you have to get use to. National
Drivetrain stocks the Detroit.
Detroit Install
BDS Suspension

Click picture for larger image |
|
The BDS springs have been holding up great. These flex better than expected. |
The front and rear BDS springs have
been holding up real well. They flex much more than expected and
ride smoother than our old Skyjackers. In the front, we have 6"
springs. These have the round Teflon pads and multiple tapered
leafs which help with a smoother ride. In the rear, it’s a
little more complicated. Since the front Dana 60 axle has 1" taller
spring perches, this means we really have 7" of lift in the front.
The rear has to match so we added the ORD Shackle Flip (see above)
which gives 4" of lift. BDS 4" springs were used on top of the Flip
but we didn’t want 8", so we decided to take the overload
away from the rear springs hoping to get 7" of lift to match the
front. This combination actually gave 6" of lift which is no good.
We then cut the overloads so they were more like blocks and bolted
them back to the springs. This seemed to have given the best match
so both front and rear was lifted the same height. Testing these
springs on the ramp and achieving 986 RTI on a 25 degree ramp
isn’t too bad!
BDS Review
Revolver Shackles
Click picture for larger image |
|
The Revolvers can really flex! |
We get many email questions on
these shackles. The Revolver Shackles (a.k.a. Teraflex) are holding
up well. The Revolver Shackles will give you great flex and
impressive scores on the ramp. Other things like hydraulic brake
lines, e-brake cables, longer shocks, etc have to be addressed when
slapping a set of these on. The shackles do give a little body roll
in the corners and more axle wrap than we would like to see.
There’s no issues with braking. Proper maintenance such as
greasing the pivot points has to be done time to time. What we
would like to see is a steel plate and longer studs so you could
lock these down on the street or certain trails. Even though these
shackles help with flex, we've seen many other Blazers flex just as
good with a softer or smaller lift. Also keep in mind, there's
times when flex isn't always a good thing. One example is crossing
a sloped trail where your vehicle is tilting over 35 degrees to the
left and it's a long ways down!
Revolver Review
High Angle Driveshafts
Click picture for larger image |
|
These 1350 CV shafts mounted in the rear and front eliminated any vibration we were having with the previous stock shafts. |
This upgrade was a must! After
lifting the Blazer 7", we couldn't get rid of the shakes and
rattles the stock driveshaft was giving off. This drove us crazy
not to mention strange looks from people around you! The best
solution is to install a CV shaft. With the horsepower and torque
this engine will be putting out, we were afraid to run the smaller
CV shafts. High Angle is the only the company that makes the larger
1350 CV shafts. A custom flange is required to mount the super
shaft but in the end it's definitely worth every cent. In the
front, we also added the stout 1350 CV shaft but also had the super
longer splines incorporated. With the amount of flex we were seeing
on the ramp, the front shaft just wasn't long enough. We already
lost 2 front shafts from the flex but with the new 1350 shaft, it
actually gives more operating angle and no more shaft problems.
With the vibration and noise gone, flexy front and rear shafts, and
the added benefit of stronger joints, High Angle is the only way to
go.
High Angle Review
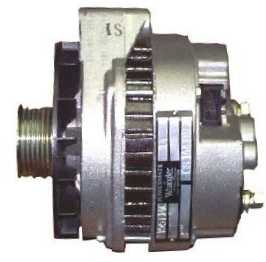
High Amp Alternator
Click picture for larger image |
|
The 225 amp alternator provides plenty of juice to power our electrical loads including the 12,000lb winch. |
When you have high power lights, a
thumping stereo system and a winch, your stock 60 amp alternator
just won't cut it. Wrangler NW Power Products came to our rescue
with a 225 amp alternator. Now thats power! The installation was
easier than we thought it would be. The stock bracket worked like a
charm. It does have an external regulator which means a DIY onboard
welder coming soon! It has no problems running the 12,000 lb winch
or the 210 watt lights. Yes, there are different ways to upgrade
your alternator but we don’t recommend the others. The other
methods involve taking the stock alternator to a local shop, and
have it rewound for higher output. This procedure involves
increasing the windings inside the alternator, which results in
higher maximum current output. The problem here is that while the
alternator is now capable of much higher output, it also will be
generating much more heat. The other components inside the
alternator likely are not rated for the additional heat, and can
fail. If you need an alternator, give Wrangler a call.
Wrangler Review
Mag-Hytec Aluminum Diff Covers
Click picture for larger image |
|
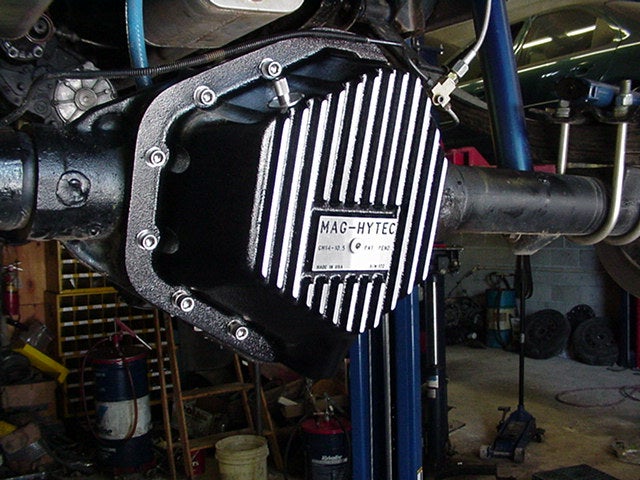
The Mag-Hytec diff covers offer additional cooling and several other features. |
We chose to run the Mag-Hytec
differential covers on both axles. These covers are cast in thick
A356T6 aluminum and offer many features like cooling fins,
magnetic, drain plug, dipstick, temp sender location, o-ring
gaskets, and SS hardware. Many people choose to ignore the fact
that the thin metal cover is not much protection between a ring
gear and a rock. The stock covers hold little fluid and don't offer
any cooling. You would be surprised how hot a differential will get
when towing or if you're running large tires. If you happen to be
running a chrome cover, that's actually worse since the chrome
holds in heat. After going through the cost of a front Dana 60 and
a rear GM 14 bolt, plus the cost of the lockers we wanted a better
differential cover to protect our investment. So far these have
been holding up fine and have taken a few good smacks from some
rocks. When we first installed the front cover, it was so close at
full turn, it was rubbing the tie rod just a little. Now with the
new 1.5" Rock Rod (tie rod), we are unable to use the front cover.
The rear cover will stay on.
Mag-Hytec Review
AGR RockRam
Click picture for larger image
|
|
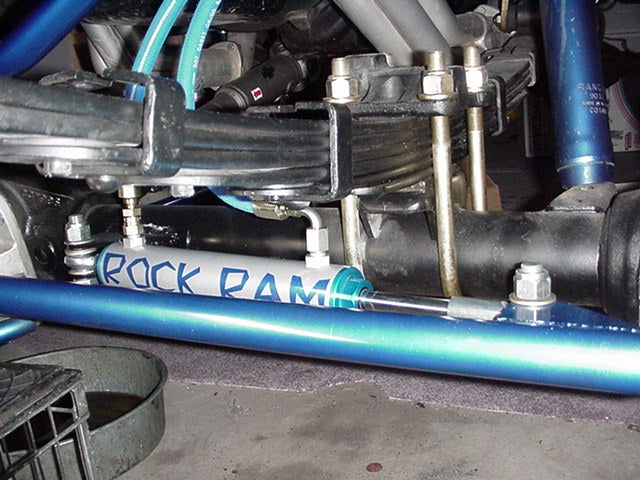
The AGR Rockram System. |
The RockRam is the latest trick
that many of the professional rock crawlers are using. It basically
replaces the steering stabilizer with a hydraulic ram powered by
the steering gear box hydraulic pressure. Instead of pushing
against the frame, it pushes against the axle. With this steering
setup, you can actually move boulders with your tires! With
powerful steering like this, it won’t take much to break a
knuckle so some care must be taken. The ram was a little on the
short side and we had to mount the ram a special way to get full
side to side steering. Another benefit, is the steering gear box
ratio has been increased so the steering will respond better.
It’s actually a sweet setup and we’re looking forward
to some hard core testing with this RockRam.
Rockram Review
Crossover Steering

Click picture for larger image |
|
Crossover steering provides sharper turns, full control off-road, and eliminates bump steer. |
Crossover steering has a big affect
on steering control. The stock steering setup always had bump
steer, poor turning radius and sometimes you couldn't even turn if
the drivers side tire was drooped. The crossover eliminates all the
problems above. The installation isn't difficult on a Dana 60. Now
the K5 handles like a dream both on and off-road. Steering is much
sharper. Hairpin turns on the trail can be done in one pass where
it usually took a couple tries before crossover. When a front tire
is at full droop, you can still steer unlike before. The highways
are much more pleasant to drive now without the bump steer. This
mod was one of the best ones yet. We did have some problems with
the drag link ends binding a little and the drag link hitting the
crossmember. We solved this with a Rockstomper 1.5" dropped drag
link and getting rid of the steering block.
Crossover Install
Tuffy Console
Click picture for larger image |
|
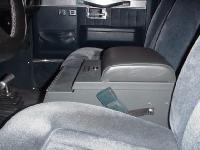
The Tuffy console provides superior protection against theft. |
This console is definitely a
worthwhile upgrade. It locks your valuables like a vault but also
has a nice compartment for a CB and is strong enough for people to
sit on it if needed. It's made of thick gauge steel and is almost
bullet proof. The little tray that’s inside comes in handy
for change or whatever. We'd actually like to see someone try to
break in this thing (not using our vehicle of coarse). Trust us,
they wouldn't succeed. We wouldn't mind seeing a few more colors
but we can live with gray. There's many sizes to choose from and
the CB/radio compartment is optional.
Tuffy Review
Warn Classic Bumper
Click picture for larger image
|
|
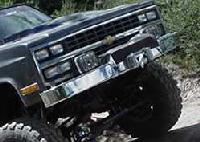
It wouldn't take much to damage the front Warn bumper. |
Warn has excellent products but when they designed this bumper, they forgot a few things. It does secure the winch okay and is actually beefy in the middle but the outer sides are very flimsy and wouldn’t take much to bend. You don’t want to put a tow strap around the sides and tug with it. It’s not too reassuring when you stand on it either. Another thing we didn't like is the bumper sits way too low when you first install it. There's a huge gap between the grill and bumper. If anything, it should come up higher so no gap can be seen. We modified our brackets and mounted the bumper higher. Whether you mount the bumper high or low, it has another problem with snagging the lower grill support and bends both bumper and grill support at the same time. This only happens under full flex conditions on the trail or the ramp but thats not acceptable. This bumper get a definite thumbs down and should never be considered for a trail rig. A stronger front bumper (non-chrome) will be installed later in time.
Warn 12000lb Winch
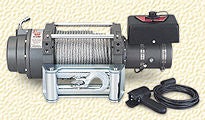
Click picture for larger image |
|
This winch is a brute when it comes to pulling. It only takes a few more amps than the 9500 model. |
This winch has all the power you would want in the winch plus more. It's never gave us any problems and works flawlessly. Though it does weigh a little more that the smaller models (9500i), and might draw a few more amps, it’s nice to know you can pull anyone out. The actual weight difference is 50 pounds but we'll sacrifice that for 2500 pounds more pulling force. It also carries 25 more feet of cable and is 3/8" thick compared to 5/16 the 9500i has. Installation is plain and simple. Just mount it, hook up the wires and you're done. Much easier than hydraulic lines. The price is a little more than a 9500 but we think it's worth it. If your budget is tight, then consider the 9500 models.
Body Mods
GM did not intend these trucks to run anything over a 33" tire size. Running both 35" and 36" tires, we found there was some major tire rub even with a 6" lift. The only solution was to hack the fenders. At first we though if we just cut the front fender back to the fender well, it would be okay but we were wrong. Without a front sway bar, the front tires hit the edge of the fender well/fender and actually cut one of tires in a couple spots. The solution was to cut the bottom-rear portion of the fender well and trim the fender back further. A Sawzall (reciprocating saw) was used for all cuts. Beware: This isn't for the faint of heart! A cut off wheel or plasma cutter will also work. Tape was used along the paint to prevent scratching and a line was drawn before the actual cut was made. Cuts were also made to the rear fender (between bumper and rear opening). We had some trail damage in that area so we just cut it off. If this rate coninues, we'll have nothing left! :-) The cuts on the rear fender now gives us better clearance in the rear. Eventually, the bumper will extend towards the rear tire.
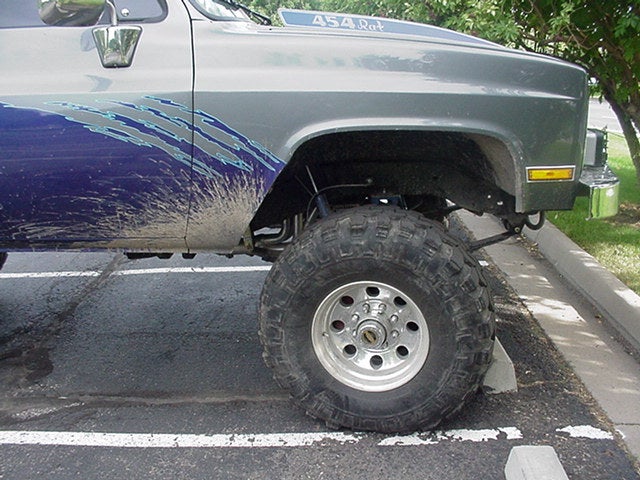
Click picture for larger image |
|
|
The front fenders were cut drastically. The tire likes to hit the rear part of the fender. We also had to cut some of the the inner fender well. (see this picture for more) |
The rear fenders never really touched the 36" tires but after recieving a little body damage, we decided to cut the damaged part off. This gives better clearance for the rear. |

Tires 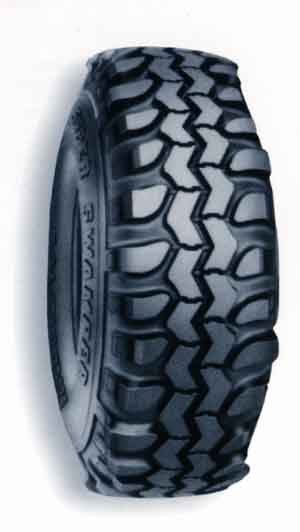
When the Blazer was first
purchased, it came with dinky P235 tires and was later fitted with
some 31" Discover tires and some used aluminum rims (couldn’t
afford new wheels back in the college days). After a 6" lift was
installed, we thought the Super Swamper Boggers would be an awesome
tire for off-road use. We were right about the Boggers being great
off-road but on the road, they had poor manors. After a year of
driving on the street with the Boggers, we sold them and tried the
Super Swamper TSL Radials. We were really impressed with the TSL
Radials both on and off-road. We’re currently running 36"
tires but are now thinking 38".
TSL vs Boggers
TSL Review
More to come!
You would think this project is close to being done but that's not the case. So many mods, so little time! Other things to come is an Gen II Offroad Design Doubler. This is two transfer cases put together into one which means a 3 speed transfer case! Lets not forget about armor and lots of it. Besides getting rid of the wimpy front bumper, we need some rocker protection and a full roll cage setup inside. Protection is a must on the trail. The gauges are starting to look out-dated so a set of racing gauges is planned. With more upgrades coming and our "never satisfied" attitude, you'll definitely be seeing more of Project Potent Rodent. Stay tuned!
See you on the trail! For more info email: sspickler@off-road.com
Return to Project Potent Rodent
Return to the Off-Road.com Projects Page
Return to the Off-Road.com Chevy/GMC 4X4 Page
|
Off-Road.com Newsletter Join our Weekly Newsletter to get the latest off-road news, reviews, events, and alerts! |
Follow @Off-Road
 Your Privacy Choices