Chevy 4x4 Chevrolet GMC truck
Jimmy pickup General Motors 4-wheel drive Blazer Tahoe Suburban
Z71
Author:Glenn
R. Viveiros
Editor:Shawn Spickler
CROSSOVER
STEERING CONVERSION
This explains the process of converting a 1977 Chevrolet K-5 Blazer
from the standard front to back steering to crossover steering
(most Jeeps and solid axle Ford's have this setup). I thought this
was going to be a very difficult and expensive project (it is not
cheap by any means, but doing the work yourself saves a lot of
money). This process will also work on a solid axle Chevrolet
½ or ¾ ton 4x4 truck or Suburban. It will work on the
1-ton variety, but you will need a different steering arm as the
Dana 60 uses a different style. It's also easier on the Dana 60,
you don't have to get the passenger side knuckle milled, drilled
and tapped. It just bolts on using the existing knuckle. First off,
let me thank the 2 people that gave me some ideas and shared their
knowledge with me. Stephen Watson at Offroad Design in CO. He is a
great guy and is always willing to answer emails and phone calls.
He was a great help and the photos of his crossover conversion were
very helpful. Next is Glenn Gladdis, he is a good friend and also
an ASE Certified Master Mechanic. His insight and never ending
faith in my abilities were also of great help. When he and I get
together, there is nothing we can't figure out.
|
|
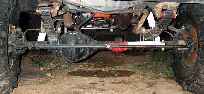
Typical
stock steering setup
(front to back).
Click on picture for larger
size |
I guess the next thing would be to decide if this is for you or
not. If you just do the occasional Offroading, and or you just
tackle the light trails and dirt roads, then you may not want to do
this. Its not that it's unreliable or that it is unstable in any
way, it's just that the money and time involved may not be worth it
to you. If, however, you are like me and Wheel the Wee out of it,
than this is what you have been looking for. With the standard
front to back steering setup,
|
|
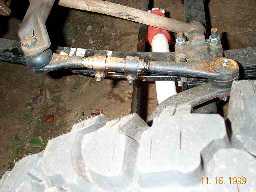
Stock
front to back draglink
Click on picture for larger
size |
as your driver's side tire moves up and down, it will actually turn
the steering wheel in your hands. If the driver's side tire is in
extreme droop, you will have very little, if any steering. The
reason this happens is that the drag link from the factory is only
about 16 inches long. When the drivers side tire droops, the drag
link is put in a severe downward angle, which effectively reduces
its length to about half of normal. Which in turn takes away almost
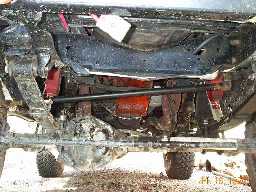
all steering ability. Crossover steering takes the little, short
front to back drag link that goes from the pitman arm to the
steering arm on the drivers side knuckle, and replaces it with a
drag link about 3 times longer that goes to the passenger side
knuckle with another steering arm. With this, no matter what angle
your axle is at, you have full lock-to-lock steering. My K-5 now
also turns sharper than it did before, and does not have the
tighter to one side turning radius that most G.M. solid axle trucks
have when lifted. I will include as many part numbers as possible
as well as their places of purchase.
|
|
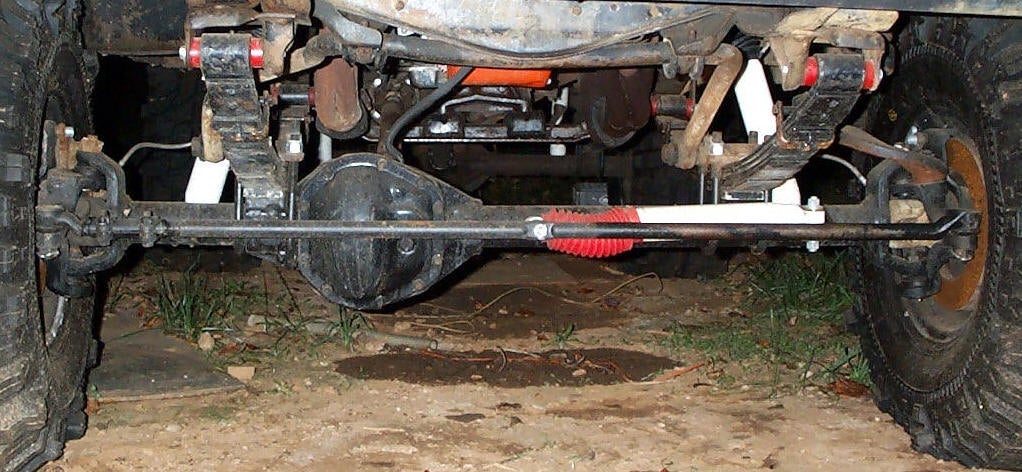
Crossover
steering setup.
Click on picture for larger
size |
Parts, parts and more parts... All right, here it goes. You
will need to get quite a few parts to do this, I got most of the
G.M. stuff from a junkyard, and the rest were from friends and auto
parts stores, and 1 from a tool supply warehouse. You will need a
2wd G.M. steering box, make sure that you check your power steering
hose ends and find the same connections on a 2wd box. I got a box
with different connections and had to actually swap the 2wd shaft
into the 4wd box, it was easy to do, but I had already swapped the
boxes when I found the problem, and taking those heavy suckers on
and off is a pain in the a$$. You need the box because the 4wd box
turns from front to back and you can't change the pitman arm. The
2wd box uses a pitman arm that will let you index it in 4 different
locations, so that you can set it to turn side to side, that's what
you need for the crossover.
|

|
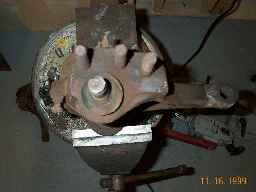
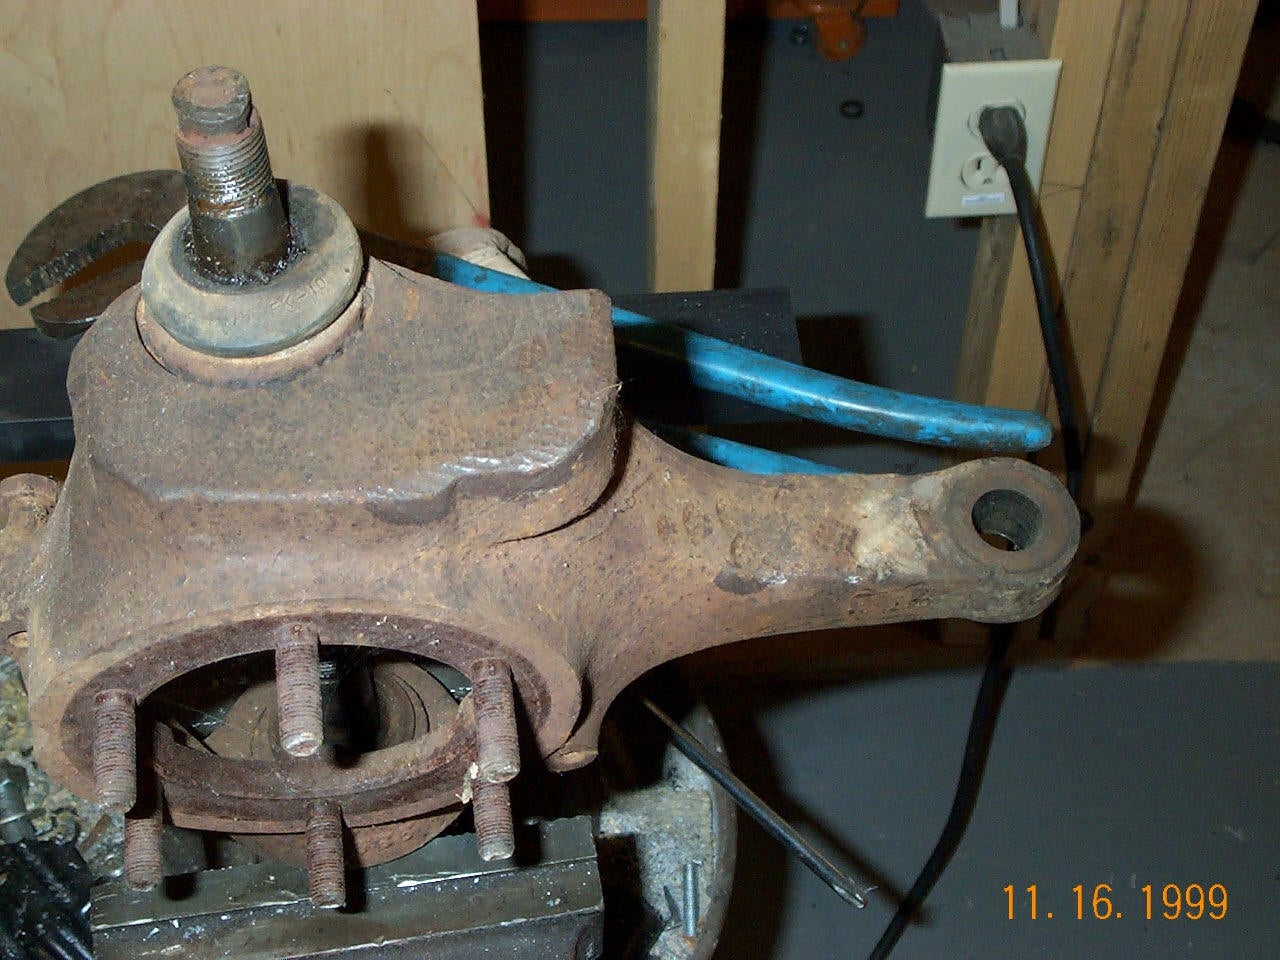
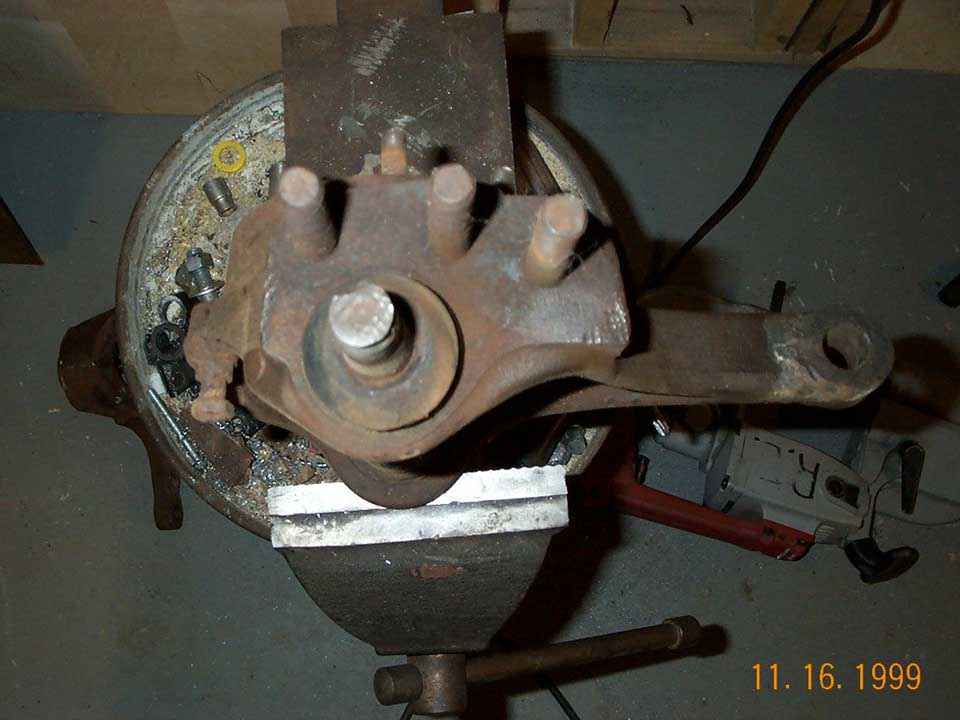
Knuckle
without the 3 studs (before)
Click on picture for larger size |
Next you will need a flat top passenger side knuckle. This knuckle
will have to be taken to a machine shop to have someone drill and
tap the holes for the steering arm mounting studs, it uses that
same studs and cone type washers that the drivers side knuckle
does. You may also have to have the top part machined flat as the
casting is sometimes a little rough. Some rigs have them, some
don't, if you have one already, I would still get one from a
junkyard or other supplier. That way, you won't have to have your
axle unassembled just to get the knuckle machined, and your rig
won't tie up the garage or driveway. My machinist was super busy,
so I dropped it off with a drivers side knuckle and told him I
wanted the mirror image of the drivers side knuckle on the
passenger one. It took him about 2 months to get to it, but I trust
him and he does great work, also the price was right $$$.
|
|
Knuckle
with the 3 studs (after)
Click on picture for larger
size |
I have only seen these knuckles on the Dana 44 axles, but they will
work on the 10 bolt axles as well. They are a direct bolt on and
the spindles bolt straight to them with no problems, make sure its
off a disk brake axle though, I don't know if K-5's or other G.M.
trucks with Dana 44 front axles ever had drum brakes, but this
would be the only one I would not try, it may work, but I don't
know for sure. Also on all the flat top knuckles that I have seen,
the tie rod ends come in from the top, and on my K-5, the tie rod
comes in from the bottom, you have three options here: 1) You can
buy the older style tie rods (if yours uses this already, no
problem). 2) You can do what I did and have it re-tapered to go in
from the bottom. 3) The last one is to just drill it out and use
heim joints and a custom-made tie rod. I wanted parts I could get
anywhere, so the heim joints were not an option for me.
|
|
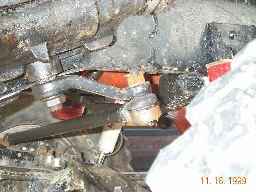
Crossover
pitman arm
Click on picture for larger
size |
Next up is the pitman arm. I have been told that several different
arms will work, but for my K-5, the perfect arm was, don't wince, a
stock arm off a Jeep Wrangler YJ, also the price was right (free,
thanks Shawn!). Well, I say free I had to do a spring over
suspension on his YJ for it. He goes almost everywhere I go, and is
a great friend, he owns a Jeep and wheels the heck out of it too. I
had to have the end where the drag link connects to it re-tapered
for a Chevrolet Tie Rod. The YJ arm looks a little small, but when
you have the tapered hole opened up and re-tapered, it looks much
better. To date I have had no problems with it or any part of the
setup. I am, however, going to get another one and have it
re-tapered to carry for a spare. NOTE***By far, getting the
knuckles and the pitman arm re-tapered was the hardest thing to get
done. This took me forever to find someplace with the right reamer
to do it. The taper is not a standard one, so you can't get a
reamer at you local tool supply place. I had mine done at a Race
Car Shop in a local town a few miles away.
|
|
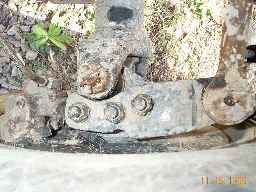
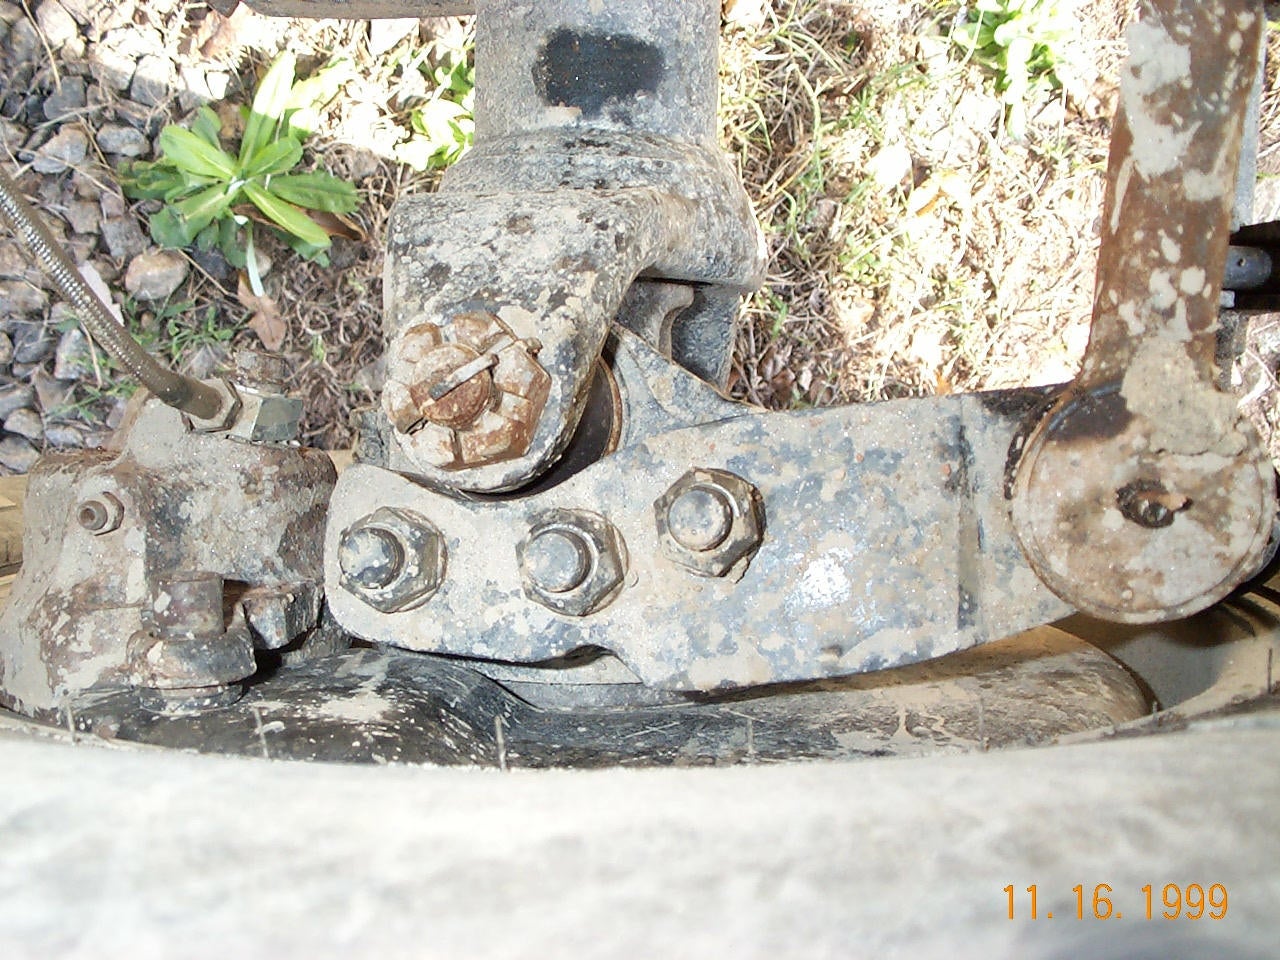
Passenger
steering arm
Click on picture for larger
size |
Next on the list would be the passenger steering arm. I bought mine
from Tri-County gear. You can also get it and the flat top
passenger knuckle from Stephen Watson at Offroad Designs. You will
have to contact him to find out if his knuckles are already
drilled, tapped and ready for the steering arm to bolt on. The arm
is super beefy and uses the same cone type washers for a super
strong wiggle free connection. A large amount of time and effort
went into the design of this arm to get the angles right. I don't
know how the Ackerman angle works, but if it's not right, it makes
for a horrible driving vehicle, so don't cut corners here. I have
seen other arms that look way cheesy and even had a guy try to make
me a homemade one. The steering is a vital component on your rig
and can cause serious injury or death to you and others, SO DON'T
USE CHEAP JUNK! This arm has the angles right and is also tapered
for the Chevrolet Tie Rod end. I had to do a little hand file work
on the edge around the ball joint, because it was a super tight fit
and I did not want to have to hammer it on and possibly destroy a
ball joint in the process.
|
|
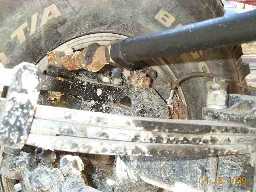
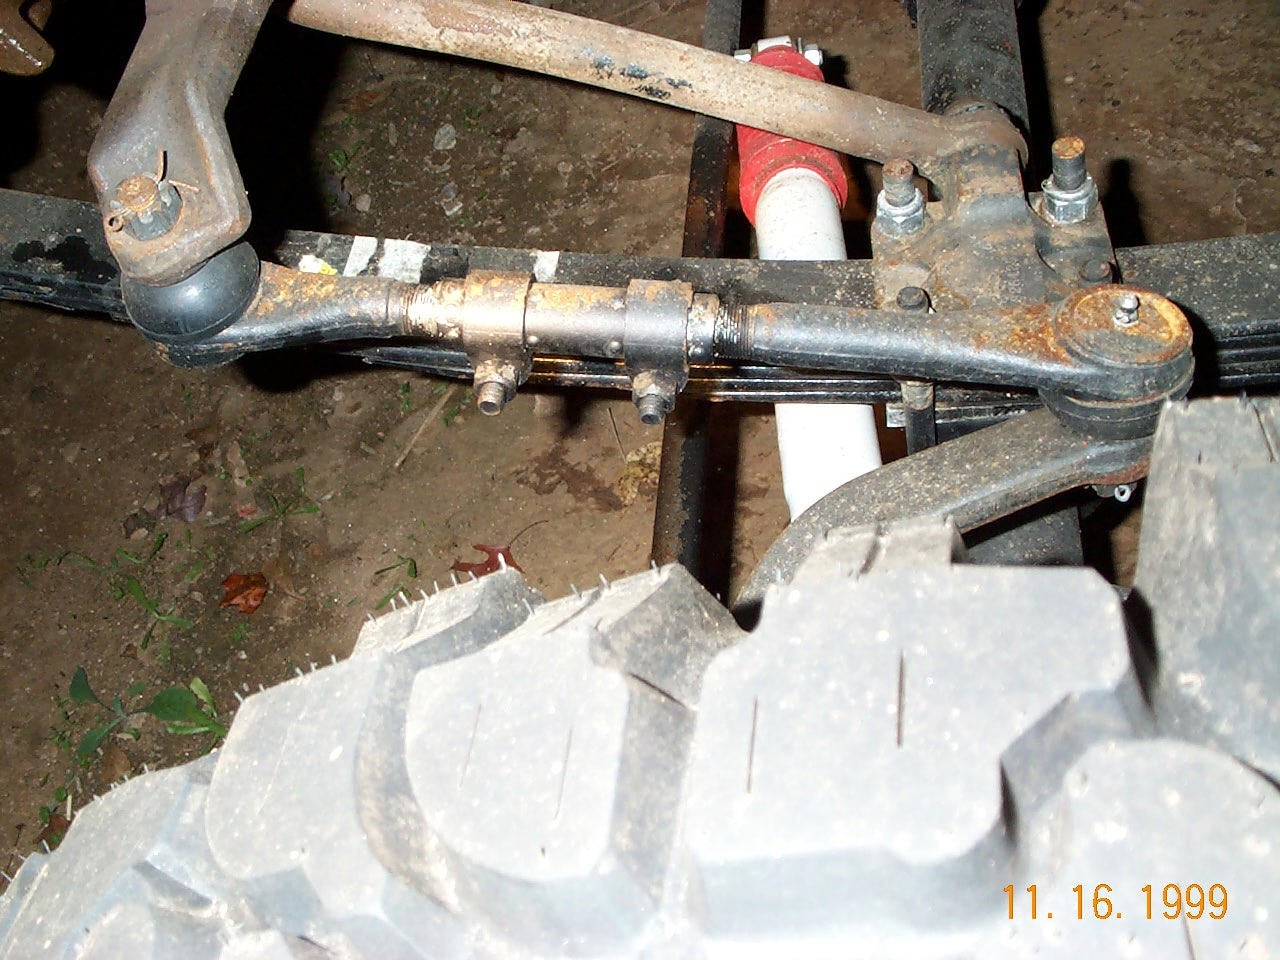
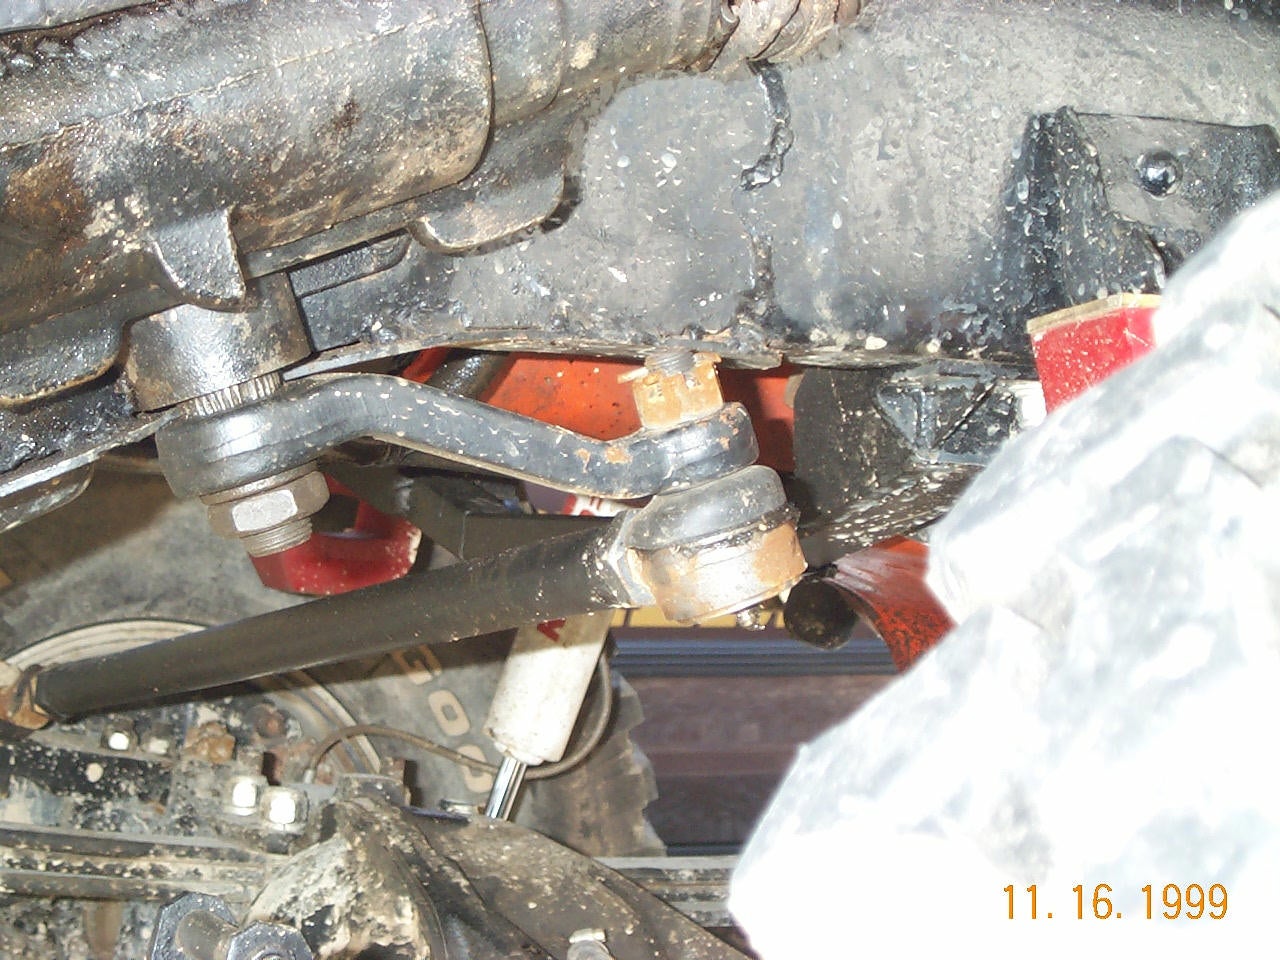
Drag link
connected to passenger side steering arm
Click on picture for larger
size |
Now you have to make a drag link. I used the stock Tie Rod setup
off of an 85 K-5 (I was told 83 and up K-5's and K-10's have the
same style). Instead of being a solid steel bar like the one I
have, it is a hollow piece of D.O.M. tubing that is threaded on
both ends and uses a short style tie rod in each end with a jam
nut. Instead of having a sleeve with 2 clamps on it to adjust the
toe in, it has the jam nut on each Tie rod end that you loosen and
turn the tube in the center to adjust toe in. It is left hand
threaded on one end and right hand on the other. I used new Tie Rod
ends from Auto Zone for mine, they are lifetime guaranteed. The
center tube is only available at a G.M. Dealer or the local
junkyard. I tried every parts store out there and nobody makes it
(it has no joints that wear out, so its not very profitable to make
it). The one end that should be on the drivers side if it was being
used for a Tie Rod has an eye cast into it to attach the steering
stabilizer to. I tried to find one without this eye (just because I
don't like the way it looks) but to no avail. Anyhow this is where
it gets fun. Now you have to buy a tap, or have a machine shop that
has one do this for you. The tap is 7/8" and 18 threads per inch
right hand thread. When you cut the tube to length, make sure you
cut ONLY THE RIGHT HAND THREADS, if you cut the left hand ones off
by mistake, get another tube, the left hand tap was about $150
bucks and had to be ordered.
|
|
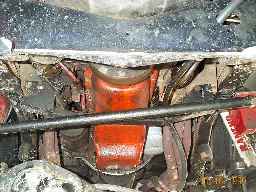
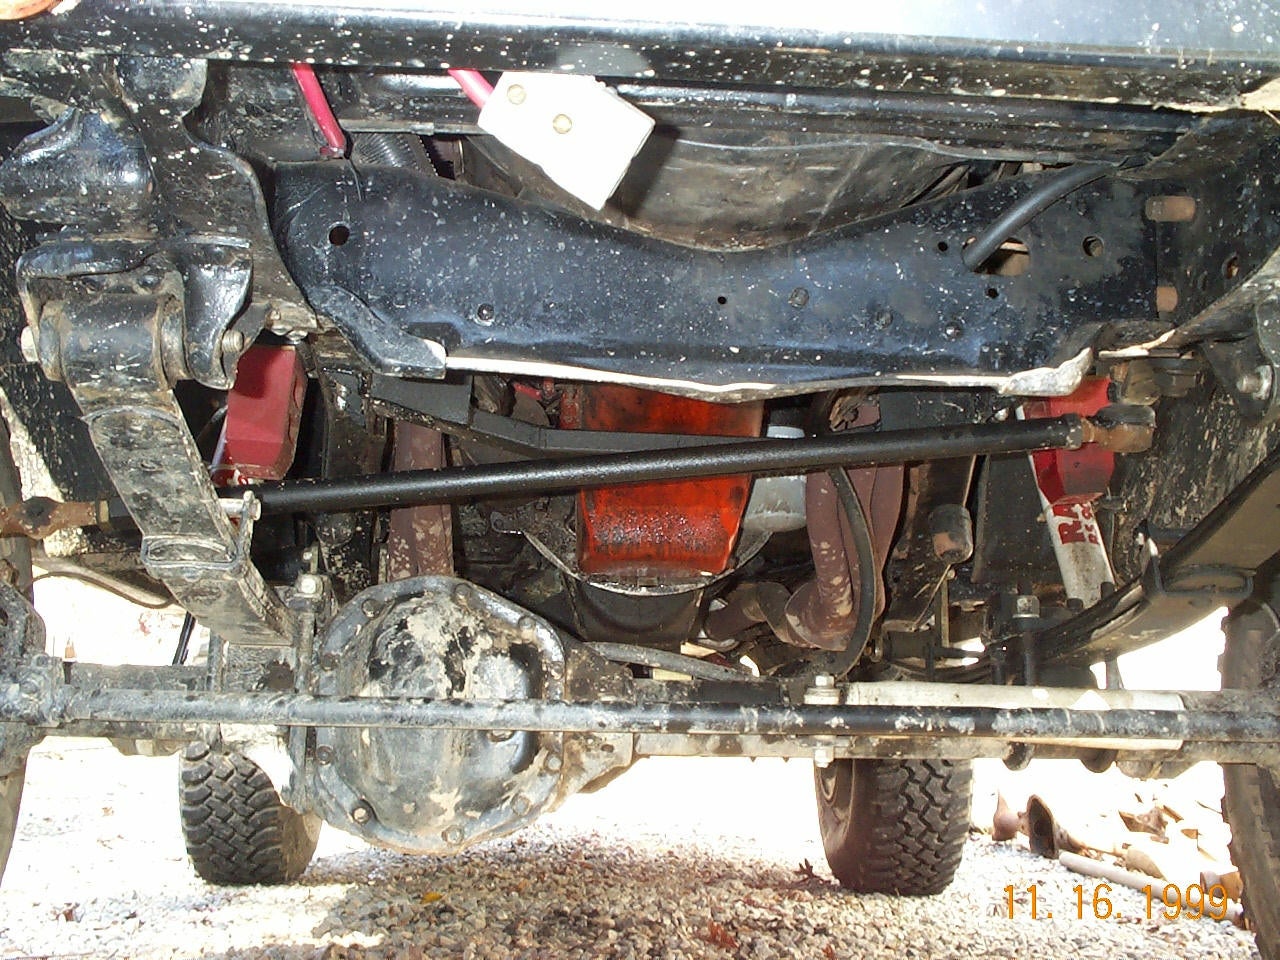
Front
view of drag link
Click on picture for larger
size |
The right hand tap I bought from a supply place called McMaster
Carr, it's like a Grainger, but Grainger did not have this tap. The
cost was around $50. The length for my truck was 34", you must
measure yours to make sure of the length before you cut it, it may
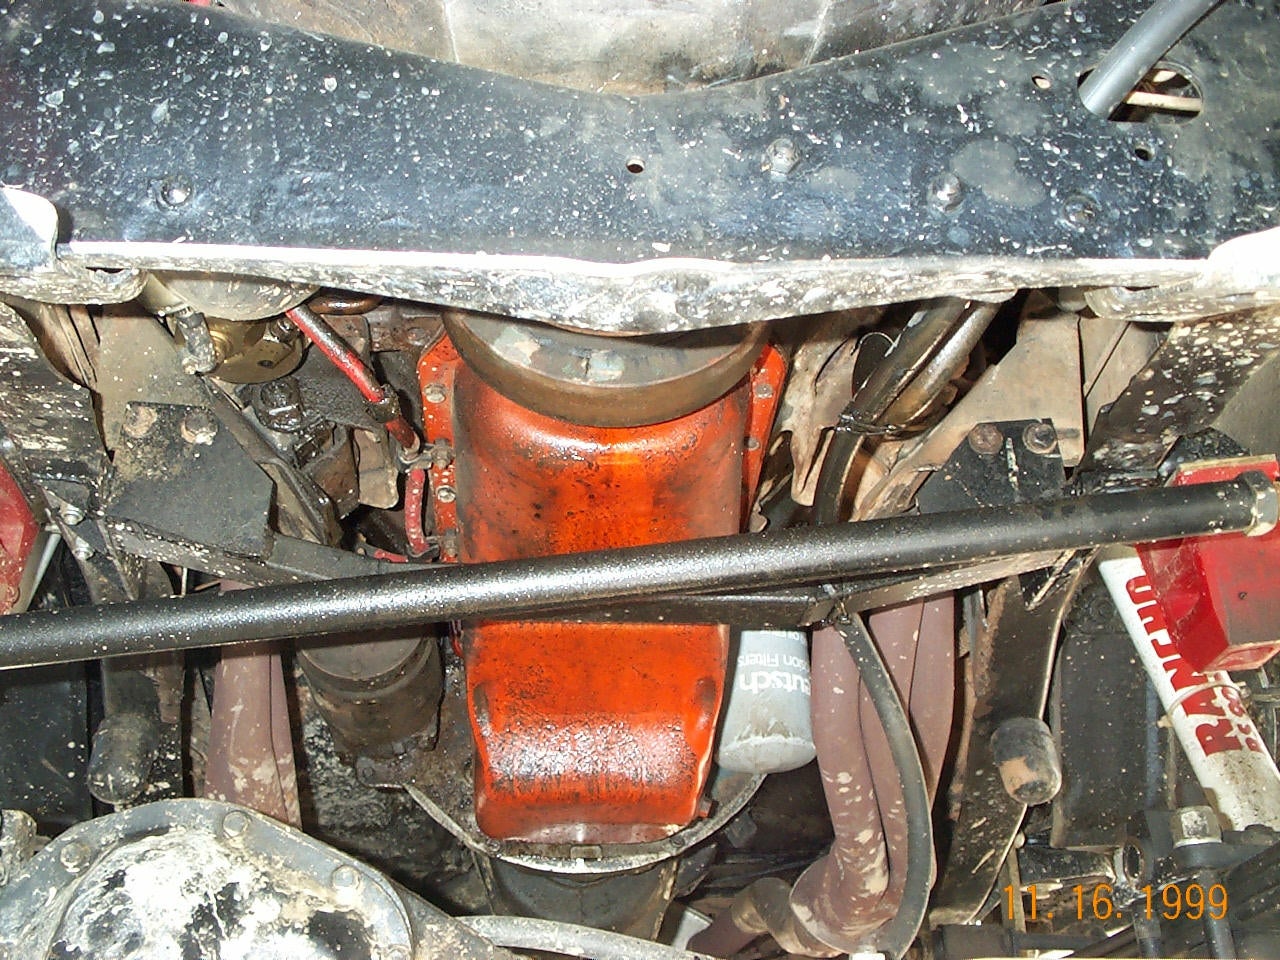
be different than mine. Now its time for the final part, this one
you have to make yourself, or have it made for you. It's the cross
member for the motor mounts. I have been told that there are
different styles and that some of them do not get in the way. To
date, I have looked at quite a few different K-5's and have not
found any where the cross member would not have to be moved in
order to function correctly. When I say correctly, what I mean is
Offroad, on the street it would be fine, but when you flex it
Offroad, it would make contact with the cross member. The stock one
is bolted to each motor mount with 2 bolts and attached to the
frame with 2 rivets at each end. They are also prone to cracking,
mine was and I had welded it up before doing the crossover.
|
|
A new
crossmember is fabricated
Click on picture for larger
size |
My cross member came forward and went right under the harmonic
balancer. To remove it, I unbolted it and cut off the rivets with
an air chisel. I still had to cut it in half to get it out from
between the frame rails. The new one I made out of 1" by 2 "
rectangle tube, with ¼" thick walls. I used angle iron and
flat plate and welded it all together, it bolts to the frame with 2
bolts on each side and to the motor mounts in the same bolt holes
as the stock cross member (the motor mount holes, not the frame
ones, I had to make 2 new ones for that). The drawing does not have
any measurements on it, but will show you the shape of it so that
you can understand how to build your own. The measurements will not
be exact from truck to truck, so I did not take any of it. I hope
this helps explain the function and installation of crossover
steering, if you have any other questions that I did not answer,
please feel free to email me and I will try my best to help you
out. Glenn R.
Viveiros
viveiros@inetnow.net
Offroad Designs - www.offroaddesign.com Stephen Watson- Steering arm,
Flat top Knuckle, other G.M. goodies and a wealth of knowledge. He
also has made his own cross member for his K-5, he may be
fabricating them for a crossover conversion. Tri-County gear -
www.tricountygear.com - Steering arm, tell them the
passenger side, as they make kits for jeeps and they use both sides
on their kits. Auto Zone - Tie Rod ends- Part numbers ES2233L (left
side) ES22334R (Right side) Tom Jumper Chevrolet- 18006485576-
Studs for Flat top knuckle-Part number 2570-C (you need 3 and I
believe this is the dealer part number, not the G.M. part number)
McMaster-Carr Supply Co.- www.mcmastercarr.com- Tap 7/8"x18 threads per
inch right hand Part number 2595 A423 (the A423 may me the number,
but the other 4 numbers were in the same column) Local Junk Yard -
In your area!!!- 2wd Steering box and 83 or newer tube type tie
rod. The cross member, you will have to find your own metal for.


 Your Privacy Choices