Exploring the great outdoors requires careful preparation, and if its an extended trip to the woods or the desert, it also requires a decent amount of space to haul your gear. For that very reason we decided to add A.R.E.s Overland Series Camper Shell on our truck, which offers lockable, covered storage for our half-ton so it stay safe and secure while driving and if were away from the vehicle. The shell comes with one small downside in the form of added weight, which puts just enough added pressure on our Fox piggyback shocks and stock leaf springs to make the rear end sag just a bit something that becomes even more pronounced when towing.
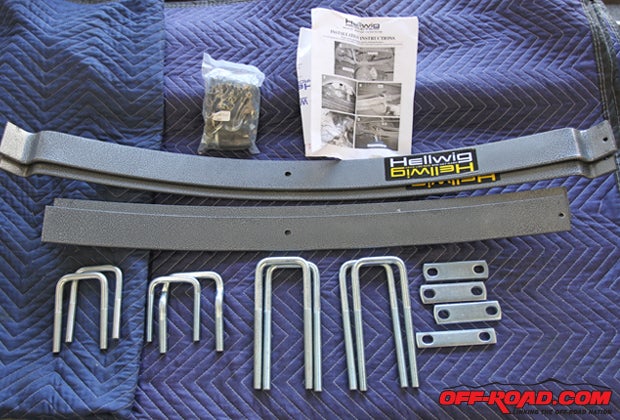
To compensate for the few additional pounds, and to help level out the back end with the front suspension, we turned to Hellwig Products. With its new two-leaf Pro Series Helper Spring kit, Hellwig offers a simple solution with this leaf kit designed to sit atop of the factory spring pack with no drilling required. If one so chooses, the kit can be installed by a garage mechanic using hand tools, as it includes instructions and all necessary hardware for installation, but its also a relatively quick job for your local shop if youd prefer to leave the work to the professionals. For help with our installation, we turned to our local off-road shop SoCal SuperTrucks in San Bernardino, California. With the help of their experienced crew, the installation was knocked out in a few hours.
Note: Its important to note that the Hellwig Helper Spring kit will increase spring rate and stability while towing, but it does not actually increase the factory GVWR, and therefore should not be viewed as a license to disregard the factory towing capacity.
. Begin by removing the stock U-bolts that hold the factory spring pack (while the tires are still on the ground if you are working on the truck in your garage). Note: Hellwig recommends doing this one side at a time.")


 use the 9/16 x 6-inch Z-shaped U-bolt to secure the Hellwig spring in place using the crossbar, nuts and washers. For the installation of the front of the spring on the drivers side, the 1/2 x 3 3/4inch U-bolt should be used along with the supplied black roller. Attach with the cross bar, washers and lock nuts. Be sure to adjust the spring tension so that both the front driver and passenger side match, and Hellwig notes you may need to pull the front of the leaf tip down with a C-clamp to get the bolt over both springs.")


After the installation, we were very curious to see what, if any, difference there was with the feel of the truck. The added springs stiffened up the rear every so slightly its not a massive difference for on-road daily driving but its there, and we like the change.
We previously installed 2.5 Fox remote reservoir coilovers up front, and because of the additional 3-inch lift these shocks provide our Tundra has always had a slight nose-up, pre-runner stance; this wasnt so bad for daily driving and we pointed our headlights down a bit to compensate for the front end of the truck pointing higher. But over time, and especially with the added weight of the A.R.E. shell, the nose-up attitude eventually wore on us while towing, as the added weight would pull down the rear end even more so and our headlights would blast right into oncoming traffic. The Hellwig Helper Springs stiffen the rear suspension a bit and evens out the trucks stance since it increases the height a little bit.
When it comes to towing we noticed the change even more so. The day before the installation we drove to Honda to pick up a new Pioneer 1000 side-by-side, which would be using as our photo rig to adventure around Johnson Valley during the recent King of the Hammers race. After the installation, we towed that very same Big Tex trailer loaded with our Honda Pioneer 1000 out to Johnson Valley and out onto the lakebed to camp during the races, and we noticed a major improvement in the ride. With all of our upgrades and additions to the truck, our Tundras rear end just sagged more than wed like with any decent sized trailer attached. After adding the Hellwig kit, the truck felt more composed while towing whether it was making a sweeping turn on the highway, easing over speed bumps in a parking lot, or while bouncing on the rutted dirt road in Johnson Valley leading to Hammertown. Overall, the truck just imparts a little more confidence to the driver.
Now, as we mentioned, Hellwig reminds buyers that its kits will not change the GVWR of a vehicle, as many factors contribute to that rating (brakes, suspension, chassis, etc.). For our purposes we really werent looking to add more capability to haul or two more, but more so just to just improve the rear suspension without going to great lengths. The Hellwig Helper Spring kit certainly fits the bill and provided us with exactly what we needed a little lift out back and added stiffness for whatever task we decide to tackle.
For the Toyota Tundra, Hellwig currently offers two different kits, including a 2,500 lb. Helper Spring kit for the 2000-2006 Tundra (Part #1910) and then the one we installed for the 2007 to 2013 Tundra (Part #1909). If you own another truck or SUV brand, theres a good chance Hellwig Products offers a Helper Spring kit, so click on the website link below to see if they offer one for your vehicle.
CONTACT
Hellwig Products
800-Hellwig
HellwigProducts.com
SoCal SuperTrucks
909/383-5454
SoCalSuperTrucks.com
Part List
Part #1909
2007-13 Toyota Tundra 2500 lb Helper Springs
|
Off-Road.com Newsletter Join our Weekly Newsletter to get the latest off-road news, reviews, events, and alerts! |
Follow @Off-Road
 Your Privacy Choices