GX 470: Metal Tech 4x4 Swing-Out Bumper Install

Jun. 15, 2017 By Josh Burns. Photos by Jaime Hernandez and Josh Burns
With the bumper ready to go, the first step is to remove the bolt holding the safety latch for the door, remove the latch and then remove the plastic piece that sits between the bumper and the rear storage area. This will be reinstalled again so hang onto it. This will also expose four bolts that need to be removed.

Our GX 470 is about ready for the trails, but we’re missing one important piece – a legit way to carry a spare tire. Fortunately, we already sourced a new rear bumper from Metal Tech 4x4, and much like our Goblin Front Bumper this unit requires no cutting or welding of the GX.

The new Metal Tech 4x4 Pegasus Swing-Out Rear Bumper and Spare Tire Carrier is just what we need for our off-road adventures. The bumper improves departure angles by ridding our GX of its low-hanging plastic rear bumper, and it also provides the option to carry a spare up off the ground and not in the stock spare location under the vehicle in the rear (a ground clearance issue in itself). This new bumper is designed to work in conjunction with the stock rear door (though opens separately from it), requires no trimming of our machine (which we love), and can carry up to a 35-inch tire (so our 33 will fit just fine!). We also like the fact that Metal Tech 4x4 offers to options to replace the stock hitch that we need to remove, one of which allows us to retain our 6,500-pound maximum towing capacity. 

Follow along as we install the Pegasus Swing-Out Rear Bumper and Spare Tire Carrier installation on our Lexus GX 470.

MORE GX 470 STORIES

Metal Tech 4x4 Goblin Front Bumper for Lexus GX 470

Icon Vehicle Dynamics, Metal Tech 4x4 GX 470 Rear Suspension Install

GX 470 Upgrades: Icon Alloys, Nitto Ridge Grappler Tires

With the bumper ready to go, the first step is to remove the bolt holding the safety latch for the door, remove the latch and then remove the plastic piece that sits between the bumper and the rear storage area. This will be reinstalled again so hang onto it. This will also expose four bolts that need to be removed.

To remove the bumper there are four bolts above the bumper, four below and four screws and a clips in the fender wells holding the bumper in place. Once they are removed the bumper will pull off easily at the ends. We previously removed the mudguards, but if you haven’t done so make sure to take those off as well.

If equipped, the OEM hitch needs to be removed. You’ll also want to remove the factory tow hook on the rear as well.

Although all of the plastic mounting pieces will be removed from the GX, the ventilator for the rear door will be re-used but it needs to be pulled out of the housing before being reinstalled.

Before going much further we want to get all of the features and extras installed on the bumper, such as the rear lights (and any other accessories)
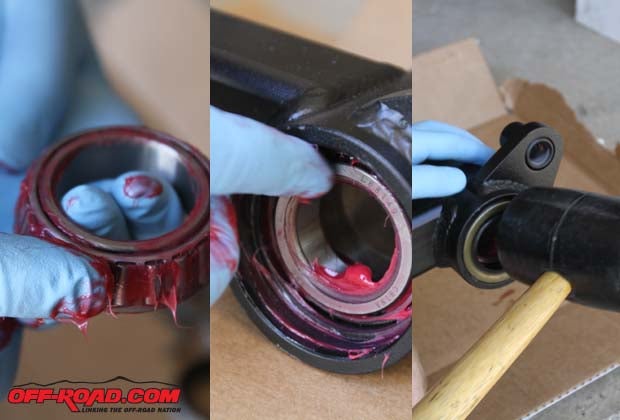
, latches, strut and more. We mounted the LED lighting for the rear and added some blue Loctite to the bolts. We did not attach the electrical connection yet but have access to do so down the road.

The landing pad needs to be assembled and mounted to the bumper, as this is where the swing arm will come to rest.

The latch can be a little tricky to assemble, and we found it easiest to use a closed 1/2-inch wrench with some tape to help hold the nut in place as shown.

The swing arm moves on tapered roller bearings and the entire unit is sealed within the swing-arm mount to protect it from sand, dirt and water. The upper and lower bearings need to be liberally greased and set in place. For the bottom, the metal seal can be massaged into place using a rubber mallet to complete the seal.

Metal Tech 4x4 notes to check for any weld splatter below the frame corners, because if there is any it will prevent the Pegasus bumper from fitting the tight clearances. We found there was some excess material and helped clean it up using a cut wheel – though it wasn’t all that much.

There are four bumper bolts that will go into the existing stock holes to secure the bumper, but they may need a little massaging (left) 
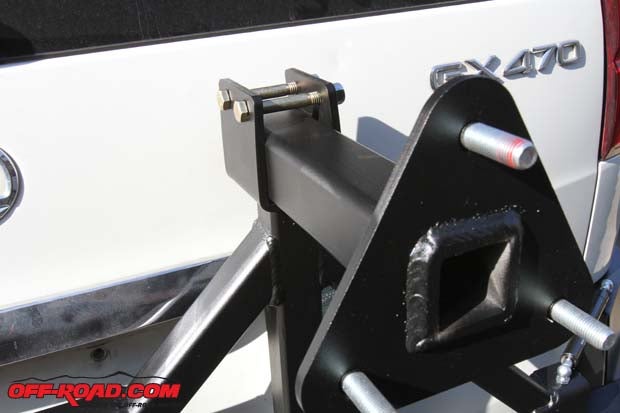
to line everything up properly at first. Four long bolts help secure the bumper legs in place, and don’t forget to set the 1/4-inch spacer (right) on the frame between the bumper arm and the frame.

Even with an extra set of hands to help us on the installation, we still taped the edges of the GX to help protect it during the bumper installation. Once the bumper is securely in place, it’s time to install the swing arm.

After setting the swing arm in place and installing the tapered bearings, the final step to properly secure it is to tighten the crown nut and use a cotter pin to secure it.

The strut can be tricky to install, as its 120 lbs. of pressure make it pretty much impossible to move by hand. We had to loosen the crown nut and pull the swing arm off and use the swing arm itself as leverage to get the strut in place. If it sounds complicated, it is, but Metal Tech 4x4 tells us they have changed the design on this portion of the installation to make it far easier.

One of the last pieces of the puzzle for our installation is to install the utility rack accessory, which mounts on the swing arm itself and holds our fuel can and water holder.


Off-Road.com Newsletter
Join our Weekly Newsletter to get the latest off-road news, reviews, events, and alerts!