Trail Tips: A Primer on Off-Road Winching
Off-road trainer Tom Severin outlines the proper steps to take before and during winching
If you spend any significant amount of time in difficult terrain, youre bound to encounter a recovery situation at some point. It could be either your vehicle or someone elses. And a winch may be the proper tool at that time. This is a good time to review recovery, and winching in particular.
The steps that follow are taken from my nifty and exclusive Winch Recovery Bandana. Keep in mind that these tips and the information provided on the bandana are not a substitute for proper training, sound judgment and quality equipment.
Every winching operation should start with a plan in your mind as to how youll rig it up. Winching is a risky procedure; proceed very slowly and methodically. Youre dealing with material and parts that are subject to a tremendous amount of force. A mistake can be fatal so take your time.
Winching begins with a walkthrough. You want to inspect all parts and lines while the system is under light tension. If everything looks good, you can power up and proceed with the recovery.
Previous Trail Tip Stories
Camp Cooking for Your Next Off-Road Trip
How to Replace U-Joints on Your 4x4
What Causes Washboard Roads?
The vehicle doing the recovery is kept in neutral with the emergency brake on. Having the transmission in neutral protects the parking pawl. Chock the front wheels if you can. (Some people even anchor this vehicle to a tree or another vehicle.) You do not want that vehicle to move. Start the winch slowly so you take up some of the slack.

Lines that are slack while on ground take on a new dimension when under tension. You need to check them before proceeding with the recovery. The lines may be binding or twisting. They could be rubbing against an edge on the bumper or other body part. In some cases the lines end up right over a taillight. Under load those lines will smash the cover and bulb.
Check all connections. Start at one end of the line and work your way through. Are any connections about to be pulled through the pulley? Adjust as needed.
Keep the engine running or its battery will be drained dry. Even though the emergency brake is on, someone should be in the recovery vehicle applying pressure to the brakes. Now review the winch cable as it is leaving the winch. Does it leave at greater than a 15-degree angle? If so, it will start to pile up on one side of the drum, causing the cable to snag and possibly break that side of the winch. If you see the cable starting to pile up, stop winching. Disconnect the cable, pull it out manually, and wind it up neatly. Always start with your cable properly wound on the drum. Then, consider moving the recovery vehicle or pulley to decrease the angle of pull.

When you winch at greater than a 15-degree angle theres a greater chance of the cable rubbing or getting caught on the bumper of the recovery vehicle. There may be times when you have no choice but to winch at a severe angle. Just watch the cable closely.
As youre paying out the cable, remember the Rule of 5: Keep at least five turns of cable on the drum at all times (eight turns for synthetic cable because its slippery). If you dont keep a minimum amount, the tremendous force of recovery will pull the rest of the cable right off the drum.
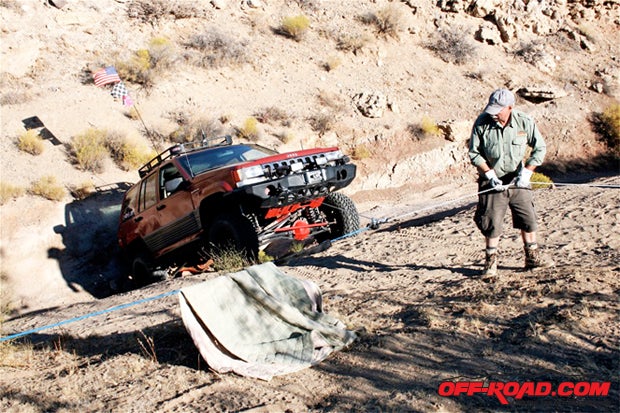
If you have a large blanket, toss it over the pulley (note the image at the the start of the story). Called a parachute by 4-wheelers, this blanket will absorb some of the energy should the cable snap.
Keep an eye on the parachute during winching. It has a tendency to ride up the cable. You dont need that jamming into the pulley or winch. Stop the winching if necessary to move the blanket.
Position spotters to watch the lines and pulley. (They should off to the sides of the vehicles. No one should be in the path of the lines.) Winch slowly, and pay particular attention to portions of cables nearest the vehicles. Youre watching for any binding, rubbing and twisting. Make sure, also, that the vehicle being recovered is behaving properly. You may need to stop the winching and adjust the whole arrangement.
As I mentioned at the beginning, this is just part of the entire winching process. Next month well review the corresponding steps, which take more of a strategic view.
Until then, good winching!
Badlands Off-Road Adventure
Off-road trainer Tom Severin shares insight and tips on a variety of topics related to preparing you for that next off-road adventure. With over 40 years of off-road experience, Severin operates under his business Badlands Off-Road Adventures. He is a certified professional 4WD Trainer by the International 4-Wheel Drive Trainers Association and a Wilderness First Responder (WFR). He is a member of the California Association of Four Wheel Drive Clubs (CA4WDC), United Four Wheel Drive Associations and the BlueRibbon Coalition. He also is a certified UFWDA and a CA4WDC 4WD instructor.
For more information about Badlands Off-Road Adventures, visit http://www.4x4training.com/.
|
Off-Road.com Newsletter Join our Weekly Newsletter to get the latest off-road news, reviews, events, and alerts! |
Follow @Off-Road
 Your Privacy Choices