Put it together:
After sanding and painting the dash to match my Jeep, it was time to put it together. The first fit-up showed how great the dash looks without a dash pad, so out the window went the idea to use the YJ dash pad, and no dash pad was the way to go! Also, it showed that the windshield hold down bolt holes are about 1" further apart on a YJ than they are on a CJ. Out came the dremel to drag the holes in the newly painted dash. This would be covered by the big hold-down plate, so, no worries. The new speedo cable needed a new place to enter the tub, as the existing hole was in the wrong place, and the cable wouldn't reach. Get the drill…
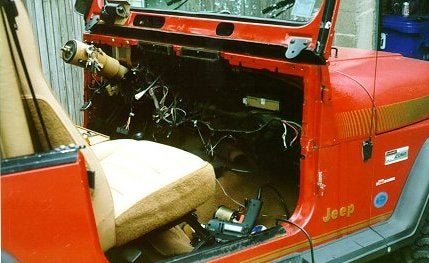 Otherwise, it bolted right in, and all holes
matched up, short of a couple where the defroster ducts are on the
YJ. My CJ dash also has no upper lip, so it doesn't mount under the
windshield. I don't know if they are all this way, but mine was.
Wire up the new gauges, drain some coolant to put the new temp
sender in, remove the old oil pressure sender and screw in the feed
for that, etc. Wiring was not fun, and there was a lot of it. I
took my time, and used all good-quality crimp connectors, fuse
holders, etc. No twist-and-tape here. Hours spent with the YJ and
CJ wiring diagrams, to find the sources of the directionals, 4
wheel-drive light, etc., and wire them up to the CJ components.
Dash lighting for the new gauges, etc., etc.
Otherwise, it bolted right in, and all holes
matched up, short of a couple where the defroster ducts are on the
YJ. My CJ dash also has no upper lip, so it doesn't mount under the
windshield. I don't know if they are all this way, but mine was.
Wire up the new gauges, drain some coolant to put the new temp
sender in, remove the old oil pressure sender and screw in the feed
for that, etc. Wiring was not fun, and there was a lot of it. I
took my time, and used all good-quality crimp connectors, fuse
holders, etc. No twist-and-tape here. Hours spent with the YJ and
CJ wiring diagrams, to find the sources of the directionals, 4
wheel-drive light, etc., and wire them up to the CJ components.
Dash lighting for the new gauges, etc., etc.Defrost solution:
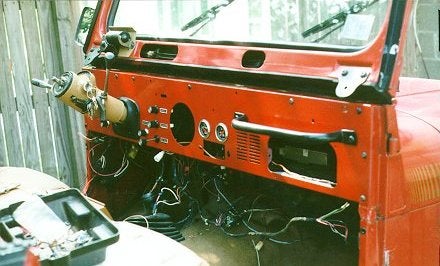
Seeing as I am choosing to not use the YJ dash pad, I need a solution for a defroster. I have heard so much about how the CJ defroster stinks, and considering the fact that it pumps the air into the windshield frame, and I'd have to cut the tub and the frame, and get a new defrost duct, I am choosing a different solution. Mechanical Engineer as trade, I drew up a 1" square aluminum bar, 23" long, with radiused ends, that will have milled ports to redirect the defrost air upwards to the windshield. This will be mounted to the top center of the dash, and will use the existing YJ ducting. Look at the picture of no dash, and you will see what this will be. As I write this, the stock is on the milling machine and the work is being done by my friend Dave in his shop. I can't imagine this would be any worse than a stock CJ system, and will be better sealed, though a little far away from the windshield.
 Wiper Motor and Cover:
Seeing as there is now no dashpad, the wiper motor is hanging from the windshield frame exposed. Looking at the CJ wiper motor, there is a nice cover that mounts to the backplate, the one that holds the VIN# on a riveted tag. The plates are different, however, and you will need a CJ backplate to use the CJ wiper motor cover. I got a backplate and cover from a junkyard (only found 2 in the whole place – these weren't easy to come by) for $15 (including some CJ windshield knobs, and a good supply of square heater control lights in case mine blow out). I removed the YJ wiper motor, and drilled out the 2 rivets holding the plate to the windshield frame. I drilled out the VIN tag from the YJ backplate, and pop-riveted it to the CJ plate. The plates are very similar, but slightly different in shape. The wiper motor mounts to it no problem (I hear they are almost the same?). Bolted it all up and I'm done. You also need to pull the small c-clip that holds the wiper linkage to the motor, and then get it back on – this isn't easy either, as there's not much room to work in.
Misc:
Taking out the YJ dash, leaves you with a few issues. On my 88, there is an "emiss maint" light. Having removed the unit long ago (when the light came on), the light seemed somewhat not needed. This may or may not be legal. I don't think it's an issue.
The "4 wheel drive" light also needs to be dealt with, so you'll know when you're having fun. On my CJ speedo, there is a small red light on the right side, and it says "emer drive". Seemed fitting to me. I wired the 4 wheel drive light to this.
Heater controls:
I used the stock CJ heater control cables, and mated them to the YJ cables that were already there. I simply disconnected the YJ stuff from the heater control unit, and connected the end of the cables together. The ends of all cables have a round twisted end, and I put a nut and bolt through that, and then used a clamp to hold the cables together. Seems to work OK, but on the little indicator lights, "push" may be "pull" or vice-versa. There may be a better way to do this, but if I can get heat and defrost, that's good enough for me. There is also a vacuum controlled something on the YJ, I think it's maybe a vent flap or something to do with the defroster. I haven't figured that one out yet, but the heat works.
If you have a newer YJ with injection and a "check engine" light, you may have more work to do with the lights from the old panel.
Putting in the CJ windshield knobs was fun. There is a taper on the big knob that was not on my YJ's bolts. If you take off the small plate that holds the windshield on, you will find the small taper on the plate on the BACK SIDE, and simply reverse the plate, and put the big hand knobs on. Sweet.
 Conclusions:
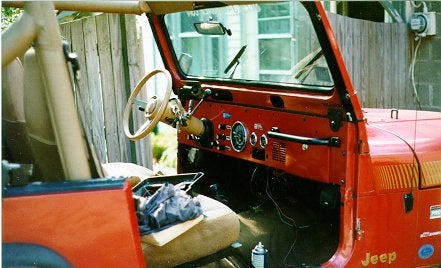
This is a great swap. I love it. Now I get to drive down the road in a CJ (almost). I love the big speedo and the flat dash, and the look of having no dash pad.
Overall costs were:
•Used dash with speedo: $125
•Autometer Gauges: $60
•Speedo cable $15
•Misc. (paint, wire, connectors, etc, etc, ) maybe $20-$25.
•Total: Approx. $200-$220
You could go with less expensive gauges, or play with sending units and stock gauges if you want to make this less expensive. I wanted the Autometers.
Good luck! Scott
If I still had my YJ, bet I'd be planning this conversion...and who knows...maybe it'll work in a TJ! I doubt it, but I've already seen a Scrambler with a TJ front clip, so I'm sure someone out there will find a way! Great job, Scott!
Email Scott Peterson with questions!
|
Off-Road.com Newsletter Join our Weekly Newsletter to get the latest off-road news, reviews, events, and alerts! |
Follow @Off-Road
 Your Privacy Choices