In our last article we stripped the Project KTM 380 dirtbike right down to the frame. Doing this allowed us to get a general inspection of all the major parts we removed. All signs of that disassembly and inspection pointed to a bike with parts that were in good to great overall working condition with only a few items in need of replacement. Previous to the chassis teardown we had removed the top-end to find the cylinder in excellent shape but still in need of a piston and a power valve cleaning. Now with the engine on the bench we have an opportunity to do a little more digging.
When a bike is left to sit for extended periods of time the seals can dry out and become brittle and prone to leaking. Not knowing how long the bike had been sitting with its previous owners we wondered what condition some of the seals would be in, specifically the crank seals. Brittle and/or leaking crank seals can suck air and transmission oil into the combustion chamber. If the bike is sucking air through a crank seal the crank bearing will often be toast in a short amount of time due to the lean condition. If transmission oil is being sucked into the bottom end through a bad crank seal then white smoke will usually be seen coming out the exhaust.
*As we step you through the process, some photos may be clicked on to show the detail in a larger image.
 |
 |
| Checking the seals does not require splitting the cases but it does require more disassembly of the engine. On the ignition side of the engine the flywheel and the stator need to be removed to get access to view the crank seal. We used a flywheel puller to make sure we didn’t damage the crankshaft threads or anything else. | While using the flywheel puller the engine is going to want to turn over, so to keep it in place an old trick is to place a penny in between the clutch primary gear and the gear on the end of the crank. The penny is softer than the gears and will jam between the gears and get a little smashed but will tie up the motor enough to break the flywheel loose. |
 |
 |
| With the flywheel off it is critical to take a photo, or at least a note, of the timing position of the stator.If this isn’t done and the timing is set incorrectly upon reassembly the bike may not run correctly or if it runs can cause damage. In our case we snapped a few photos of the stator so that we can make sure to line it up the same when it goes back on. | Setting aside the stator gave us a view to the ignition side crank seal which didn’t show any clear signs of leaking. One still can’t be positive but so far it looks like it was ok. |
One area on the 380 that has a history of issues is the kick starter system. Within the life of a 380, owners might experience the kick starter either slipping while kicking, not returning fully or just plain not wanting to kick through at all when trying to start the bike. This can be caused by the kick starter or kick starter shaft splines stripping out, the return spring breaking or the pawl spring getting weak and not ratcheting correctly. During the original test ride with the previous owner I recalled thinking the kick starter slipped a little once in a while when starting it, or at least felt a little notchy. Knowing this was a fairly common problem I wasn’t to worried about it and I made a mental note that I would be sure to check it out later when inspecting the engine.
 |
 |
| Removing the kick starter is the first step in diagnosing such a problem because it gives visual access to both the kick starter splines and the splines on the kick starter shaft itself. In our case the splines on the kick starter shaft were a little buggered up but there was no sign of the kick starter slipping on the shaft. | In order to investigate further the complete side cover needed to be removed to get a visual on the primary kick starter gear and return spring. To remove the side cover the powervalve adjuster needed to be removed along with the water pump cover which allowed an inspection of the impeller at the same time which looked fine. |
 |
 |
| Once we had the complete side cover removed, the kick starter return spring and the main kick starter gear appeared in good mechanical shape. | There were no teeth missing on the primary gear and the return spring was wound and anchored in place correctly. Looking to the right of the primary kick starter gear is the kick starter intermediate gear. The intermediate gear looked good so that didn’t leave us with an answer to our kick starter slipping issues. We went ahead and removed the bolt holding the return spring and set it aside. |
Page 2
Since our initial inspections didn’t find anything we needed to continue to investigate. The next steps are a little more complicated and the goal is to get to the ratcheting system located on the back side of the primary kick starter gear. This ratcheting system consists mainly of teeth on the inside of the back of the primary gear that work with the locking pawl to hold tension in the starter system. Often times if nothing else is wrong the $3 pawl spring can be to blame. After time the spring simply looses its ability to hold the required tension in the system, thus allowing slippage.
| The kick starter gear and shaft are connected together and in order to remove the gear and shaft for inspecting the ratcheting system the clutch needs to be removed first. This is not an overly difficult task but one that requires you to have the correct tools before proceeding. Removing the bolts on the outside of the clutch pressure plate will allow access to remove the pressure plate and all the clutch discs. Be sure to keep all of the clutch discs in order so they can be reinstalled correctly. |  |
 |
 |
| At this point the next step is to remove the clutch basket, which is held in place by a nut and lock washer that folds over part of the nut to prevent it from coming loose. This is the step that can make or literally break the job if you don’t have the correct tools. First, we used a punch with a large tapered end to bend back the lock washer keeping the nut in place. | Next with the lock washer out of way the clutch basket nut needs to be loosened, easier said than done. The two tools that generally lead to success are either an impact gun or a clutch basket holding tool. In our case we had neither tool so we borrowed an electric impact wrench that backed the nut off in no time without the need for the special clutch holding tool. |
| Pulling off the clutch basket gives direct access to remove the kick starter return spring as well as the kick starter shaft and primary gear. Make sure the bolt holding the return spring is removed if not already and the entire shaft and gear should slide right out. Visually everything looked fine on the ratcheting system so our best guess is that the spring has lost tension over the years and needs to be replaced to keep the might 380 kicking happily. At the low cost of approximately $3 is isn’t a bad idea to keep an extra on hand in case this happens again in the future. |  |
Now that the engine is half-way apart the idea of rebuilding the bottom end didn’t sound like such a huge job. In fact with the clutch off there aren’t too many more steps to reach the point of splitting the cases so we figured we would just go for it. We had come this far so spending a little more money and time to replace the crank bearings, lower rod bearing and seals wouldn’t set us back as much as it would to have to do this all over again. This is especially true if the lower rod bearing or a crank bearing was worn and ended up causing the motor to let loose and destroy our new top-end job.
 |
 |
We next removed the reed cage, which was stuck in place pretty good even though there were no gaskets. To get the reed block out a punch with a flat end along with a few light taps from a rubber mallet worked well. Do NOT to try to use a screwdriver to pry in between the reed block and cases! This can leave deep scratches and lead to air leaks later on. |
With the reeds out of the way we used our impact gun again to remove the gear on the end of the crank shaft. The nut holding this gear on is REVERSE threaded on this bike so you would not want to try and loosen it in the normal direction. With the nut on the crank loosened by the impact gun the gear pulls right off and the crank seal becomes visible. |
Page 3
 |
 |
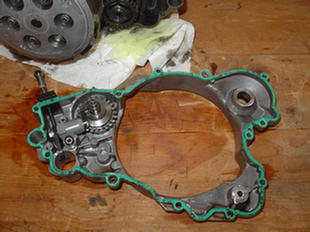
| To finish the job of splitting the cases we removed the shifting mechanism. This includes the shaft that runs through the cases as well as the shift drum. | Following up with removing all of the bolts that hold the cases together and we were ready to see if the cases would come apart on their own. |
 |
On this bike there is a gasket in between the cases but on other bikes there may be a sealant instead, which can really makes the cases hard to get apart. If that is case then using a case splitter is a smart move but lucky for us our cases came apart with a little effort. We made sure to slowly lift one-half of the case from the other and hold the transmission in place. There are a lot of gears inside and if they are kept in place it makes it much easier to keep track of where they all go. |
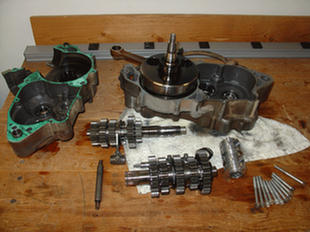 |
The transmission was removed in two stages and kept intact. All the gears really looked good with no teeth missing or bent shift forks. The crank was still stuck in one side of the cases, where it is more of a press fit onto that bearing. For now we are just going to leave it like that. From this point it will be best to hand over the cases to a professional to finish removing the crank, bearings and seals. The crank will be sent out to have the lower rod bearing replaced and trued while the seals and bearings will be replaced. |
Was all this work necessary? Well, from the looks of the condition of all the parts not really. It has been a long time since we have split two-stroke cases so part of this exercise was to just relearn the process and freshen up everything while apart. With the cases split we also have the opportunity to do some two-stroke case matching, change gear ratios around or even stuff the crank. We aren’t necessarily planning on doing all of this but are considering doing some of it. Parts are currently on order and as soon as they come in the cases and cylinder will be dropped off at the performance shop. Once this engine rebuild is completed we can have confidence that we didn’t skimp on anything that might catch us by surprise later. In addition we have gained a vast knowledge of the inner workings of the 380.
-et
 Your Privacy Choices