In our last article on Project 380 we introduced our 2 Stroke steed, covered the first ride impressions and then mentioned the desire to go through the bike to ensure its reliability. To find out the current condition of the motor we decided a top-end teardown was in order. This will allow us to find out firsthand the condition of the head, cylinder and piston as well as giving us a good feel for the overall condition of the motor.
Tearing down a top-end isn’t extremely difficult but there are a few things to think about and set aside before starting. First we made sure the bike was relatively clean, especially around the cylinder area being worked on. It doesn’t have to be perfect but the last thing we want is for dirt chunks or other debris to fall into the bottom end causing the need to split the cases when it isn’t needed.
The next thing to consider is how to keep all the nuts and bolts organized when removing them. It is really frustrating when trying to put a motor back together and having to dig through a box full of mixed nuts and bolts, not knowing for sure what goes where. Something to keep the parts, nuts and bolts organized in is a wise idea and simple plastic sealable bags that have the white strip to write on works great for this.
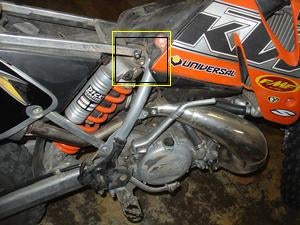
To begin we removed the seat and right-away noticed that one of the top subframe bolt was loose and ready to fall out. The reality is we should have checked all the main bolts on the bike before our initial ride but we didn’t and got lucky it didn’t fall out and cause any other issues.
 |
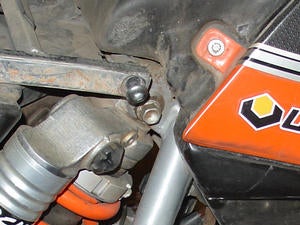 |
Instead of tightening the bolt back up and continuing we decided to just remove the subframe, then the tank and shrouds from the bike to make access easier to any part of the motor we might need to get to. With all that out of the way we had clear access to get started on the real work.

Before removing any top-end parts the coolant must first be drained from the motor and radiators. The coolant drain plug is located on the right side of the motor on the water-pump housing. Having a container and a big funnel in place before cracking the coolant drain bolt is highly recommended as the coolant can really come out with force once the radiator cap is opened.
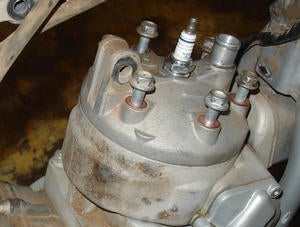
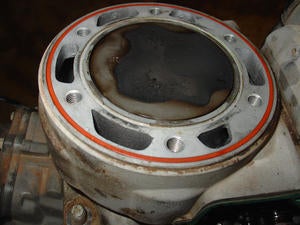
Once drained the bracket and bolts that support the head can be removed along with the head itself. The head should be checked for any damage, sometimes in the form of divots or pitting in the dome which could be caused from a previous failure of some kind. Our head looked great with no damage and minimal carbon buildup.
 |
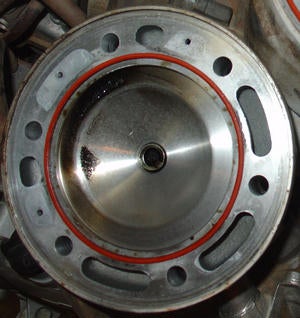 |
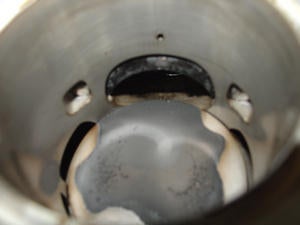
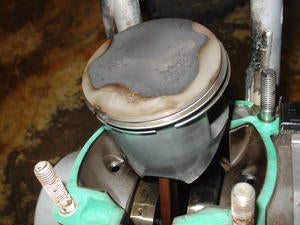
On KTMs it is important to find out how close the piston is to the top of the cylinder. Piston location in relation to the top of the cylinder is called the “X” dimension in the KTM manuals and for our bike should be 0, or flush with the top of the bore. In our case it was but in some cases one could have a piston below or above the top of the cylinder.
 |
 |
This “X” dimension affects the compression ratio as well as port timing and can be adjusted by using thicker or thinner cylinder base gaskets. A thicker base gasket will raise the cylinder and effectively lower the piston where a thinner base gasket will do the opposite. KTM sells different sized base gaskets to make sure that you get the “X” set to 0 upon reassembly.
Keep reading - you aren't done yet!
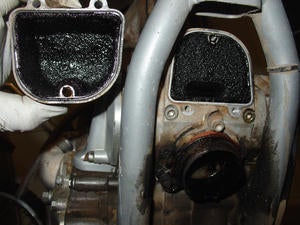
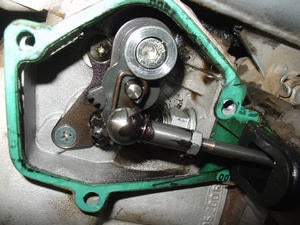
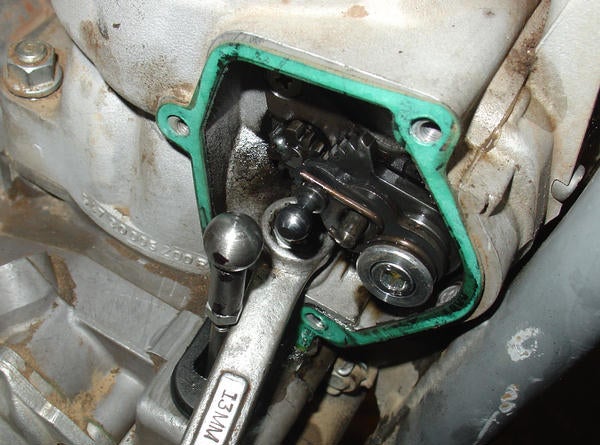
With our “X” dimension noted we moved onto disconnecting the powervalve assembly. First we removed the chamber at the front of the cylinder. KTM calls this it’s “Torque Chamber” and it is used to increase volume when the powervavle is in a certain range. Removing the chamber revealed a building up carbon and oil deposits both in the cover and on the engine side. It wasn’t the worst we had seen but it was certainly due for a cleaning. Next we removed the powervalve linkage cover off the right side of the cylinder which gives access to the actual linkage. At this point the clip holding the linkage arm can be removed, which is required before removing the cylinder from the cases.
 |
 |
The cylinder removal is the next step in the process. The base nuts can be a bit tricky due to how tight a few of them are, especially the one behind the powervalve linkage. In our case our 13mm box-end wrench fit all 4 nuts but depending on the wrench this may not be the case. An option if the wrench doesn’t fit is to grind it down or, if you still have the KTM bottle opener, it has a 13mm end on it that you can use with a drive to loosen the nuts.
Once all four cylinder nuts are off the cylinder can be gently removed, taking special care not to let the piston or rod smack around once the cylinder clears them. Ours came off easily but if it were to stick a bit then a few taps with a rubber mallet usually does the trick. Do not use a screwdriver to try and pry between the cylinder and the case, because if scratched or nicked an air leak can result after reassembly.
Last but not least is removing the piston from the connecting rod. The goal is to remove one of the circlips and then be able to easily push/pull out the piston pin. Often times though the piston pin does not come out easily in which case the second circlip can be removed and another attempt can be made to push the piston pin out that side. A good set of needle nose pliers usually works great for removing the circlips. In our case the circlips came out fairly easily but the piston pin did not. They make a piston pin removal tool which is highly recommended if reusing the piston. In our case we were not reusing the piston and used a combination of sockets and a C-Clamp to push the piston pin out. What should NOT be done is to use a socket and hammer to try and drive the piston pin out. While this may work it may also damage the connecting rod, connecting rod bearing on the crankshaft end and/or damage the balance of the crank, not good!
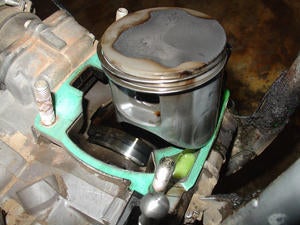
With our top-end disassembled a quick visual overview revealed the cylinder appeared to be in excellent shape. It had no gouges, no streaking, no visible damage and even the cross-hatch pattern was visible. The piston showed definite signs of wear on the skirts and some blowby around the rings in some spots but there were no deep gouges, scuff marks or evidence of seizing. The cylinder head had no pitting or gouges from previous possible engine failures and did not have a lot of carbon buildup. Overall with just a visual inspection it appears our Project 380 has not been abused, or at least it has been well cared for. Without doing measurements on the parts yet we still don’t know exactly how much the piston, rings and cylinder are worn.
 |
 |
Our next steps are to get things cleaned up a bit so we can team up with a few shops and discuss our current engine wear, current state of tune and what options we have to make improvements.
Stay tuned!
 Your Privacy Choices