IF YOU BOUGHT A SET IN 1973, IT MIGHT BE TIME TO FRESHEN 'EM UP
Nearly 25 years ago, I ran into a short, stout gentleman named Gil Vaillancourt. At first glance, he looked like an ex-prizefighter about 15 years away from the ring. Naturally, you are stunned when you find out he is not only a brilliant engineer, but a concert level violinist as well. It just doesn't seem to fit, but after a while, you forget about that visual disparity and listen to Gil talk about shocks.
Remember 1973?
Right around that time, we all rode bikes with four inches of travel in the rear. The stock shocks - in general - were wretched, so most of us opted for Konis, Curnutts or Cerianis. Then the long travel craze started, and confusion reigned.
We bolted huge coolers on those Konis trying to keep them from fading. Jim West, the Maico rider of that era, even went so far as to hand-craft an aluminum housing around his shocks and pack them with ice before each moto.
Gil didn't go through all that maddening rat race; instead, he simply made a great shock that worked. During the short travel/long travel transition, riders in the know bolted on a set of Works Performance shocks designed and built by Gil, and rode happy.
To this day, if you race a vintage dirt bike, you either slip on a pair of Works shocks, or work twice as hard as you should with something else. With the popularity of the new Evolution Series bikes (twin-shock, air-cooled machines), Works shocks have become an absolute must! Consider that bikes of this period ran around 12 inches of rear end travel.
Even though Works shocks are made from top quality materials, like anything else, they need freshening up every now and then. You can send them back to Works and let them do it, or do it yourself.
Follow along, and we'll show you how:
Step By Step:
 |
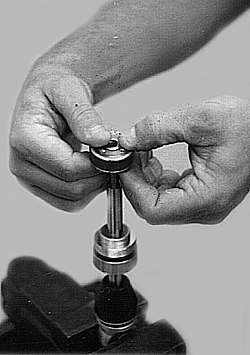
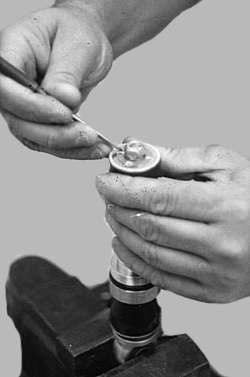
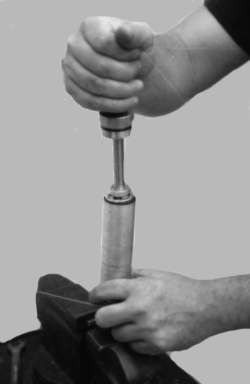
1:
In most cases, vintage bikes have spring rates in the 60 to 100 pound range, so the spring retainer can easily be removed by hand. Simply put the shock in a vise (at the shock eye, not on the body) and compress the spring by hand. |
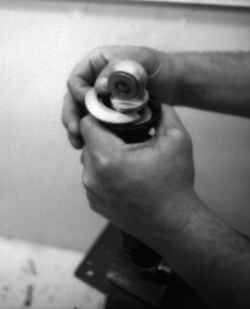 |
2:
A third hand will be needed to remove the retainer unless you're strong. |
 |
3:
On some models, the loose ring(s), or crossover spacers on the body inside the short spring, determine at which point the spring combo transitions form soft, to stiff. Stack them on a rod to keep the order correct. |
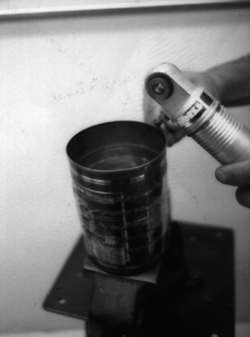 |
4:
Aim the shock at a container and release the pressure on the Schraeder valve. As the gas escapes, some oil will splatter out. |
 |
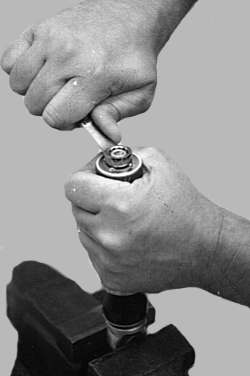
5:
Use an adjustable pin tool, or a special spanner from Works, to unscrew the cap. Threads are right-hand pitch and may take some force, or light tapping, to break loose. |
 |
6:
Remove the guts of the shock by rocking it gently as you pull it out. |
 |
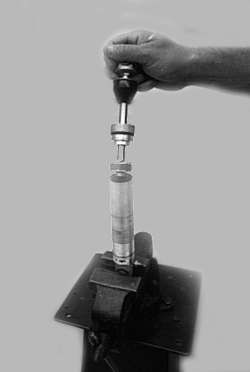
7:
Put the shock shaft eye in the vise, and then remove the nut that secures the damping piston on the shaft. |
 |
8:
Carefully remove the piston assembly in one piece, because all the parts inside must be kept in order. |
 |
9:
Slide off the rest of the pieces; stack them off to one side in order. |
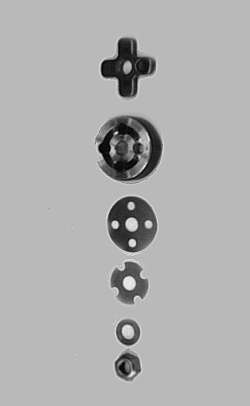 |
10:
Here's how the piston stack looks. From left to right: Star, piston, flapper (anywhere from one to three, depending on model), back-up, piston washer and piston lock nut. The dimple in the star indexes into the hole with no ball or spring. Rebound flappers have a slight cone shape and the concave side should go down against the piston face. |
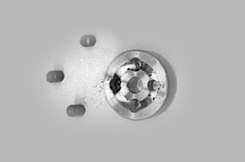 |
11:
Each spring (two on older shocks, three on later shocks) should be removed individually and identified to they go back on top of the ball in the same hole. The balls are all the same, but the springs have specific relationship to each hole size. On some shocks, a spacer is used to adjust the eye-to-eye length. It fits between the seal head and the piston. If there's a slight burr on the shaft shoulder, carefully use a light file to smooth that spot, so that the seals are not damaged during assembly. Don't nick or scratch the shaft, or the shock will leak. |
 |
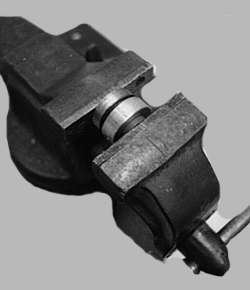
12:
Put the shock body back in the vice and clamp it down by the eye, then screw the seal head lightly back in the body. You can now easily pry out the seal with an open end wrench (5/8th inch or 17 mm works great); avoid gouging the inner surface of the seal bore, or the shaft bore. |
 |
13:
With a plastic or aluminum pick, removed the inner O-ring seal. This is the main pressure seal, so avoid scratching the groove. The outer O-ring should be removed with the same care. Clean all the parts in solvent and blow-dry them with air. |
 |
14:
The outer seal can be now pressed into place in a vice. Then lightly grease the O-rings and reinstall them. |
 |
15:
When installing the piston assembly and the shaft washer and nut, position the rebound flappers so that you can see the balls through the holes. |
 |
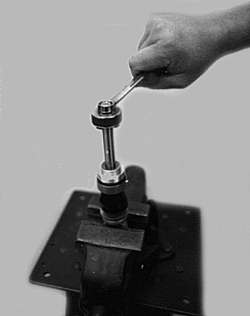
16:
Hold the flappers in position and tighten the shaft nut to 16 lbs. Double check to see that the balls are visible through the holes. |
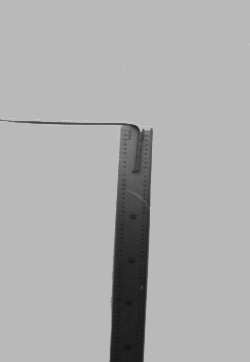 |
17:
Bend a piece of wire (coat hanger works fine) into a one-inch dip stick. |
 |
18:
With the bumper and seal firmly up against the shaft eye and the inside spacer down inside the shock, push the shaft assembly down to the edge of the shock body, and cock it over to one side. Pour shock oil in and fill to the level of your trick one-inch dip stick. |
 |
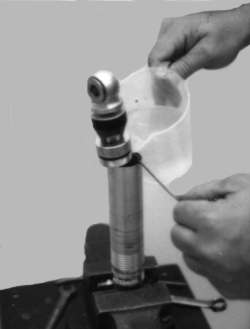
19:
Pour in enough shock oil (use Works shock fluid) to fill about a third of the body, then insert the assembled shaft with a gentle circular motion. Make sure that the threads on the body don't scrape up the piston ring. |
 |
20:
After screwing the seal head down and tightening, attach a proper air valve to the Schraeder fitting and pressurize to 250 p.s.i. dry nitrogen. Most shops will perform this service for you for a small charge. Wipe the shock clean and bolt it back up to the bike. With any luck, it'll last another quarter-century or so. |
|
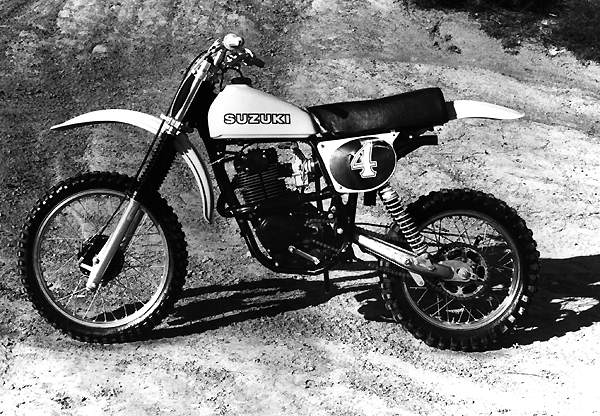
| Works will make shocks for special applications; all you have to do is send them all the vital information. This hybrid RM-framed Suzuki with a DR-370 motor built by the author got the Works treatment. Too bad the motor was such a dog. |
SOURCE
WORKS PERFORMANCE PRODUCTS, INC.
21045 Osborne St.
Canoga Park, CA 91304
21045 Osborne St.
Canoga Park, CA 91304
(818) 701-1010
|
Off-Road.com Newsletter Join our Weekly Newsletter to get the latest off-road news, reviews, events, and alerts! |
Follow @Off-Road
Buyers Guides
Visit Forums DIRTBIKE FORUMS
Copyright
VerticalScope Inc.

 Your Privacy Choices