Off-roading and other slow-motion, high-stress motoring tends to generate a lot of under-hood heat without the mitigating effect of airflow through the radiator to keep the coolant in a pleasurable operating range. That is bad. Some vehicles are rigged better to operate cool than others, but your fan arrangements can be augmented simply and cheaply. This is good.
We have a junkyard solution for you (with an essential bracket fabricated by our neighbor to simplify the installation on gen-three 4Runners and Tacomas) that will make second-generation 4Runner fans scarce, but therere plenty of them out there.

Weve been junkyarding for Toyota parts for years, first for the magical, hysterical Crawling Trucklet, then the gen-three 4Runner trail dog. We primarily hunt 4Runner and FJ stuff nowadays (FJ parts for Jaime Hernandezs excel-beater FJ40), but the eye still wanders to the classics, and the wealth of goodies weve come across would make any scavenger weep. In this case, the second-generation 4Runner has a couple of fans on it, and one of them (plus the relay and harness) is easy to remove, relatively modular to assemble, and can be adapted to almost anything, not only Toyotas weve got plans to do one of these on an XJ next.
Find the Fan and Affiliated Bits
Get yourself to a quality junkyard. Some get picked to death, so look for regular rotation of the carcasses. In this case, find a second-gen 4Runner (1990 96). We didnt research it, but every one in the yard (at least six) had the same fan arrangement and power block/harness in some state of disassembly. Our success was with the constant-on shrouded electric fan mounted on the passenger side of the radiator, wired as a pusher (and reversible). When you remove it, get the grommets and bolts too, and clip the wires so you get both ends of the plug and a few inches of wire to spare. If you manage to find both the fan and the harness on the same wreck, do yourself a favor and unplug the fan instead of cutting the wires. The staggered on-off relay arrangement Toyota used to power the fans will not be replicated when you wire the fan for switchable on-off so youll be changing wires, but a good mechanic always works neat.
 and for polarity so you know that the fan will blow your way.")
Its important to know how much room you have to work with (this fan hardware is modular enough to mount on anything), so know whatll fit before you strip the parts unless you do a lot of horse-trading with the guys. The fan, relay and parts for this project were from a gen-two 4Runner (were purists), but we could have grabbed a good electric fan from any number of import applications. The Toyota fan combo is sweetened by the affiliated relays and fuses and a good harness and power block (the relay housing), nearly universal and perfect for our needs. The Japanese and Koreans appear to use good electric fans: there was a quality-looking, plastic-shrouded unit on a wasted Montero, and a big mother fan was on a Honda minivan (the memorys fuzzy we find the junkyard to be overly stimulating on occasion). While youre hunting, remember that a good shroud is important for overall airflow.

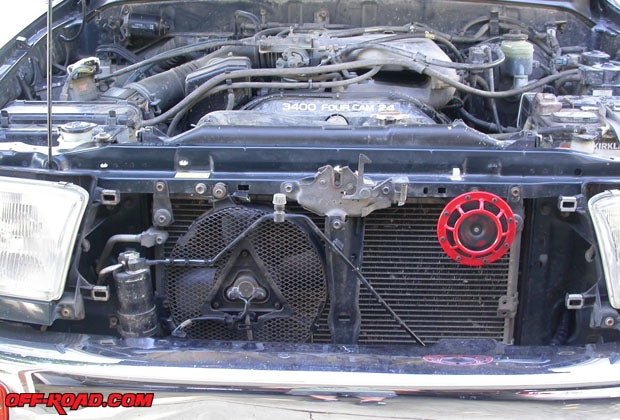
![] The fan is totally mounted, with the harness in place along the lower radiator support and through an opening in the radiator support on the drivers side of the truck (zip-ties everywhere theyre cheap). The second set of leads is hidden in the loom.](/images/content/04-DSCN8409_2.JPG "] The fan is totally mounted, with the harness in place along the lower radiator support and through an opening in the radiator support on the drivers side of the truck (zip-ties everywhere theyre cheap). The second set of leads is hidden in the loom.")
Some fans will have three wires, likely two speeds plus a ground, so make sure at least one works. Testing the fan is easy, and you must test junkyards dont do returns. When you hit the yard, bring two deep-cycle six-volt batteries with you. Wire them in parallel and with a few alligator-clip test leads, you can put power to each electric fan you find (most junkyards remove batteries make sure). Its important to verify that they not only work, but that when you swap leads, the fan will reverse directions. A pusher fan aint much good should it only pull if youve never been to a junkyard, ask a friend who has, or tune in to Off-Road.com for our Junkyard Toolbox story in the next month or so. Well have a good starter list of what tools you want with you at the yard when you head out to strip-mine the used gold.
The harness we used, which is located along the radiator core support (with two plugs and a ground), is well wrapped with plastic loom and runs from the aforementioned small power distribution block (which is marked with three small squares containing CDS FAN) on the passenger-side of the engine bay, and its removable. Its the passengers side in USDM 4Runners, the starboard side no matter where the steering wheel lives. That power block has a 30-amp fusible link sandwiched by two relays. Get the relays and link with the box if at all possible. Theyre pricey stuff, each relay costing about $60 new. The OEM 4Runner relays here arent the same, with one power-on and the other power-off. Bosch-type relays have a fifth prong that allows you to wire for either, but the OEM Toy units need to be specific. The Bosch relays can fit this relay box with a little engineering in the box. From the look of it (and if manufactured with wire thats appropriate), a relay-based auxiliary light harness would work about as well if you cant score sexy OEM parts like this gen-two 4Runner junk.
The only part used to fit this fan to our trail-beater 1997 4Runner that wasnt an OEM takeoff was a custom bracket that Super Fabrication Guy next door cut out of aluminum. Mark Fageols regular gig is high-end machining and custom Harley superchargers, but he said hed make more of these brackets for $20, plus a few skins for shipping. E-mail the author for where to send a check when you need one. The bracket makes cake of the installation for the third-generation 4Runner (and matching Taco), and Mark pre-threads the bracket for the OEM bolts.
Remaking the Fan Harness & Relay in your Mechanical Image
Theres some re-engineering necessary to make the gen-two 4Runner fan harness and power block work with switches, but its not rocket science. Well outline what you need to do, but there is some thinking necessary on your part. The Toyota relays and harness assembly is originally configured with two different relays set to operate the fans in sequence, or in tandem with a signal from the ECU (and we cant help you if you try to use it this way). You dont need the sequenced relays if youre using manual control, however, just the capacity to run both relays from the 30-amp fusible link (better than a fuse for constant power) to what youre powering.

You only need one wire going to a fan (which then goes to ground), but the harness had a second power lead that wasnt used, and we kept that wire in the loom, unused and capped, plus one for the ground that we sent back up the harness. That means three wires went to each harness terminus, one carrying power, one going back as ground from each terminus (both grounds linked at a single ring connector to consolidate grounds), and the third unused wire for later Justin-cases. Note: as manufactured, this harness has a few wires merged together, so track down the stragglers, remove them and seal the bare wire. Also be prepared to do some un-taping and re-taping.


The OEM relay block is internally arranged so as to adapt easily to any Bosch-like five-prong relays, or you can modify the relay port originally equipped with the oddball power-off relay to take a power-on Toyota relay. Youll need to juggle wires to do either, but we found it helpful to rewire the block from scratch. Follow this train of thought: battery power needs to get to the single fusible link in the center of the relay/distribution block first. From the link, fused battery power needs to split off and run to each relays power circuit (popularly known as the #30 connection on a Bosch-type relay). The other side of the power circuit (the switched side, #87) will then run to the fan (or whatever is being powered), which gets its own downstream ground. The 87a prong is for power-off, if you want the relay to send power when its not switched on.
Thats half of the relay: you will need to run a switch using something like interior power that operates only when the key is in Accessory or Run position. We routed juice from the lighter-power lead through a switch, and then to the relays signal circuit (which is what turns the relays power circuit on and off), #85 and 86 on a Bosch relay. The other side of that signal circuit runs to a ground - #85 and 86 are interchangeable. The relay is activated by passing a small electrical signal through it via that switch. Imagine flipping a wall switch in the kitchen the power of your finger tells the wall switch to power the lights. Remember, the OEM Toyota relays in this block do either power-on or power-off, not both.
Youll need female spade connectors, a few ring connectors, some tubing shrink-wrap, crimpers, a few butt connectors, and 12- to 16-gauge stranded wire (dont skimp). Also, buy relays not made in China the environmental damage caused by Chinas electronics-manufacturing industry is epic (and not in a good way). If theres one thing you learn this year, its that mountain bikers hate off-roaders. Make that two things: relays. Read about how relays work and how to use them for lighting, fans and other high-current applications. Their functionality is so straightforward that youll wonder how you ever did automotive wiring without them.

While at the junkyard, another 4Runner part popped up and proved useful the rear-heat blower switch that lives in the center console facing the rear passengers. Its a two-speed switch, but it can be wired to run one speed (cant put two speeds through a standard relay), and has a nifty fan logo on it. It plunked right in to an unused Toyota dash port in our gen-three 4Runner, too, but it would be easy to carve out a rectangular hole in a flat section of dash of any vehicle. Remember to get both ends of the plug. You can also wire an LED in parallel (it cant carry the signal, or the resistor will keep the relay from activating, but it can be sistered into the plug). Poke that LED through some conspicuous spot in the dash to keep you aware that the fans still sucking power while you cool things down with the engine off. Companies like Digikey (digikey.com) sell pre-wired LEDs for this sort of use, in about 50 different configurations.

Wire Need Clipping, Loom Needs Zip-Ties, Bracket Needs Bolts
Hanging the fan in front of the third-gen 4Runner radiator meant a slight bit of rearrangement on the passenger side of it, loosening an A/C condenser line, hood-latch reinforcement and removing one of the horns to get the fan in place. The A/C parts and reinforcement were returned to their OEM position once the fan was affixed, though a small length of rubber tubing was wrapped around the A/C line to protect it. A hole went into the upper radiator support for a bolt run through an OEM isolator grommet, and the neighbor-bracket used to secure the bottom of the fan to the lower support got two holes and two lock-nutted bolts once we figured out how the fan should line up. We reroute the fans OEM plug harness a tad, but well within its range of movement. Dont spare the zip-ties secure parts to avoid them interfering with each other.
Mounting and routing the relay/power harness was simple on the gen-three 4Runner. Several auxiliary box hanger slots adorned the engine-bay fuse box, so we just parked the gen-two relay block on the side of the gen-threes extant fuse/relay box. Its as if it belonged there even the fonts match. Using a factory opening in the radiator support, the reengineered loom runs from the relay block to the lower radiator support without drama, and it has enough slack to make cinching things into place a cinch. The selfsame relay box and harness are ideally shaped to be fitted to almost any engine bay as we said, were doing this treatment to an XJ next.

Running the switched power for the relay signal was tricky so long as we couldnt find the lighter wire at the cockpit fuse panel our schematic was for the wrong year 4Runner. Duhhh. With a vampire clip (sloppy ordered some piggyback fuses for the next time), we sucked juice from the 15amp ACC-on lighter wire, ran it through the OEM fan switch (yay, junkyard parts!) and through the convenient rubber-booted opening in the port side of the firewall. Use a piece of heavy sheathing, the kind that Toyota employs all over the place: route the sheathing through the firewall boot, and you can run this particular fan-relay signal wire and more to the engine bay through it, with no more than a spritz of WD-40 necessary to ease a new wire through the tube. When trimmed long enough (leave plenty of length on both sides of the firewall), that sheathing can carry several switch wires right to the relay block or elsewhere.
All told, we laid out about $25 bucks. The fan was $15-ish, the switch, relay and harness cost about $10 (plus taxes and fees California sticks it to you every way they can). Everything else was leftover 4Runner or Rav4 bits like grommets and wire sheathing, plus a sampling of the bottomless pile of Subaru bolts in the garage. The neighbor fabbed up a killer bottom bracket, sure, but its our gift to the 4Runner universe: hell make another when you want one.
|
Off-Road.com Newsletter Join our Weekly Newsletter to get the latest off-road news, reviews, events, and alerts! |
Follow @Off-Road
 Your Privacy Choices