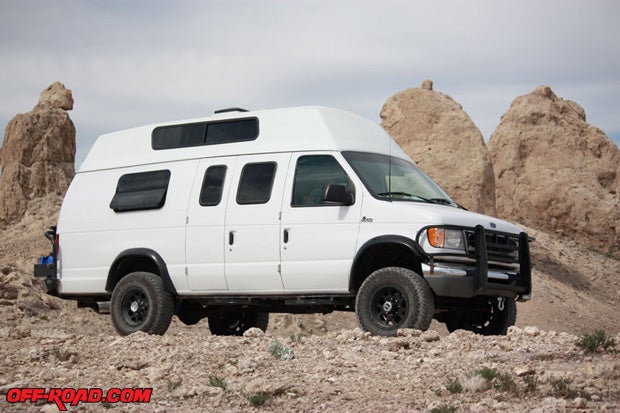
In the last article we left off having just driven the Project Motovan back from Colorado to California. It was the first real snow of the season in the Rockies followed by some nasty rain and wind storms through the rest of Colorado and parts of Nevada. The van handled the harsh weather much better than expected, with the weight of the diesel engine and 4x4 running gear probably helped to keep the van stable in the high winds with our tall hard-top. In addition, the 7.3 diesel, although louder than the V10, has been fantastic and loves the highway or slow off-roading.
Other Project Motovan Stories:
Project Motovan, Part 4
Project Motovan, Part 3
Project Motovan, Part 2
Project Motovan, Part 1
As I briefly mentioned in the last article, the van didnt have a perfect maiden voyage home after its conversion. In fact, upon arrival at Colorado Camper Van to pick up the van I was a bit shocked when I walked into the shop expecting to get a walkthrough and training session but was instead greeted with much of the interior torn apart and Derek Weber still feverishly working. A sickening feeling came over me, especially after having already given Derek a few extra weeks to finish the van. After asking a few questions I learned not only had the heater/AC unit not been hooked up yet, but the majority of the electrical items hadnt even been tested.
While Derek continued to work on the interior I walked around the van looking at some other items, stopping at the National Luna Dual Charging brain and solenoid mounted under the hood. Immediately I noticed he was using the chassis as a ground for the system and recalled from my reading the instructions it says in big red letters not to use the chassis as a ground. Knots starting to form in my stomach what have I done? Derek looked at the instructions, thought it shouldnt matter, but went ahead and ran some extra wires for me anyway.
Long story short, around 40 miles from Dereks shop on my way back to California I noticed the needle on the battery gauge on my dash dropping. I pull off the road and turn off the van but it wont restart kind of figured that. Call Derek and after first telling me to go to the nearest auto parts store to have the alternator tested (yeah, van is dead and too heavy to push) he agreed to come out. The problem turns out to be there was already an isolator on the van for charging a second battery, and when Derek removed that he ended up hooking the direct alternator feed to the National Luna system with nothing making it back to the van batteries. We examined under the hood, Derek went and picked up a couple wire ends and we had the van going again but the National Luna system showed no signs of life. At that point I was way behind schedule and needed to get going for my cross-country drive home.

Once I had a spare minute after returning home I started troubleshooting the National Luna system. Seeing the brain and solenoid held on by one screw under the hood and the power wire running right next to the steering column didnt give me a warm feeling. Then, after spotting a black wire being used as positive/red wire at the house battery I had enough and ripped the entire system out of the van. Despite having a serious lack of free time at this point, I was determined to do it right over the next month or two, 10 minutes at a time. I have to give a hand to Paul from Equipt for working with me over email and the phone to figure out the issues. Turned out the Brain circuit board, the solenoid and even the display circuit board were all fried. I am happy to report after replacing pretty much the entire system, re-running all the wiring as per the instructions and using protective loom it is working trouble-free.
Electrical issues aside, Project Motovan has many great aspects and the interior layout is turning out to be very functional. There is a lower bench seat that pulls out into a double bed. The nice feature is that it that can be left in the couch position for sitting a few people or sleeping one person. This is a nice option because it still leaves a walkway down the length of the middle of the van.
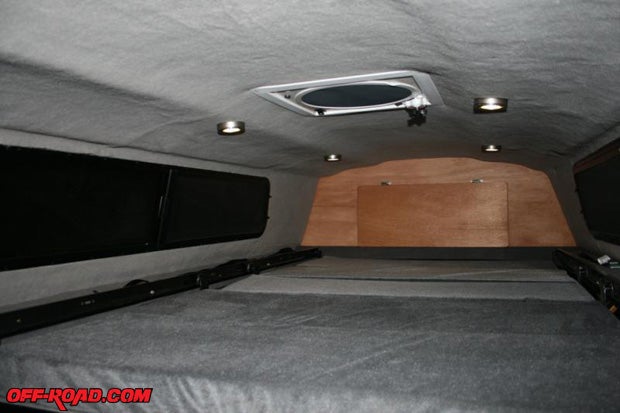
Up top, Derek came up with a very creative fold-away bed. When folded up it stows above the stock bench seat and does not take up any extra living room. If you have someone that wants to use that upper bed it can be folded out and sits low enough to be able to sit up if leaning over. With both beds folded out you can sleep two easily on each bed and then a child or willing person could still sleep on the stock bench seat as well. A very flexible layout, points to Derek on this one.

There are six LED puck-style lights placed along the ceiling that do a pretty good job lighting the interior as long as the upper bed is folded up. When the upper bed is folded down however a few portable LEDs down below are needed. Appliances consist of the National Luna Weekender Fridge/Freezer combo, a microwave, sink and inverter. There is also an approximately 25-gallon fresh water tank and then an Underbunk heater/AC unit under the rear couch. The heater is an Espar D2 Diesel heater that works off of the 12v house battery and diesel fuel from the van. The AC unit puts out 9200 BTUs and is powered by either shore 110v power or off of an 110v generator. There is also a charger that plugs into shore power to keep the main 4D house battery charged.

Although I had some issues with some of the electrical work Derek at Colorado Camper Vans did, he did a great job on the mechanical items, windows and insulation that we have already covered. He is a super nice guy, honest and I do believe he wants to build a great van and have a happy customer. Derek reimbursed me for a ding he accidently put in one of my doors and sent me a few pieces of wood trim he didnt quite finish. He took a chance on starting Colorado Camper Van and I was Dereks first real van build, and Im sure the level of detail will improve over time. For our build a local company would have been much smarter, especially when taking into account the cost of travel.

Let the adventures begin. A few weekends after returning home I attended a meet and greet for a few local Southern California van owners at the Hungry Valley recreational vehicle area. There were about five vans in various states of build, and even a guy who showed up with future expectations of being a van owner. Everyone spent the first hour or two checking out each of the vans, discussing mods and future plans. After the inspections, a few guys decided to hit the 4x4 test area and run the climbs. Chris from UJOINT Off-Road was visiting from out of state and showed off the suspension articulation and approach angle on his van in the test area - very impressive.
After riding in Chriss van on the 4x4 course, I gained an appreciation for his suspension system. The Project Motovan Quigley 4x4 conversion uses Coil springs where Chriss setup uses a leaf spring design. I honestly dont know enough about the differences, nor do I have enough experience with comparing each setup, to draw any conclusions on what setup is better. Over the years though I have heard the old saying that coil springs are better for highway driving and leaf springs are better for serious off-road work, true or not I dont know. What I do know is the Quigley setup only offers 2-3 inches of travel before hitting the bump stops up front, whereas the UJOINT setup offers up to twice that depending on the setup. With no desire or budget to even consider such modifications I opted to replace all the stock shocks on the Project Motovan in hopes of improving the on- and off-road performance. Doing some Internet research put me in touch with Bilstein, and after talking with a sales rep they were able to suggest specific shocks that were valved for my application. I noticed an immediate improvement on the reduction of wandering on the highways and much more control over bumps.

When brainstorming locations for the first shakedown campout in the van I came up with a thought. Why not host a camp out, not just a day trip, with other camper van owners? That way I could get to know some new people, check out more camper vans in person and soak up any ideas and advice I could gather. The first actual campout took place in Southern California at Bolsa Chica State Beach. While in no way remote, it was a great place to enjoy the beach and get a chance to camp in the van while being close to society in case I needed something. We had about five or so vans actually camp out and somewhere around 12-15 come by during the day. With great people, a variety of vans and great weather right on the beach it was a success.

One thing worth noting was that out of all the vans I walked through I feel the layout of my build is by far the best for its intended use. Some vans had a ton of cabinet space but felt so tight I wouldnt want to spend much time in them. Others were more open but just not as overall functional in the layout. What I really like about the Project Motovan is not only is it very open and roomy feeling but I can sit on the lower bench seat and reach the sink, counter and the fridge/freezer all without getting up. This doesnt sound like a big deal, but it sure makes it easy on your back after a long day of riding, or waking up first thing in the morning. The beauty of building a custom van is that each owners needs are a little different and you can build the van to meet your needs.
Sadly, one thing I did learn from viewing all of these different vans and talking to the owners is the fact that many of them also had issues with their builds. Some of the vans that cost three and four times as much as what we have into the Project Motovan were taken back to their official builder more than once for rework. From what I witnessed, quality control does not seem to be a strong point on many of these van builders. There was one van owner who really had a quality build by a place called RV Interiors (RVI) in San Diego. After talking with the owner of the business, discussing ideas and seeing more of his work I know who will be working on my van interior in the future if needed.
On the bright side, I have had great success and been very pleased with some of the vendors whose products I have purchased for the van. The first was Dave from Aluminess, whose company makes custom Aluminum bumpers for trucks and vans. For Project Motovan we purchased their rear bumper with a gas can carrier on one side and the deluxe box on the other. This allows quite a bit of extra storage for items that you dont need to keep inside the van, or dirty items like muddy gear that you want to keep from messing up the inside of the van. The bumper itself also offers storage where we have been storing various things on trips like jumper cables, a tow strap and tie downs. Service at Aluminess was great and their product has been a great addition to the functionality of the van.

The second vendor who deserves some praise is Joe from Joe Hauler Motorcycle Carriers. A friend of mine purchased one of Joes products a few years ago and was very satisfied with the quality of the product and the fantastic service. In fact, upon receiving the first hitch carrier he decided he wanted to upgrade to the more heavy-duty carrier because he had just purchased a KTM 990 Super Enduro. Joe actually took the original carrier back (undamaged of course) and sent out the heavier duty version which has been working flawlessly ever since. Because of my friends great experience, I contacted Joe to see about building a custom carrier for the van that would clear the storage box on the Aluminess Bumper.

Joe invited me down to his shop near San Diego where he took measurements and discussed different layout options for me. We decided upon going with a carrier that would hold my KTM 525 Dualsport bike, along with a couple of gas cans and utilize his cam lock setup to reduce sway. Since Joe has been in the business for many years and also has Engineering in his background, I felt comfortable with his decision to go with just one hitch mounting point on the bumper, as opposed to having three like I have seen on some custom setups. Joes reasoning was that some flex was good because he has actually seen a frame break from the carrier being too rigid with multiple attachment points. While at his shop, he also helped me install a front bumper hitch for carrying either another bike up front or a storage rack.
After purchasing the bumper and Joe Hauler motorcycle carrier it was time to head out for some real off-road adventures in the van. I took one outing to the Trona Pinnacles where there was not another sole camping that night. Although the weather was 33 degrees outside at night, the Espar D2 heater kept it a nice 67 inside the van at around half-way on the dial. I didnt bring the bike on this trip but did pack the Aluminess box full with a BBQ and other supplies. It swings out of the way and still allows access through the rear doors, which proved very practical when needing something from the fridge. All in all a very memorable camping trip for the vans first off-road adventure.
The next outing was out down to the Salton Sea to an RV campground called Glamis North KOA to meetup with my cousin from Arizona. There the temps were in the 90s, so I plugged in the van to the provided hookups and fired up the AC. While the AC puts out plenty of cold air it does so with just one vent, but luckily it is right by the bed so that part of the van stayed cool. The KOA was great featuring a restaurant, pool and mineral baths. I came back to this place again later for a dirt bike get-together where I was able to try out the Joe Hauler carrier. With the exception of a little flexing on a bumpy road that caused the handguard to touch the top of the Aluminess box, I found the rack to be perfect for my needs. The best part is I am not restricted to doing only 55 on the freeways like those towing trailers.

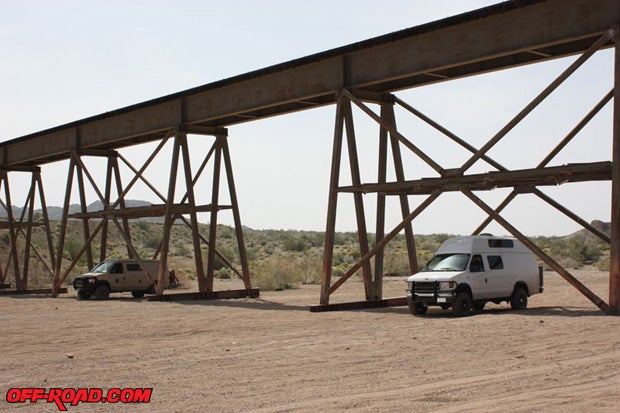
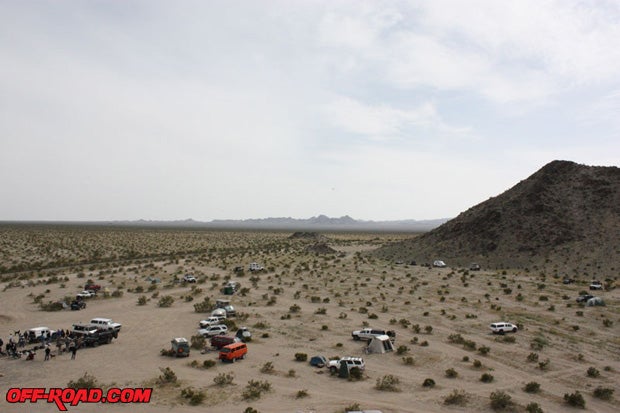
The most interesting off-road campout so far had to be for the Expedition Portal So Cal get together also down by the Salton Sea. My dad was in town from Australia so he and I followed another van buddy off-road along the outskirts of the bombing range while we made our way toward the campsite, where 50 other off-road random vehicles were gathering for the weekend. Stopping along the way we checked out a few different sites, like, the old train trestle and the pile of dummy bombs. Very cool weekend meeting lots of new people, seeing all kinds of expedition vehicles and even enjoying a delicious complimentary meal cooked fresh by Overland Gourmet. I even hitched a ride in a Pintzgauer for part of the day and witnessed Harrier jets buzz our camp two days in a row.
Upon arriving at the end of the dirt road leading out of the desert, we got lucky and ran into a service truck driver who graciously aired us both back up before we hit the highway for a bit to check out an old rock cabin known as the Hotel California. Leaving that place we ran across some stranded bikers who needed fuel, so my dad and I chatted with one of the guys while my buddy drove the other guy to the nearest gas station. Project Motovan is about experiencing adventures and creating memories with family and friends. Whether the dirtbike is attached or not, the Motovan allows a new sense of freedom to escape off the beaten path, away from the everyday city life. I like it.
Sources:
Aluminess Products Inc.
http://www.aluminess.com/
Colorado Camper Van
http://www.coloradocampervan.com/
Joe Hauler
http://www.joehauler.com/
Bilstein
http://www.bilstein.com/
Equipt Expedition Outfitters
http://www.equipt1.com/
Other Project Motovan Stories:
Project Motovan, Part 4
Project Motovan, Part 3
Project Motovan, Part 2
Project Motovan, Part 1
|
Off-Road.com Newsletter Join our Weekly Newsletter to get the latest off-road news, reviews, events, and alerts! |
Follow @Off-Road
 Your Privacy Choices