Yeah, yeah, I know we already used it!
But, damn it looks good!
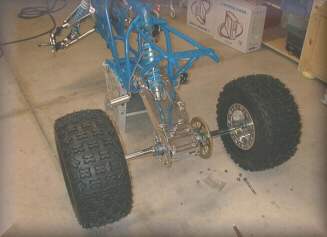
*Those HoleShots and reinforced wheels from ITP will stand up to anything the desert can dish out!
With the front and rear suspension bolted up, we are ready to install the rear axle and make this an actual "rolling" chassis! A "must do" modification for any hopped up 'Zilla is a wider rear axle from Dura Blue. We chose their +2" axle for the dunes. With it's lifetime guarantee against bending... If Pat can't bend this at his dainty, little flower weight of 260 something pounds then you know it will last the rest of us forever! Before you assemble the rear carrier be sure to clean it well and replace the bearings and seals. Rear axle bearings are a VERY HIGH FAILURE component on the LT500R and will require frequent replacement. Signs of impending failure are obvious... That load squealing noise coming from the ass end when you let out the clutch should be your clue!
*Prior to replacing the bearings I prefer to install a zerk fitting in the rear center of the carrier (between the chain adjuster studs) so that it can be greased periodically...
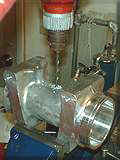
Drilling for the zerk
fitting.
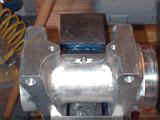
Finished zerk fitting.
*Disclaimer: Drill the hole before you install the bearings!
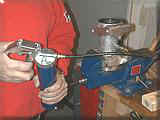
Our carrier was trashed (along with every other moving part, duh!) and was replaced, thanks to Yamaha-Suzuki of Arizona along with new bearings, seals and adjustment studs (also prone to failure).

A little heat for the carrier...
While the bearings are
cooling overnight in the
freezer...
After you drill for the zerk, heat the bearing boss of the carrier and the frozen bearing will slip in with a minimum of effort, insert the large tubular spacer (pre-greased). Then install the second bearing in the same fashion (remember to glob some grease into the bearings before you press or drive them in... AND DON'T FORGET THE SPACER!
After you get the bearings in start globbing in the grease... I like one of those cheap paint brushes used for solder flux, etc. You cannot have too much goo here, these bearings love to burn up... After you work in the grease, wipe it from the very lip of the bearing boss and install the seals.
Then try out that new
zerk!
*Do not
install the chain adjuster studs yet!
With the carrier assembled. We are ready for the
axle...
|
Off-Road.com Newsletter Join our Weekly Newsletter to get the latest off-road news, reviews, events, and alerts! |
Follow @Off-Road
 Your Privacy Choices