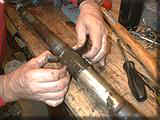
VERY IMPORTANT! You will need the circlip from your stock axle! Do not throw this away! It centers the axle and proper alignment without it is almost impossible to achieve. Also the clip IS NOT AVAILABLE FROM SUZUKI!
Install the clip on the new axle while it is held securely in a vise (gripped at the very center where there are no splines!). This is the brake side of the axle...
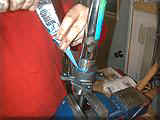
Brush a light coating of grease inside the
sprocket and brake rotor hubs.
Slide the brake rotor hub down against the circlip, then lay a healthy bead of silicon around the outer lip before you run the large axle nuts down and torque then to spec.
Seal the outside of both the sprocket and
brake rotor hubs with silicon RTV.
Now you can bolt on the brake rotor... We chose one from "Braking" for it's good looks, light weight and greater strength than stock.
Slide the carrier into the swingarm, drop the four big bolts into place through the large oval brackets that serve as washers and a guide for chain adjustment (we chromed ours). Install the rear brake caliper mount (chromed as well) and large snap ring, feed the axle through the carrier from the right side of the machine.
Install the sprocket hub in the same way as the rotor hub, using silicon RTV. Followed up with the MONSTER 630 Sidewinder Aluminum Sprocket from Krause Racing...
Krause Racing's 630 sprockets dwarf the
stock steel unit!
TIP: A really big prybar, or extension, etc. stuck through the sprocket, boxed end of the swingarm and the brake rotor will allow you to tighten even the most stubborn of axle nuts.
Blue LocTite (semi-forever)on the chain
adjuster studs.
Note the two nuts locked
together.
The trick to installing the chain adjuster studs is to lock two nuts together to get the stud threaded down good and tight, use blue LocTite and let it harden over night before you split the nuts apart and install the end plate... Chromed of course!
Red LocTite (forever) on the wheel
studs.
Super-trick aluminum hubs with steel axle splines are from
Graydon-Proline.
With the Graydon-Proline hubs installed we are ready for the wheels and tires We chose ITP's HoleShots and heavy duty reinforced wheels for doing battle in the rocky and rugged terrain that surrounds Las Vegas' city lights... Then the Baja swingarm skid from DG Performance to protect our Krause sprocket and Braking rotor...
Great looks, incredible strength and light
weight!
Well there's the basic rolling chassis! Looks like our Quadzilla is starting to take shape. We have a lot more work before our chassis is fully functional. We still have to bolt on all the brake hardware and steel braided lines, controls cables, wiring, etc. But at least we can roll it around the garage now... And out of Mom's way!
Join us next month when we get back at
the engine and it's reassembly!
Back to Page Three
|
Off-Road.com Newsletter Join our Weekly Newsletter to get the latest off-road news, reviews, events, and alerts! |
Follow @Off-Road
 Your Privacy Choices