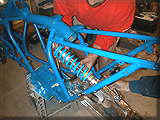
The ass end of the
Suzuki LT500R is a work of art. Compared to the tired old garbage
that Yamaha shoves down the throats of it's customers year after
year, Suzuki put quality and state of the art engineering into the
rear suspension of their high performance ATV's...
Assembling this complex floating suspension is tricky, again I stress you will need the manual!
Before we started assembly the swingarm was sent out for polishing to a mirror finish. I recommend against chroming this piece, the aluminum arm does flex and chrome plating will likely pop and crack. Polishing the swingarm will be a high maintenance routine, but good looks always come at a price!
Assemble the rear cushion lever bearings and seals per the shop manuals directions. Be sure to use that water-proof grease liberally! Our cushion lever was missing from the baskets of parts we received from the "Squid". A replacement was provided be Neanderthal's Cycle Salvage as well as a swingarm to replace the abused and badly cracked one that came with our bike.
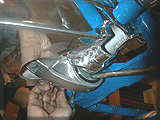
Now... Here's the tricky part!
Using compressed air to clean out the
recessed mounting points.
Before starting clean the swingarm mounting points thoroughly!
Driving in the Bushings.
Using an extension to install the inner
bushings and seals.
Using the appropriate sized sockets, tap the swingarm bushings, then lastly seals into place. A long socket extension inserted through the swingarm pivot makes it easier to get straight shot on these delicate parts. After the bushings are installed work some grease into them before you tap in the seals.
Now that you have the bushings in, we are ready to install the rear suspension!
Before fitting the swingarm into the frame,
bolt the cushion lever in place. Be sure the bolt is inserted FROM
THE RIGHT SIDE! The swingarm (shown in place) is notched to clear
the head of the larger nut on the left side.
Install the cushion lever first, with the greased bolt inserted from the right side, torque to spec. Place the swingarm in the frame, then slide the greased swingarm bolt in FROM THE RIGHT SIDE!

Swingarm bolt installed.
Do not put the swingarm nut on at this time, the pivot bolt will need to be partially removed later to install the engine!
Allow the swingarm to drop all the way down and lift the cushion arm up and through the swingarm.
Installing the Works Performance rear
shock.
Lining up the lower
mount.
With the cushion lever raised, slide the rear shock in from the front, as shown in the photo. Insert the greased bolts into the LOWER SHOCK mount from the RIGHT SIDE, the UPPER SHOCK mount from the LEFT SIDE, and torque to spec.
Note: Be sure your rear shock is positioned with the remote reservoir fitting at the top and facing forward.
Rotating the cushion
drum.
Last step! If you followed the directions it will slide right together... If you didn't your linkage will be all bound up!
Rotate the cushion drum so the offset bushing is at or near top dead center, raise the swingarm slowly and using a line up punch rotate the drum until the holes line up. Then install the large cushion lever bolt from the LEFT SIDE and torque to spec.
Again, if the proper steps aren't followed in won't go together or the suspension will bind, possibly causing severe damage. BE SURE TO CHECK YOUR WORK!
Now let's hit the last step... The rear axle.
|
Off-Road.com Newsletter Join our Weekly Newsletter to get the latest off-road news, reviews, events, and alerts! |
Follow @Off-Road
 Your Privacy Choices