We have a ton to cover
here, so I'm gonna stick to the tips and tricks that will save you
time and aggravation. If I haven't mentioned enough times
already... You should have your trusty manual close at hand to
refer to!
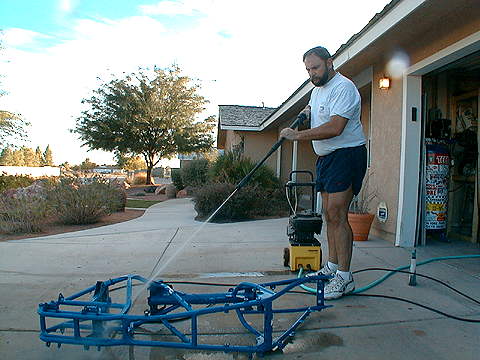 |
| Before starting the frame was pressure washed and repainted. |
We chose to paint our frame as opposed to powder coating. While powder coating provides a better corrosion barrier it is prone to oxidation and "sand blasting" in the dunes, and looses it's luster quickly. Since our project 'Zilla will call Las Vegas it's home, corrosion issues are negligible. Those of you in wetter climates may want powder coat to protect your investment.
Myself, I chose to chrome my entire frame on my 'Zilla, but I'm a devout Glamis squid...
 |
| Assembled front suspension, Featuring Works Performance shocks with remote reservoirs. |
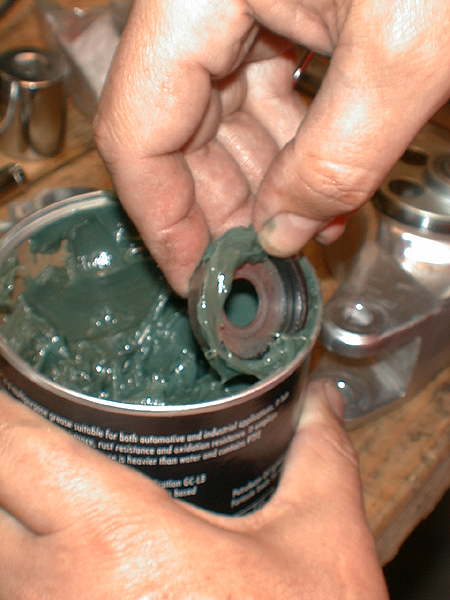
Assembling the front suspension is pretty straight forward, and well outlined in the manual. The main thing I want to cover is that you need to use copious amounts of water-proof wheel bearing grease during assembly of the A-arm bearings. These are comprised of bearing cups that are pressed or driven into the A-arm ends, loose needle rollers that must be held in place with grease for assembly, and a tubular bushing shaft.
NOTE: If you chromed
your A-arms like we did, the bearings may not want to be driven in
due to plating material in the A-arm ends. DO NOT FORCE THE BEARING
RACES WITH GIANT HAMMERS!
Instead... Bake the arms for an hour or two at
250º (any hotter will discolor the chrome) in Mom's oven and
freeze the bearing races over night in the fridge. They should
slide in a little easier.
DISCLAIMER FOR MORONS: 250º metal will burn the shit out of your bare, unprotected skin, handle the hot A-arms with the proper safety gear and great care! You have been warned!
Before you begin reassembly be sure all your parts are clean and organized. That you know what goes where and you have a torque wrench to properly tighten these important fasteners.
 |
 |
 |
| All suspension parts that were to be reused, such as shafts, sleeves bolts, etc. were thoroughly wire wheeled and cleaned prior to reassembly. Note that even our "Shop Boy", Norm "Being Green" Lenhart, demonstrates the proper use of eye protection! | Be sure to grease the dust seals, handy tip is to run the edge through the grease, scooping it into the seal.After you fit the seal, wipe away the excess. | A-arm bearings greased and ready for the dust seals. |
Since our bearings were toasted from salt water submarine duty at Pismo Beach and the Oregon Dunes by the previous idiot that owned our poor beast. We replaced all the bushings, bearings and steering pivots (ball joints/tie rod ends), with new parts from Yamaha-Suzuki of Arizona...
 |
| After cleaning all the suspension bolts with a wire wheel they were lightly greased prior to assembly. |
I cannot stress the importance of using gobs and gobs of high quality, high temperature, salt water-proof wheel bearing grease in all steps of suspension assembly. Water will destroy all the hard work and expense of a suspension overhaul in a flash!
 |
| Fitting the Works Performance front shocks. |
The last step in assembling the front end is fitting the shocks and hooking up the tie rod ends to the steering shaft (our shaft was provided courtesy of Neanderthal Cycle Salvage). Remember that the flattened part of the tie rods goes to the outside, by the wheels. Leave the ends loose for now. We will cover the front end alignment, suspension tuning/setup and brake assembly in a future installment...
And now we move to the rear end, and the hard part!